Service Function Chain
Guide to configuring and managing Service Function Chains (SFC) in OOS using VNF containers in vWAN and vBridge modes, featuring OpenVPN and AdGuard setup examples.
Service Function Chain (SFC)
Virtual Network Functions (VNFs) are used to construct Service Function Chains (SFC), enabling network packets to sequentially traverse VNF instances on the chain. VNF chains improve deployment efficiency while minimizing system resource consumption, allowing service providers to introduce VNF features rapidly without altering source code.
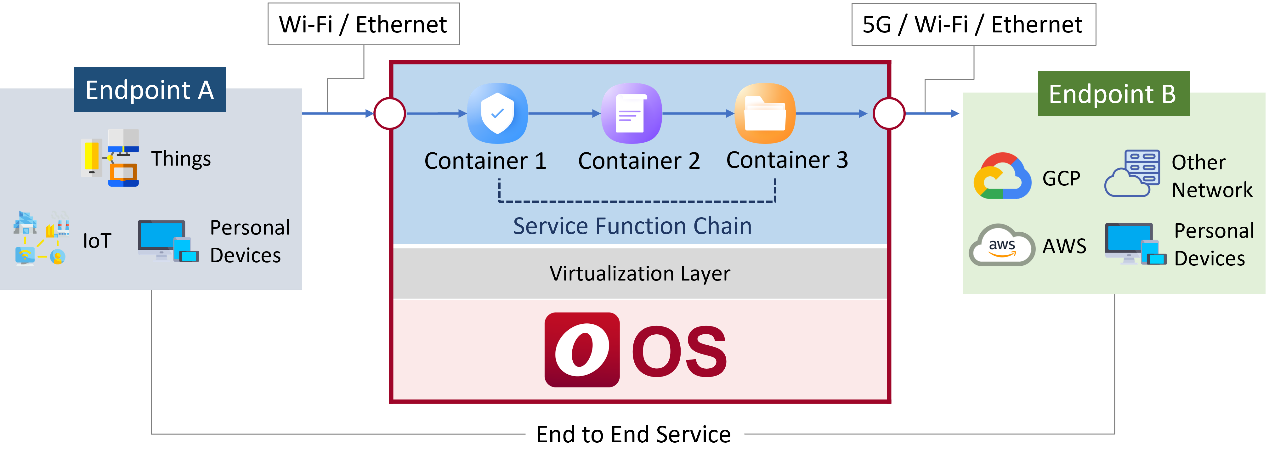
The Service Function Chain page supports two operation modes:
- Virtual WAN (vWAN) Mode: Connects one or more containers in series, passing network traffic from Container 1 to Container 2 through Container N.
- Virtual Bridge (vBridge) Mode: Establishes container-based bridging between different VLANs.
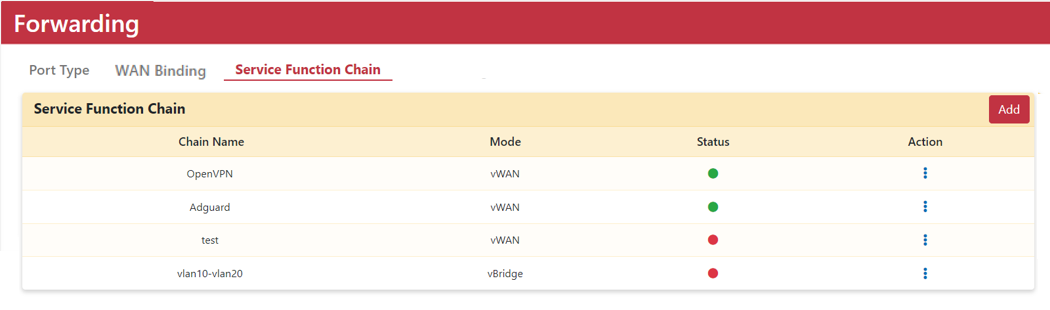
Creating a vWAN Service Function Chain
- Go to Networking > Forwarding > Service Function Chain.
- Click the "Add" button.
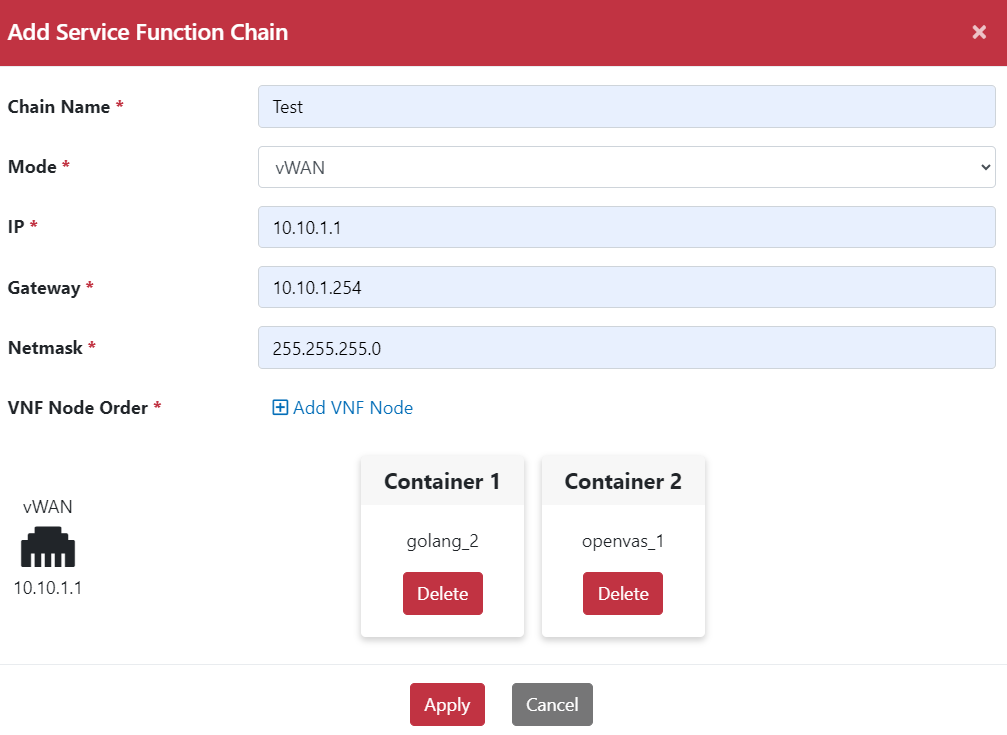
- Enter the Chain name.
- Select vWAN mode.
- Enter the vWAN IP address.
- Enter Gateway and Netmask.
- Click "Add VNF Node" to append containers to the service function chain.
- Click "Apply".
Configuration Example 1: OpenVPN Service Function Chain
With an OpenVPN container deployed on the device, client devices connected to the CPE can establish VPN connectivity to a corporate OpenVPN server without local client configuration.
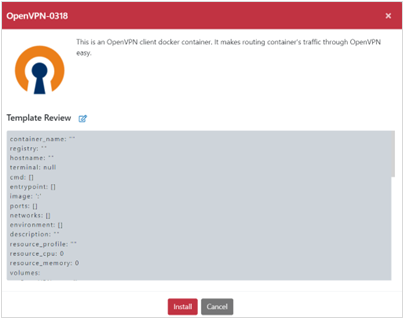
- Add the OpenVPN template and install the OpenVPN app via App Store.
- Go to Application > Information > Container.
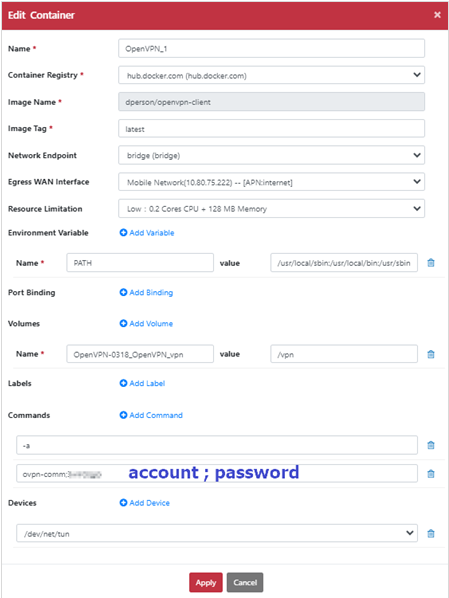
- Click the Action icon for the OpenVPN App and select "Edit" to pop up the "Edit Container" dialog box.
- Configure the Egress WAN Interface.
!NOTENote: If the OpenVPN server resides on the corporate internal network, the Egress WAN Interface must not be assigned to the internal corporate interface.
- Add Command to supply the OpenVPN username and password.
- Add Device
/dev/net/tun. Click "Apply".
- Go to Application > Volume.
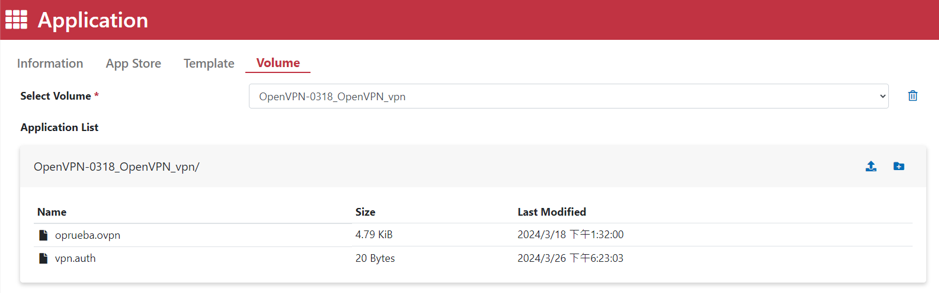
- Select the target volume (e.g.,
OpenVPN-0318_OpenVPN_vpn). - Click the upload icon to upload the
.ovpnconfiguration file required for the VPN tunnel.
- Go to Networking > Forwarding > Service Function Chain.
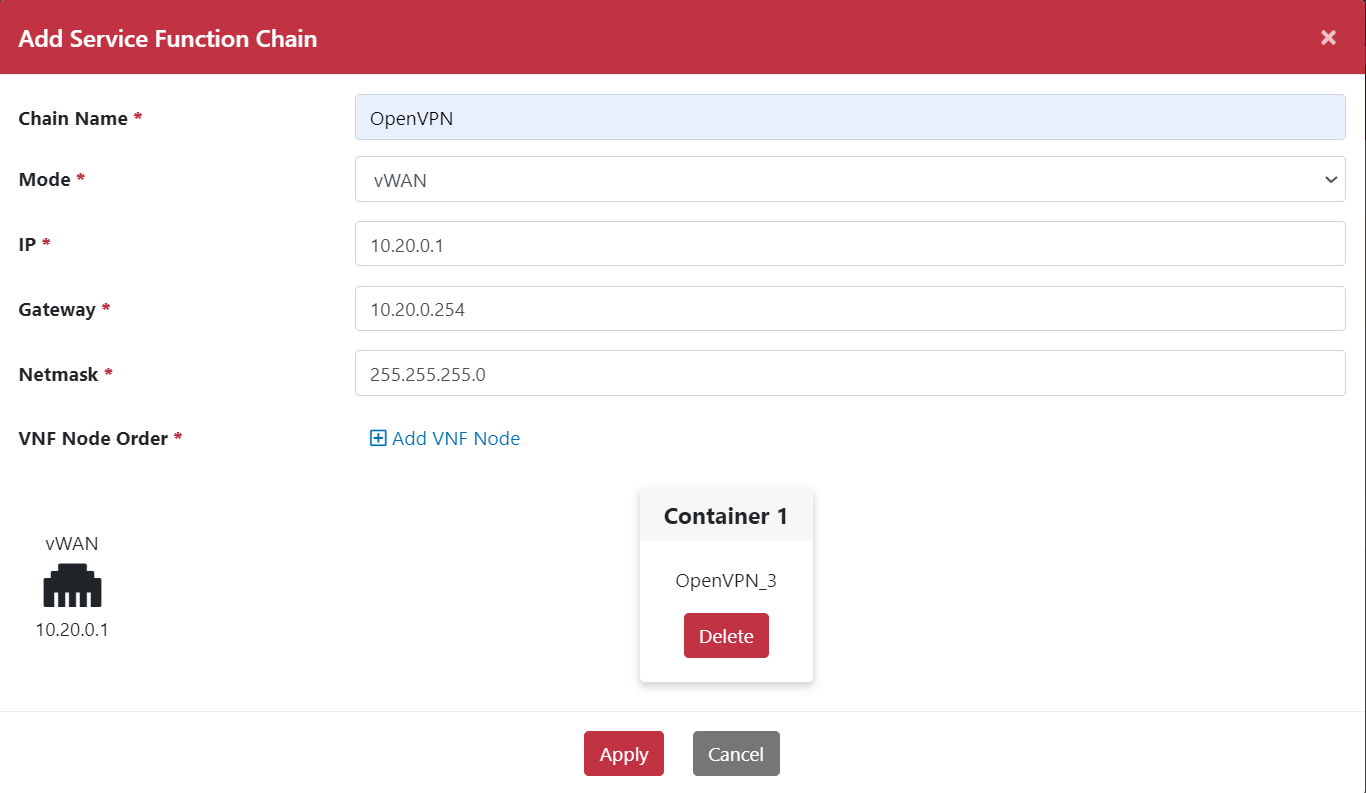
- Click "Add".
- Enter Chain name, select vWAN mode.
- Enter IP, Gateway, and Netmask.
- Click "Add VNF Node" to add the OpenVPN container to the chain.
- Click "Apply".
- Go to Networking > Forwarding > Service Function Chain.
- Click the OpenVPN App Action icon and select "Start" to launch the chain.

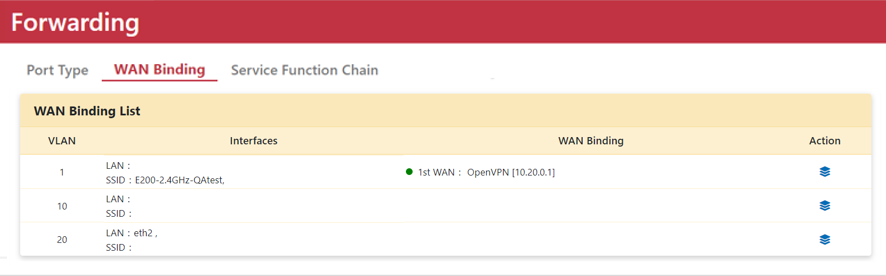
- Go to Networking > Forwarding > WAN Binding.
- Move
OpenVPN WANfrom Available WAN to In Use WAN. - Click "Apply".
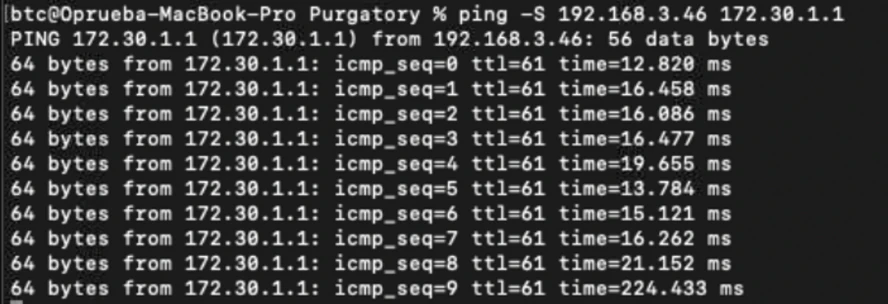
- Connect a laptop to the LAN SSID and ping the gateway at the OpenVPN server site to verify VPN connectivity.
Configuration Example 2: AdGuard Ad-Blocking Service Function Chain
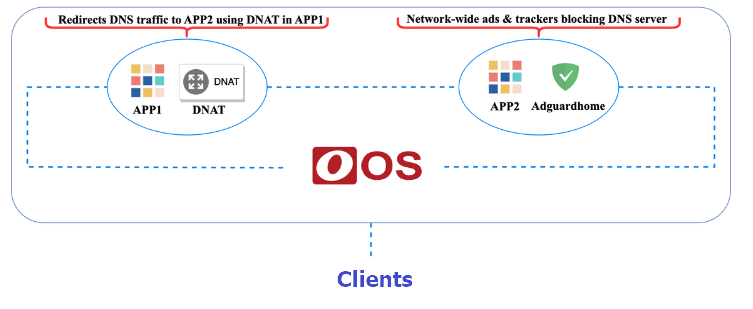
AdGuard is an ad-blocking application that suppresses pop-ups, banners, and video ads. To deploy AdGuard as a VNF node on an SFC, an Alpine container running DNAT rules is positioned ahead of AdGuard to redirect incoming DNS query traffic to AdGuard.
Steps to Deploy Alpine and AdGuard Containers:
- Go to Application > Template > Container > Add Template.
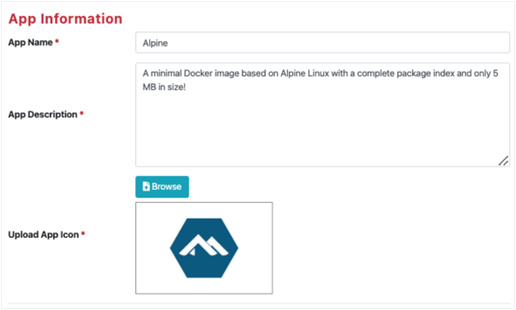
- Add an Alpine container template containing DNAT iptables rules. Fill in App Name, App Description, and upload an App Icon.
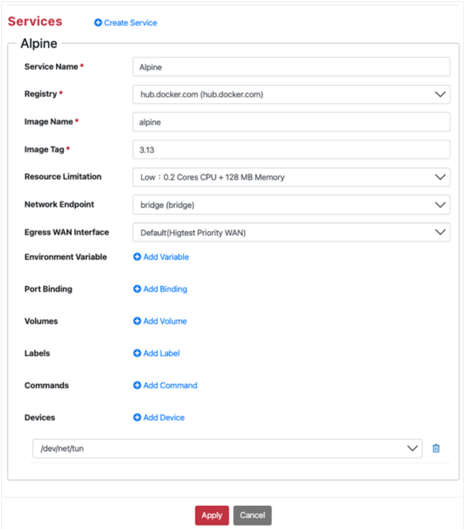
- Configure Service settings:
- Service Name:
Alpine - Registry:
hub.docker.com - Image Name:
alpine - Image Tag:
3.13 - Resource Limitation:
Low: 0.2 Cores CPU + 128 MB Memory - Network Endpoint:
bridge - Egress WAN Interface:
Default (Highest Priority WAN) - Add Device:
/dev/net/tun(grantsNET_ADMINandNET_RAWcapabilities to execute iptables).
- Service Name:
- Click "Apply".
- Go to Application > Template > Container > Add Template.
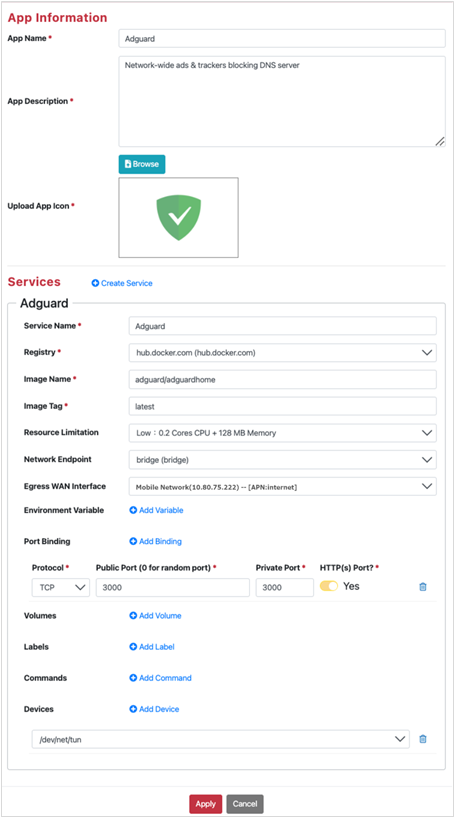
- Add the AdGuard container template:
- App Name:
Adguard - App Description:
Network-wide ads & trackers blocking DNS server - Service Name:
Adguard - Registry:
hub.docker.com - Image Name:
adguard/adguardhome - Image Tag:
latest - Resource Limitation:
Medium: 0.5 Cores CPU + 512 MB Memory - Network Endpoint:
bridge - Egress WAN Interface:
Mobile Network (internet) - Environment Variable:
PATH=/usr/local/sbin:/usr/local/bin:/usr/sbin:/usr/bin:/sbin:/bin - Port Binding: Protocol
TCP, Public Port3000, Private Port3000, HTTP(s) PortYes.
- App Name:
- Click "Apply".
!NOTE
- Egress WAN Interface: AdGuard is the egress VNF container on the chain; therefore, a specific WAN interface must be selected (cannot use Default).
- Device
/dev/net/tun: GrantsNET_ADMINandNET_RAWprivileges for iptables usage.
- Go to Application > App Store > Application > Container and install Alpine and AdGuard.
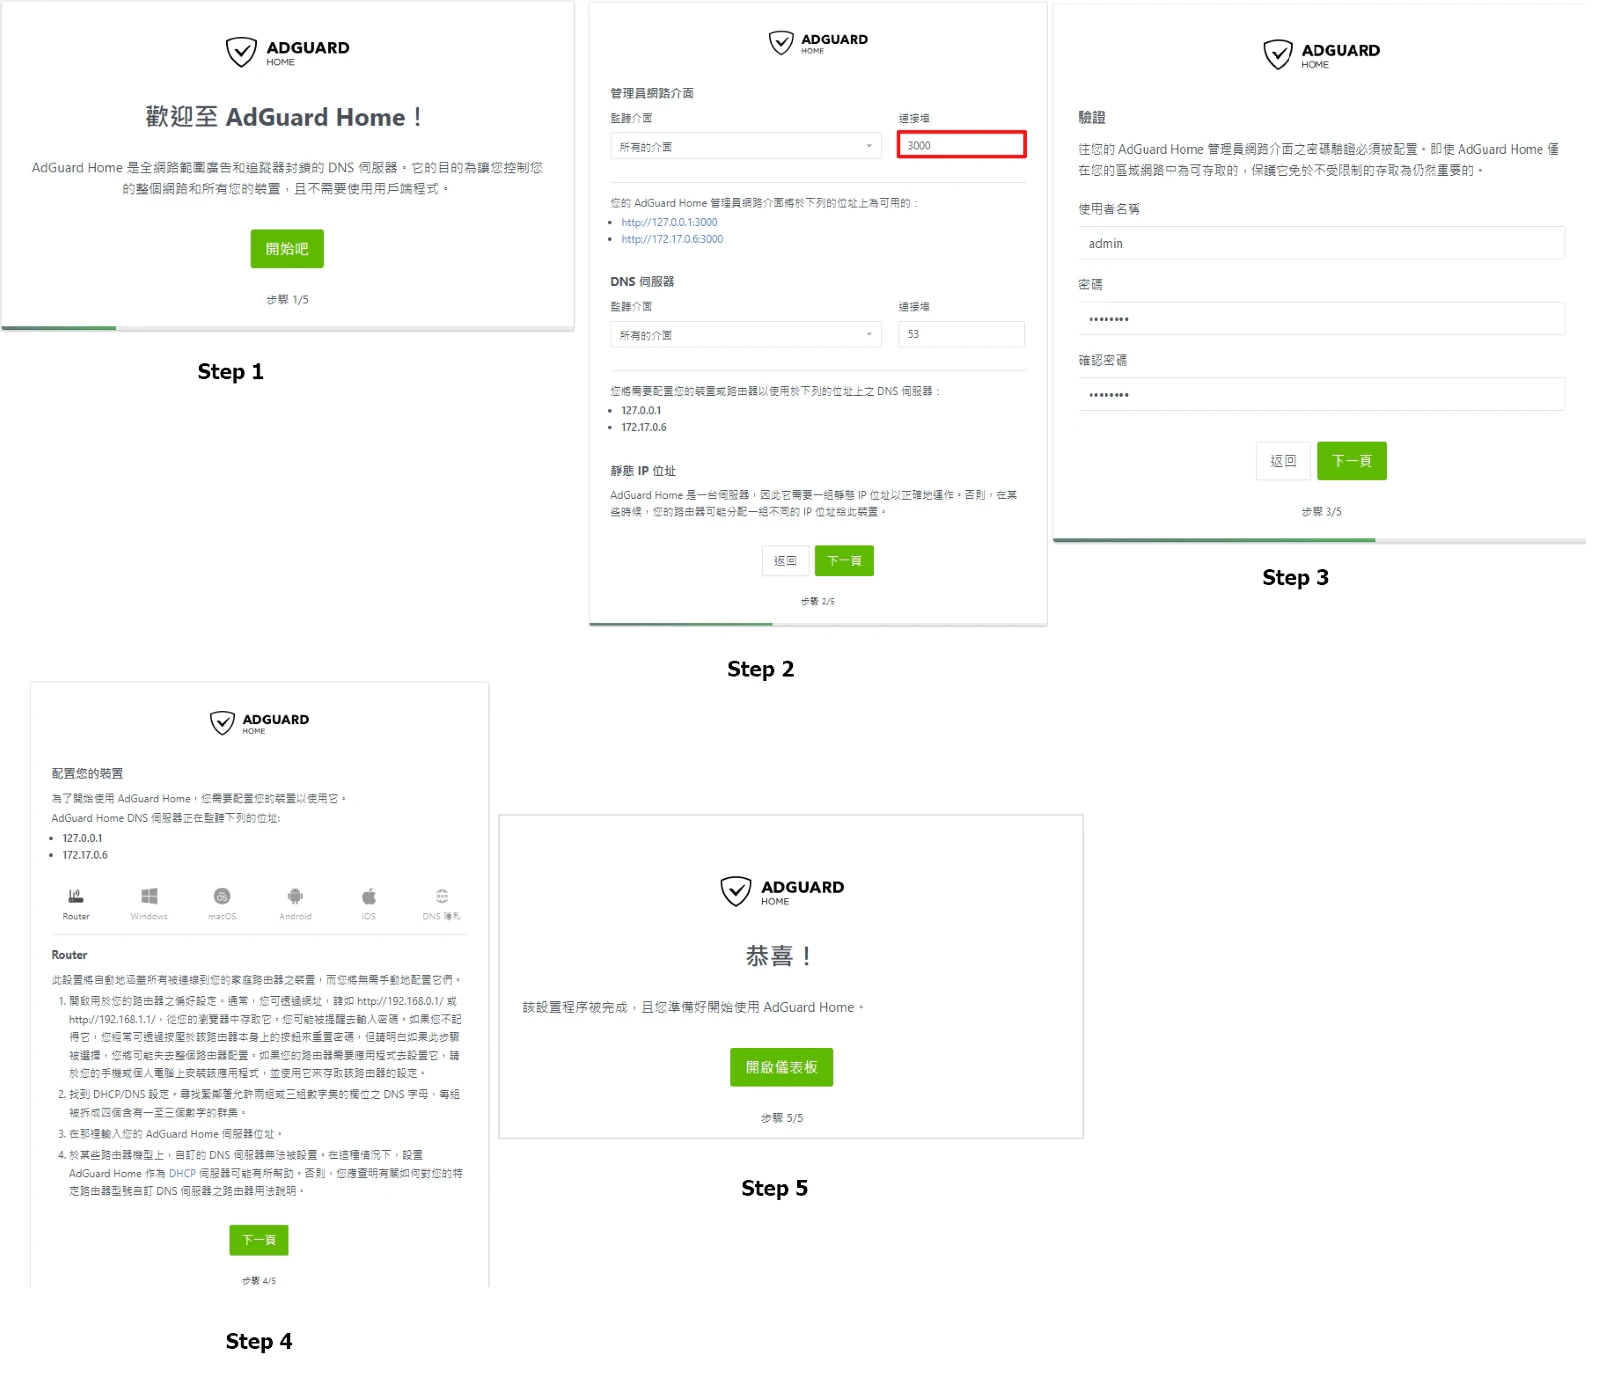
- Go to Application > Information > Container.
- Click the AdGuard port mapping link (
http://CPE_IP:3000) to access the AdGuard interface.
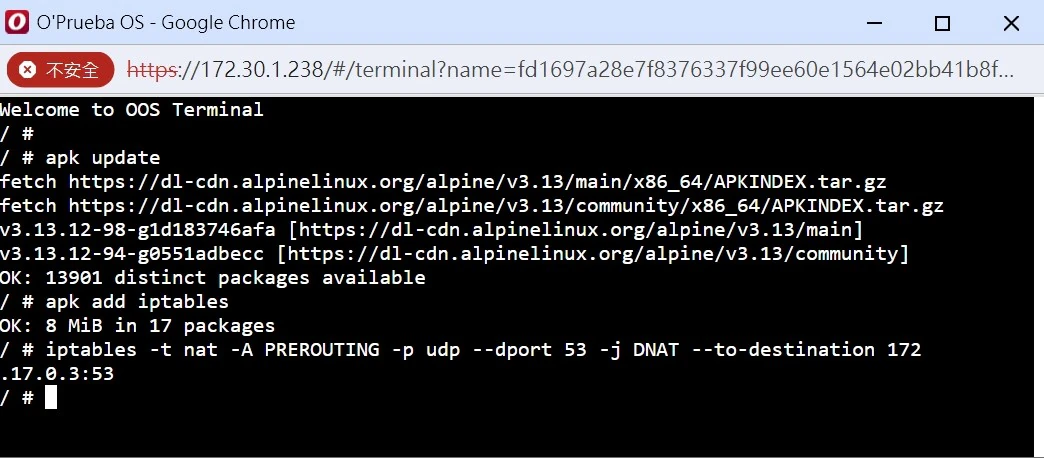
- Click the Console icon under Alpine Action, and execute iptables commands to redirect Port 53 DNS traffic to the AdGuard container IP:
apk update
apk add iptables
iptables -t nat -A PREROUTING -p udp --dport 53 -j DNAT --to-destination Adguard_IP:53
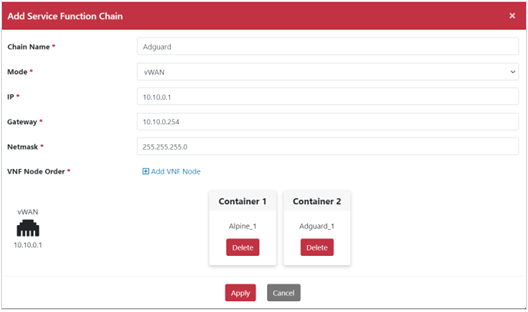
- Go to Networking > Forwarding > Service Function Chain, click "Add".
- Enter Chain Name, select vWAN mode, and specify IP, Gateway, and Netmask.
- Click "Add VNF Node" to add Alpine as Container 1.
- Click "Add VNF Node" to add AdGuard as Container 2.
- Click "Apply".
- Click Action icon to start the AdGuard service function chain.
- Go to Networking > Forwarding > WAN Binding and bind the AdGuard interface to active WAN to route LAN device traffic through AdGuard.
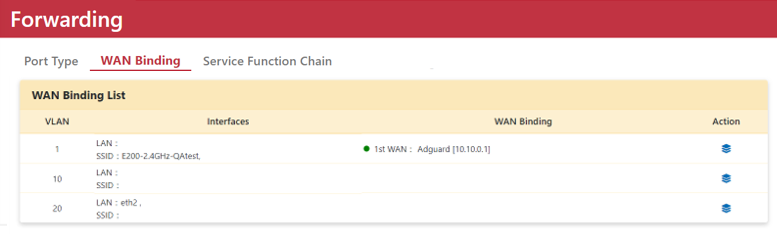
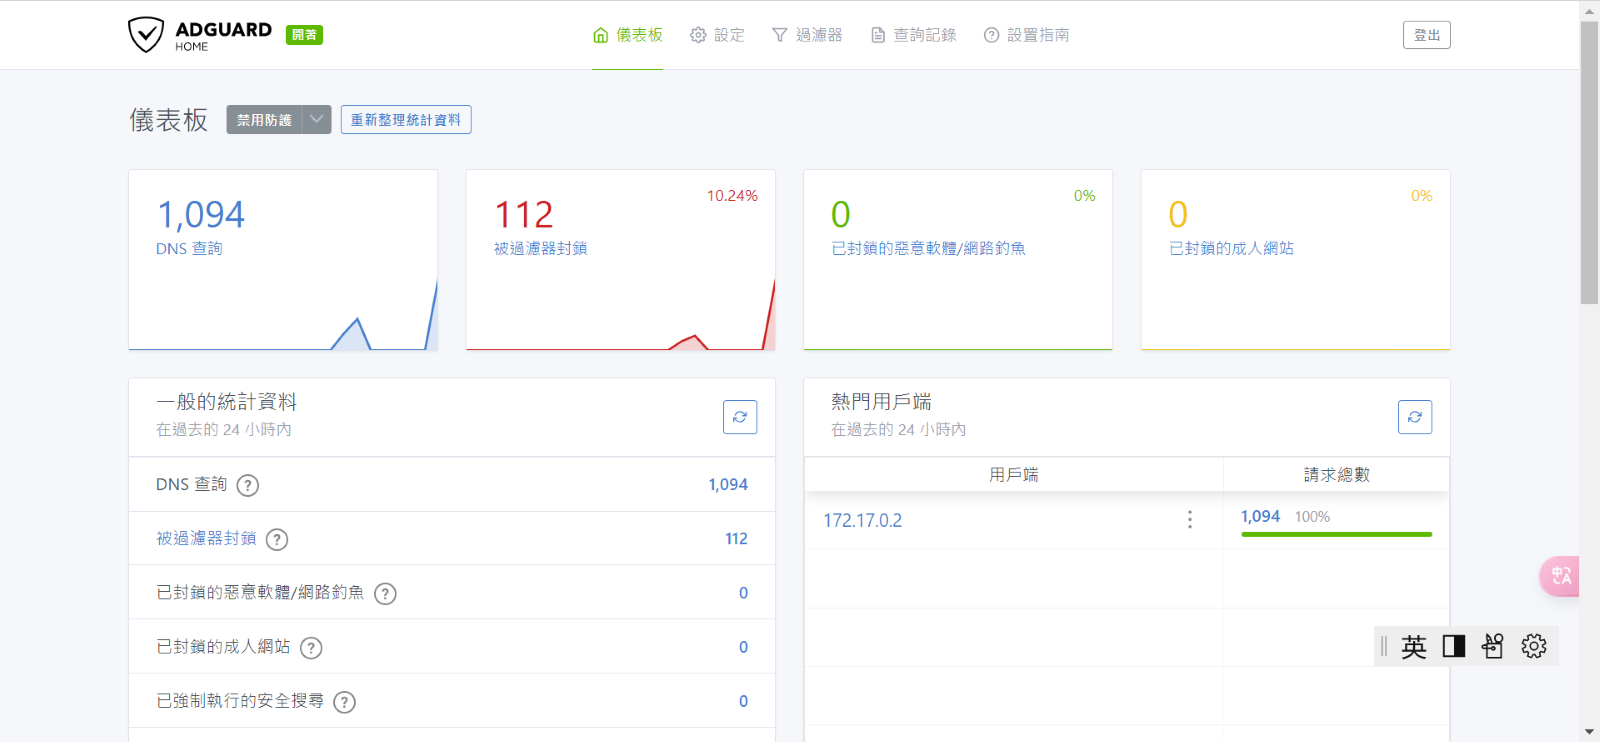
- Open YouTube on a LAN device to verify traffic passing through AdGuard.
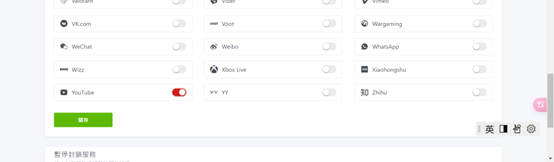
- Go to the Filter page in AdGuard and enable the YouTube blocking rule.
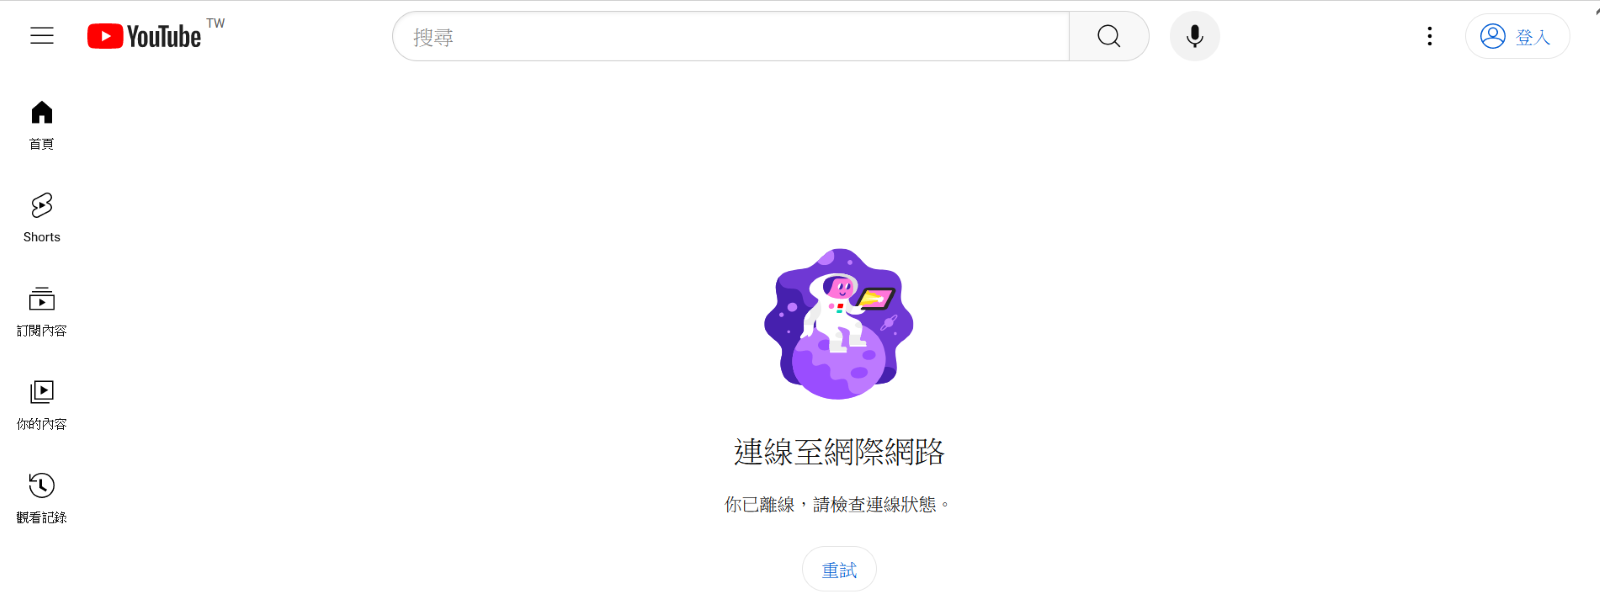
- Test pinging YouTube from a LAN device; no response is received, confirming YouTube access is blocked.

Configuration Example 3: vBridge Mode Connection
vBridge mode establishes container-mediated bridging between two separate VLANs.
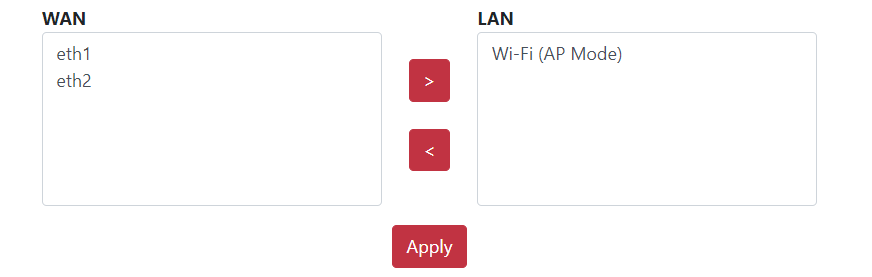
- Go to Networking > Forwarding > Port Type, and move
eth1andeth2from WAN to LAN.
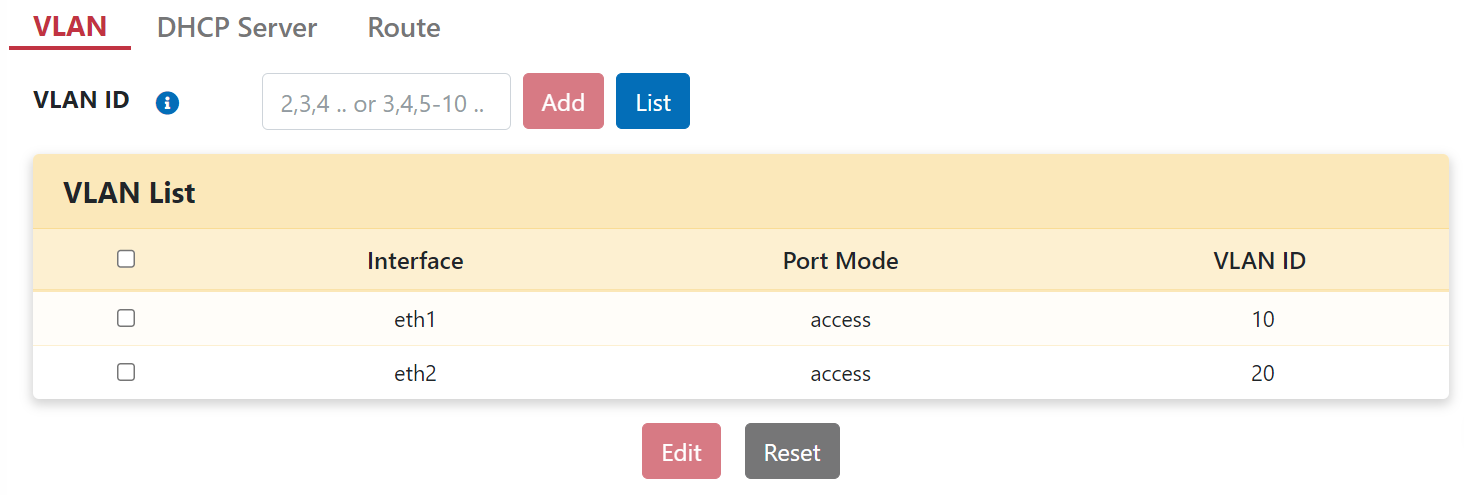
- Go to Networking > LAN > VLAN, and create VLAN 10 and VLAN 20.
- Edit
eth1to bind Access VLAN 10; editeth2to bind Access VLAN 20.
- Connect Laptop 1 to
eth1and assign IP192.168.10.10. - Connect Laptop 2 to
eth2and assign IP192.168.10.20. - Go to Application > App Store and install Nginx and Python applications.
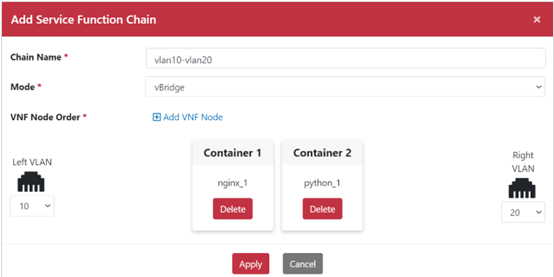
- Go to Networking > Forwarding > Service Function Chain, click "Add".
- Set Mode to vBridge, enter Chain Name.
- Click "Add VNF Node" to select Nginx, followed by Python.
- Set Left VLAN to
10and Right VLAN to10.
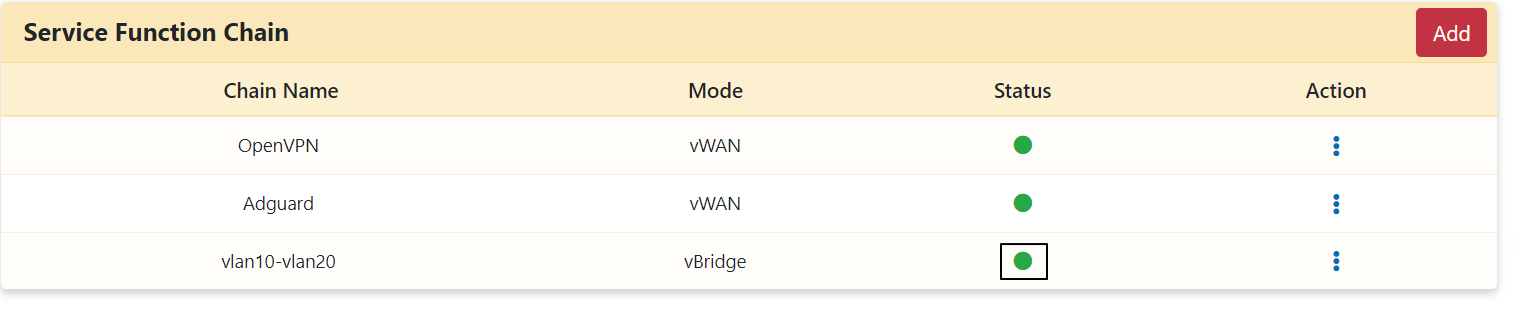
- Start the SFC via the Action icon.
- Ping Laptop 2 IP (
192.168.10.20) from Laptop 1 to receive responses. - Ping Laptop 1 IP (
192.168.10.10) from Laptop 2 to verify cross-VLAN bridging functionality.