oosVersion 2.1
服務功能鏈
說明如何在 OOS 中設定與管理服務功能鏈 (Service Function Chain, SFC),利用 VNF 容器串接提供 vWAN 與 vBridge 模式,並包含 OpenVPN 與 AdGuard 的實作範例。
服務功能鏈 (Service Function Chain, SFC)
虛擬網路功能 (Virtual Network Functions, VNFs) 用於建構服務功能鏈 (SFC),使網路封包可依序通過 SFC 上的各個 VNF。利用 VNF 鏈能以較低的系統資源開銷提高部署效率,並允許服務提供商在不修改原始碼的情況下快速將 VNF 功能整合至設備中。
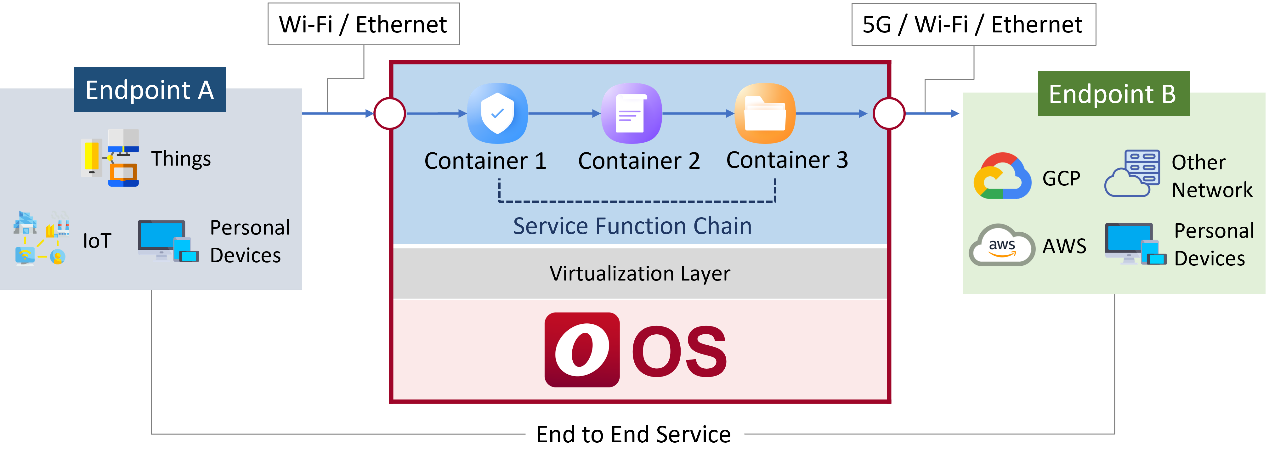
SFC 頁面提供兩種模式:
- 虛擬 WAN (vWAN) 模式:可連線一或多個容器,網路封包依序由 Container 1 流向 Container 2 至 Container N。
- 虛擬橋接 (vBridge) 模式:允許透過容器實現不同 VLAN 之間的跨區域橋接連線。
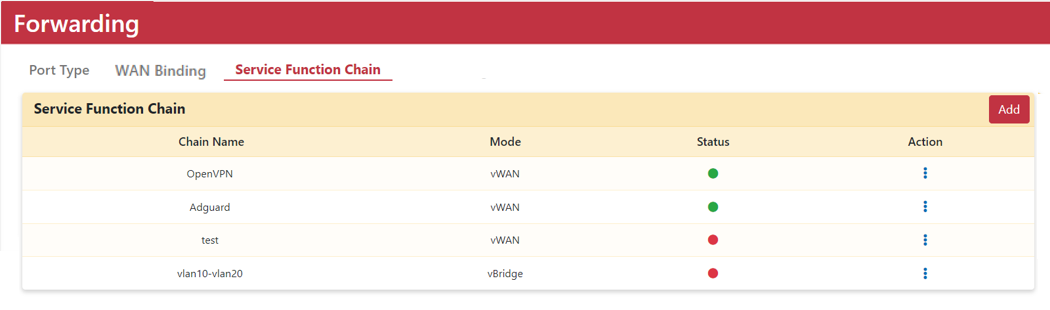
建立 vWAN 服務功能鏈
- 前往 Networking > Forwarding > Service Function Chain 頁面。
- 點擊「Add」按鈕。
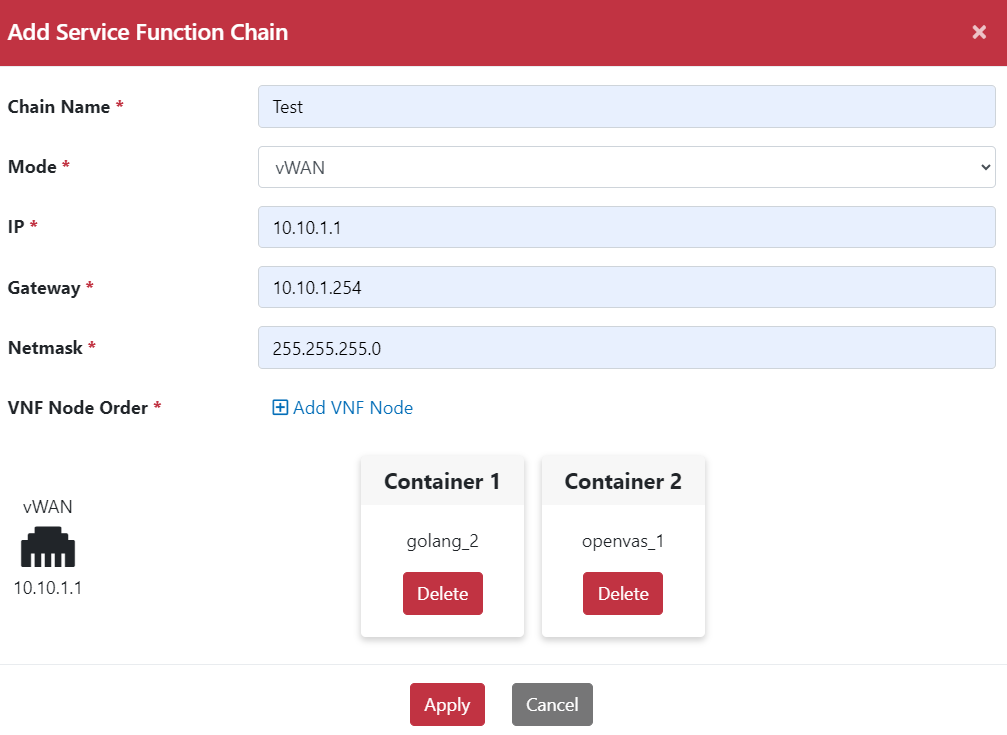
- 輸入鏈名稱 (Chain name)。
- 選擇 vWAN 模式。
- 輸入 vWAN IP 位址。
- 輸入 Gateway 與 Netmask。
- 點擊「Add VNF Node」將容器新增至服務功能鏈。
- 點擊「Apply」按鈕儲存。
實作範例 1:OpenVPN 服務功能鏈
在設備上部署 OpenVPN 容器後,CPE 客戶端裝置無需單獨配置 VPN 即可連線至公司的 OpenVPN 伺服器。
- 新增 OpenVPN 樣板並透過 App Store 安裝 OpenVPN App。
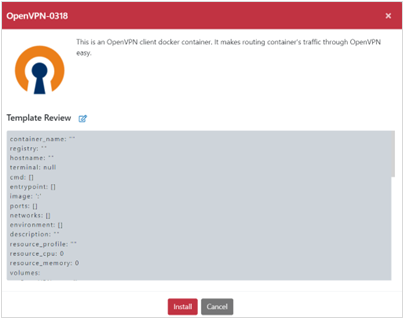
- 前往 Application > Information > Container 頁面。
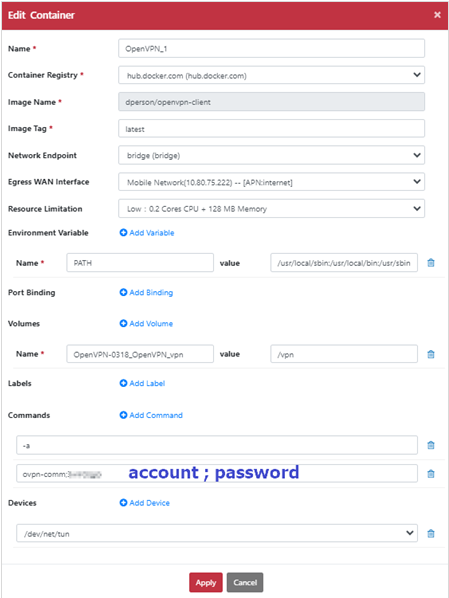
- 在 OpenVPN App 的 Action 欄位中選擇「Edit」圖示,彈出「Edit Container」對話框。
- 選擇 Egress WAN Interface(出口 WAN 介面)。
!NOTE注意:若 OpenVPN 伺服器端網路為公司內部網路,Egress WAN Interface 請勿設定為公司內部網路介面。
- 新增 Command 輸入 OpenVPN 的帳號與密碼。
- 新增 Device
/dev/net/tun。點擊「Apply」按鈕。
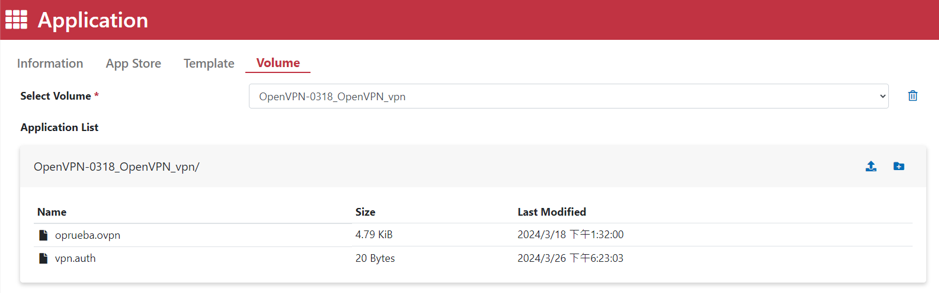
- 前往 Application > Volume 頁面。
- 選擇 Volume(如
OpenVPN-0318_OpenVPN_vpn)。 - 點擊上傳圖示,上傳建立 VPN 連線所需的
.ovpn設定檔。
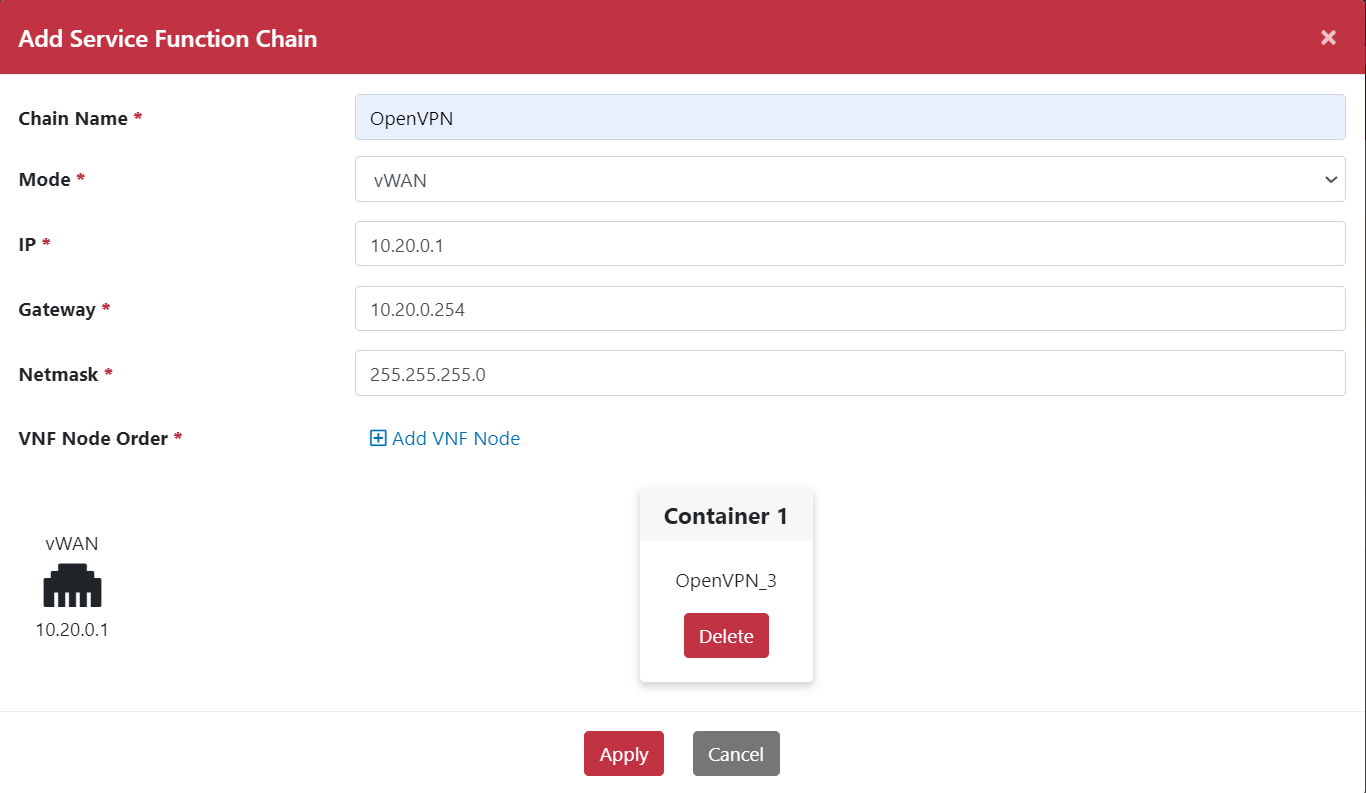
- 前往 Networking > Forwarding > Service Function Chain 頁面。
- 點擊「Add」按鈕。
- 輸入 Chain name。
- 選擇 vWAN 模式。
- 輸入 IP 位址。
- 輸入 Gateway 與 Netmask。
- 點擊「Add VNF Node」新增 OpenVPN 容器至服務功能鏈。
- 點擊「Apply」按鈕。
- 前往 Networking > Forwarding > Service Function Chain 頁面。
- 點擊 OpenVPN App 的 Action 圖示,選擇「Start」啟動服務功能鏈。

- 前往 Networking > Forwarding > WAN Binding 頁面。
- 將
OpenVPN WAN從 Available WAN 移動至 In Use WAN。 - 點擊「Apply」按鈕。
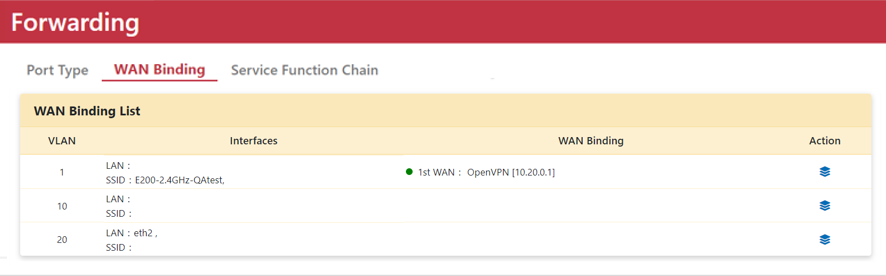
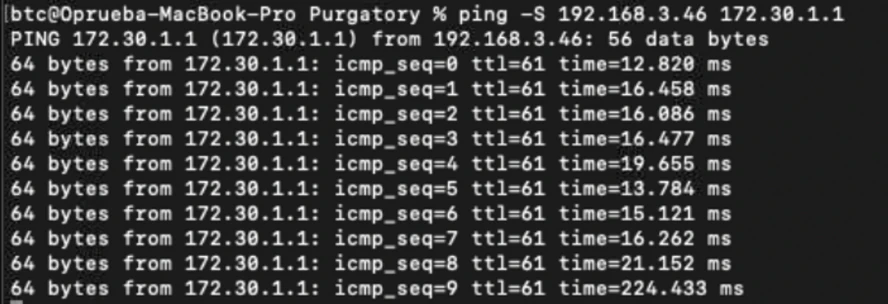
- 使用 LAN 端的筆記型電腦連線至 SSID,Ping OpenVPN 伺服器端的 Gateway 以確認 VPN 連線已成功建立。
實作範例 2:AdGuard 廣告攔截服務功能鏈
AdGuard 是一款廣告攔截應用程式,可阻擋彈出視窗、橫幅廣告與影片廣告。作為 SFC VNF 節點使用時,需在 AdGuard 容器前部署一個具有 DNAT 的 Alpine 容器,將 DNS 查詢流量重導向至 AdGuard。
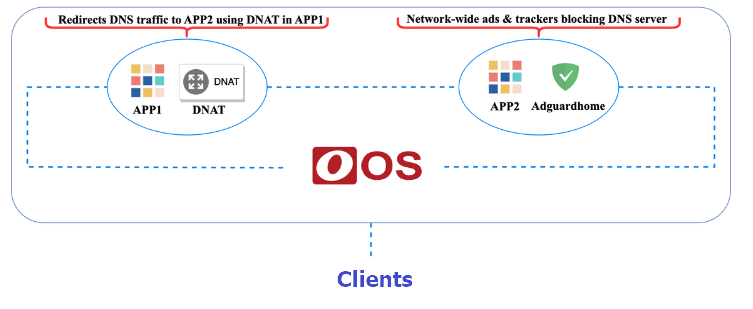
部署 Alpine 與 AdGuard 容器步驟:
- 前往 Application > Template > Container > Add Template 頁面。
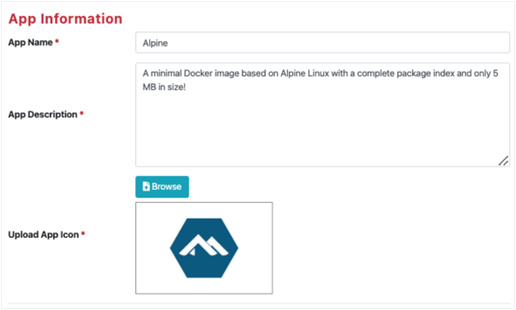
- 新增帶有 DNAT iptables 規則的 Alpine 容器樣板。設定 App Name、App Description 並上傳 App icon。
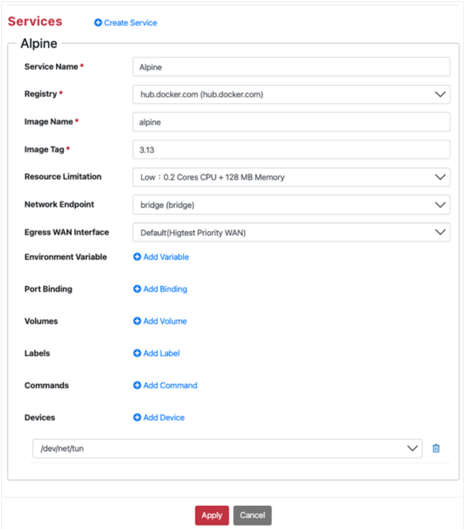
- 設定 Service:
- Service Name:
Alpine - Registry:
hub.docker.com - Image Name:
alpine - Image Tag:
3.13 - Resource Limitation:
Low: 0.2 Cores CPU + 128 MB Memory - Network Endpoint:
bridge - Egress WAN Interface:
Default (Highest Priority WAN) - Add Device:
/dev/net/tun(授權NET_ADMIN與NET_RAW權限以使用 iptables 工具)。
- Service Name:
- 點擊「Apply」按鈕。
- 前往 Application > Template > Container > Add Template 頁面。
- 新增 AdGuard 容器樣板:
- App Name:
Adguard - App Description:
Network-wide ads & trackers blocking DNS server - Service Name:
Adguard - Registry:
hub.docker.com - Image Name:
adguard/adguardhome - Image Tag:
latest - Resource Limitation:
Medium: 0.5 Cores CPU + 512 MB Memory - Network Endpoint:
bridge - Egress WAN Interface:
Mobile Network (internet) - Environment Variable:
PATH=/usr/local/sbin:/usr/local/bin:/usr/sbin:/usr/bin:/sbin:/bin - Port Binding: Protocol
TCP, Public Port3000, Private Port3000, HTTP(s) PortYes.
- App Name:
- 點擊「Apply」按鈕。
!NOTE
- Egress WAN Interface:AdGuard 作為服務功能鏈上的最後一個容器 (Egress VNF),必須明確指定出口 WAN 介面,不能選擇 Default。
- Add device
/dev/net/tun:用於授權NET_ADMIN與NET_RAW權限。
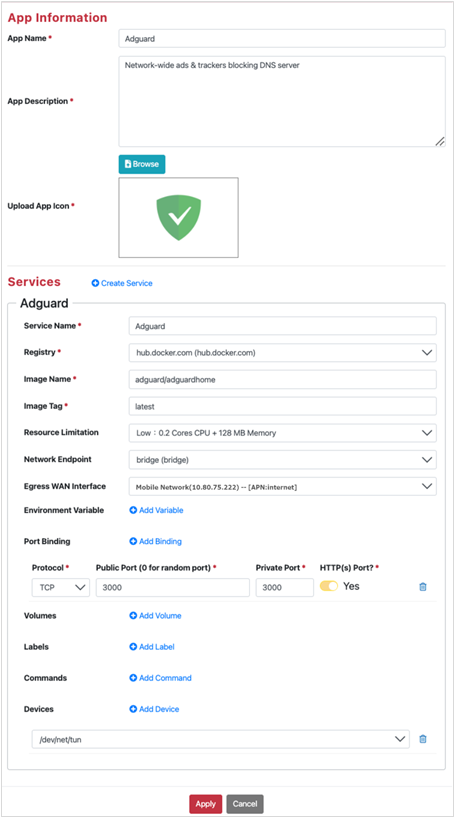
- 前往 Application > App Store > Application > Container 頁面安裝 Alpine 與 AdGuard。
- 前往 Application > Information > Container 頁面。
- 點擊 AdGuard 的 Port Mapping 連結 (
http://CPE_IP:3000) 連線至 AdGuard 控制台。
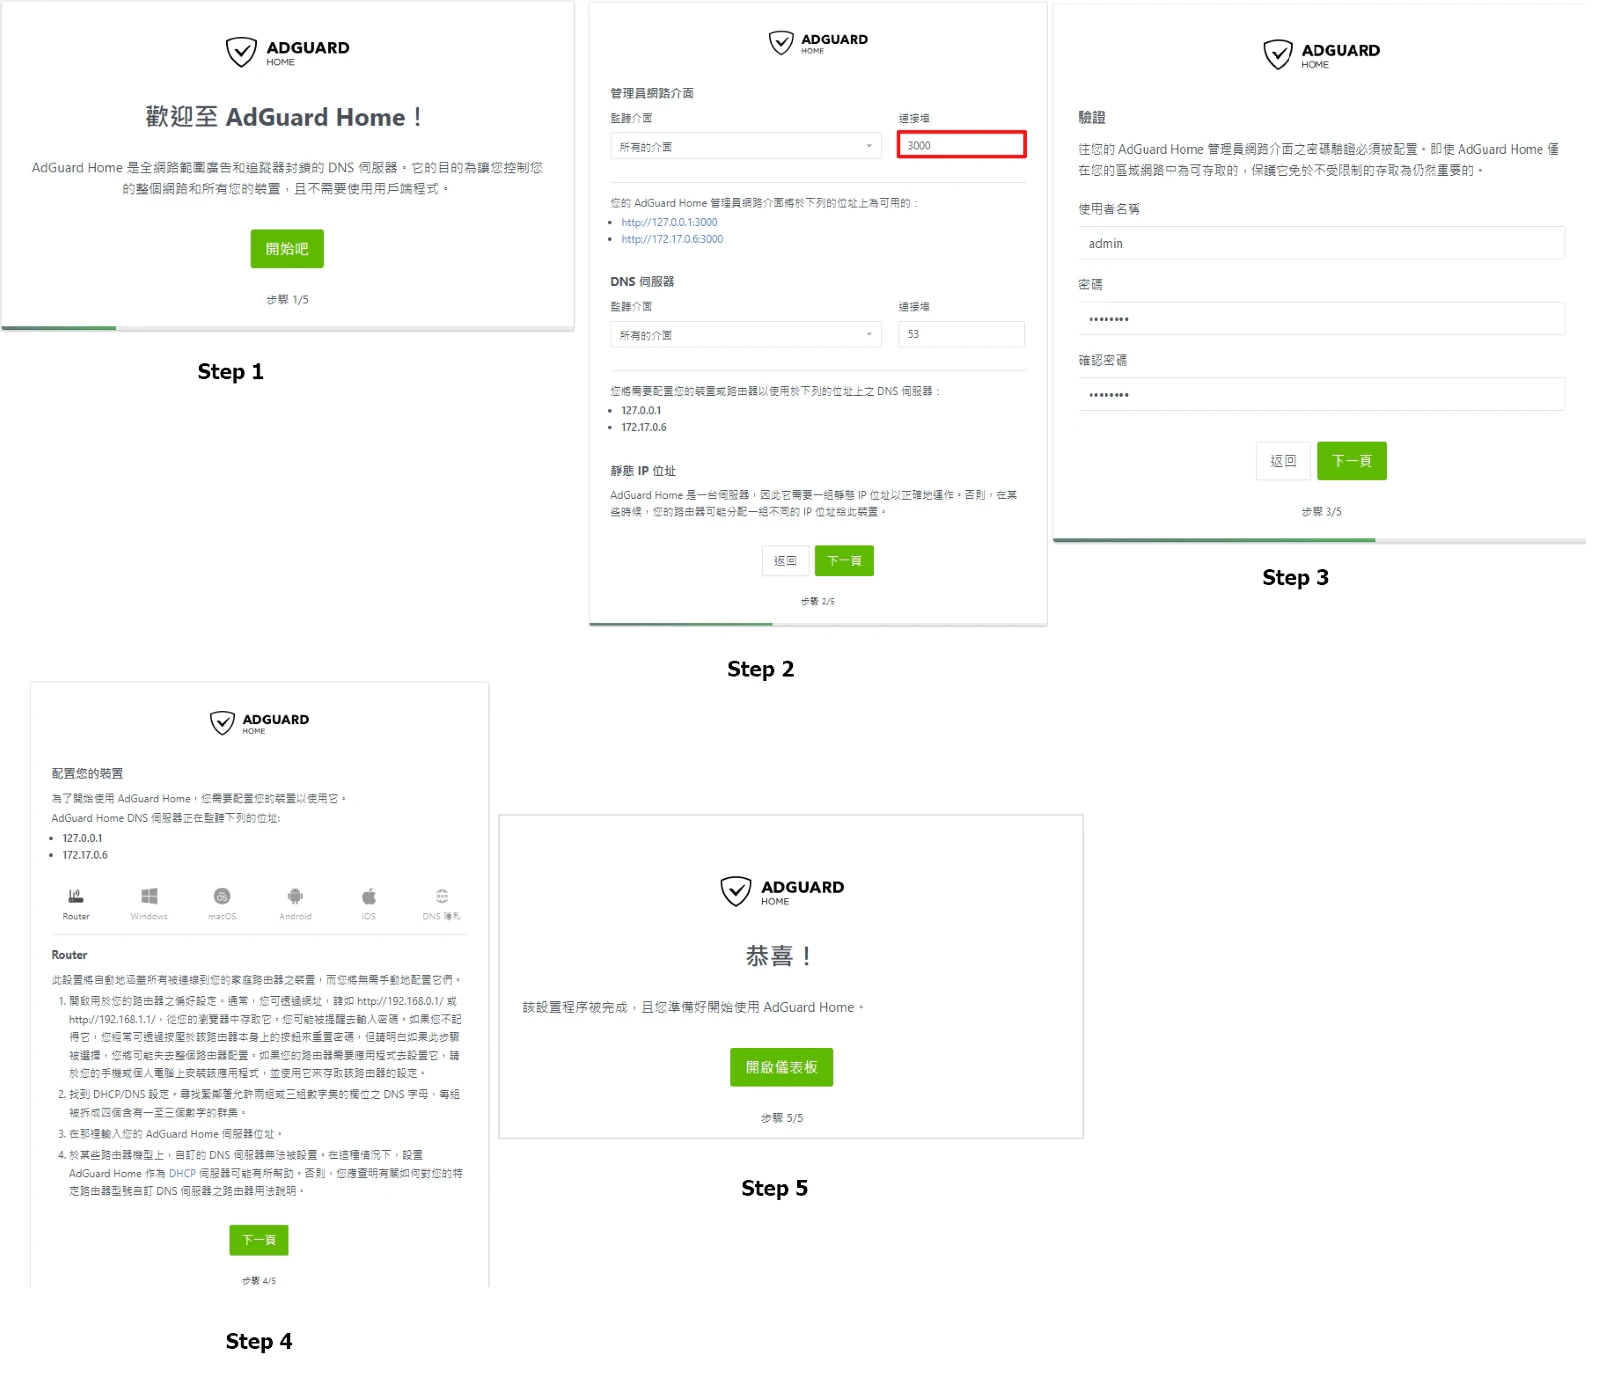
- 點擊 Alpine Action 圖示中的「Console」圖示,執行以下命令新增 iptables DNAT 規則,將 Port 53 的 DNS 查詢流量轉發至 AdGuard IP:
apk update
apk add iptables
iptables -t nat -A PREROUTING -p udp --dport 53 -j DNAT --to-destination Adguard_IP:53
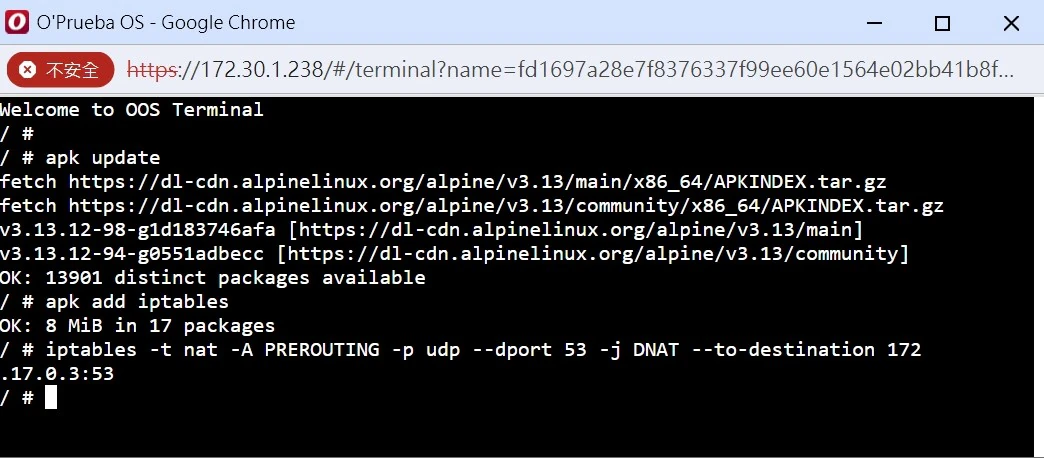
- 前往 Networking > Forwarding > Service Function Chain 頁面,點擊「Add」。
- 輸入 Chain Name,選擇 vWAN 模式,輸入 IP、Gateway 與 Netmask。
- 點擊「Add VNF Node」將 Alpine 加入為 Container 1。
- 點擊「Add VNF Node」將 AdGuard 加入為 Container 2。
- 點擊「Apply」按鈕。
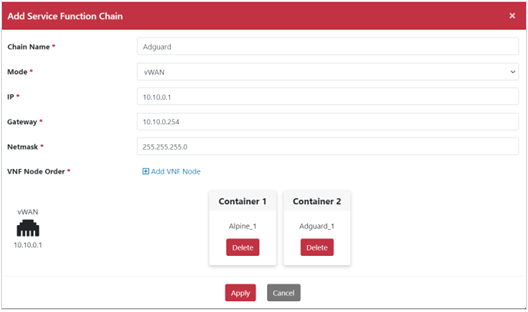
- 點擊 Action 圖示啟動 AdGuard 服務功能鏈。
- 前往 Networking > Forwarding > WAN Binding 頁面,將 AdGuard 介面移動至 In Used WAN,將 LAN 裝置流量轉向 AdGuard。
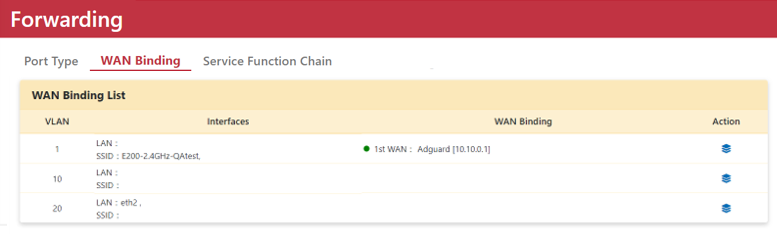
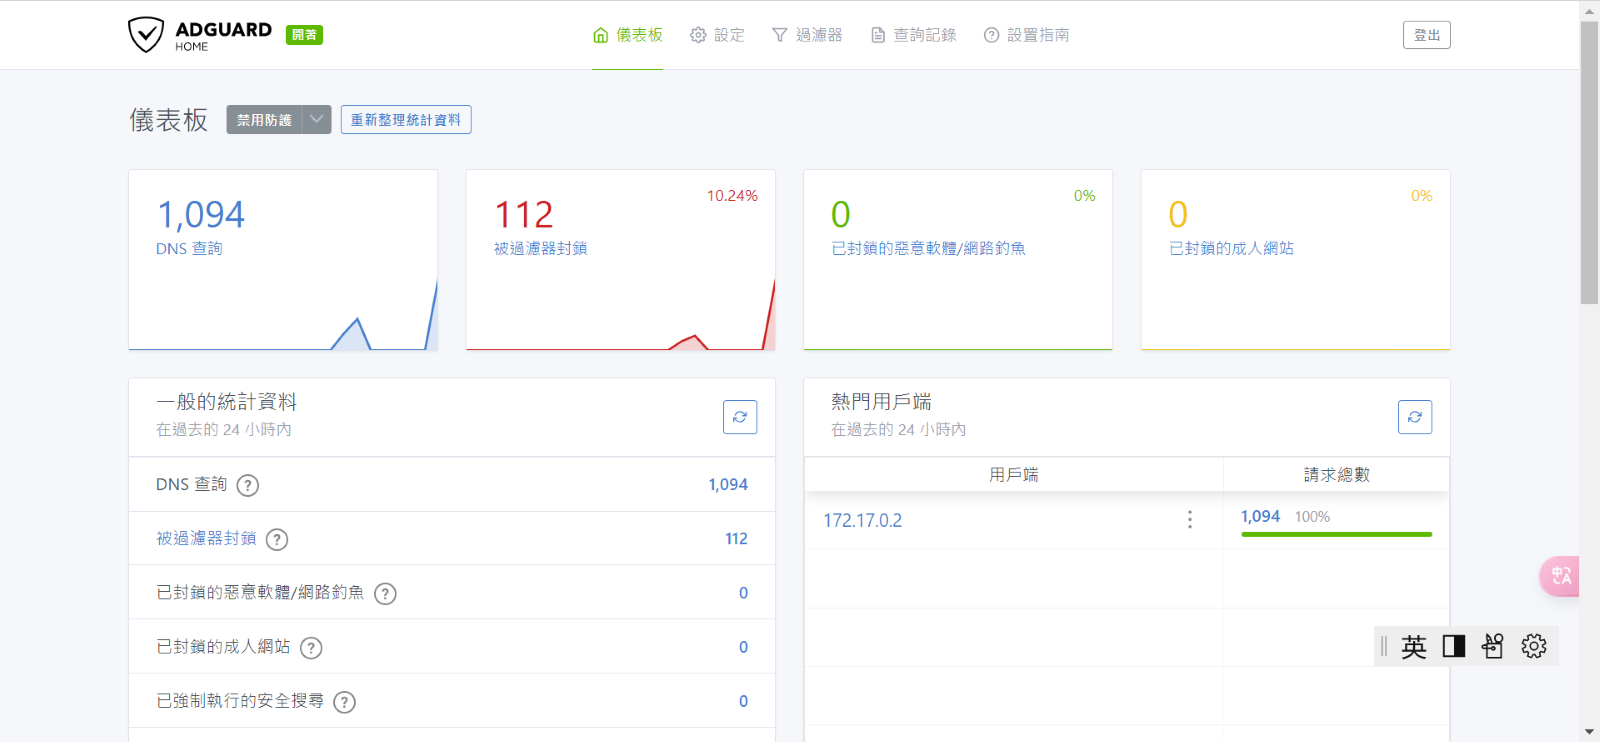
- 使用 LAN 裝置開啟 YouTube,確認 AdGuard 開始過濾流量。
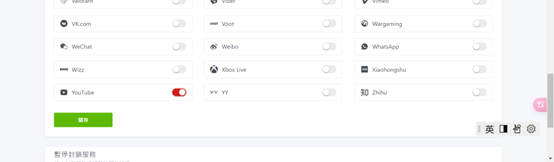
- 前往 AdGuard 的 Filter 頁面啟用阻擋 YouTube 功能。
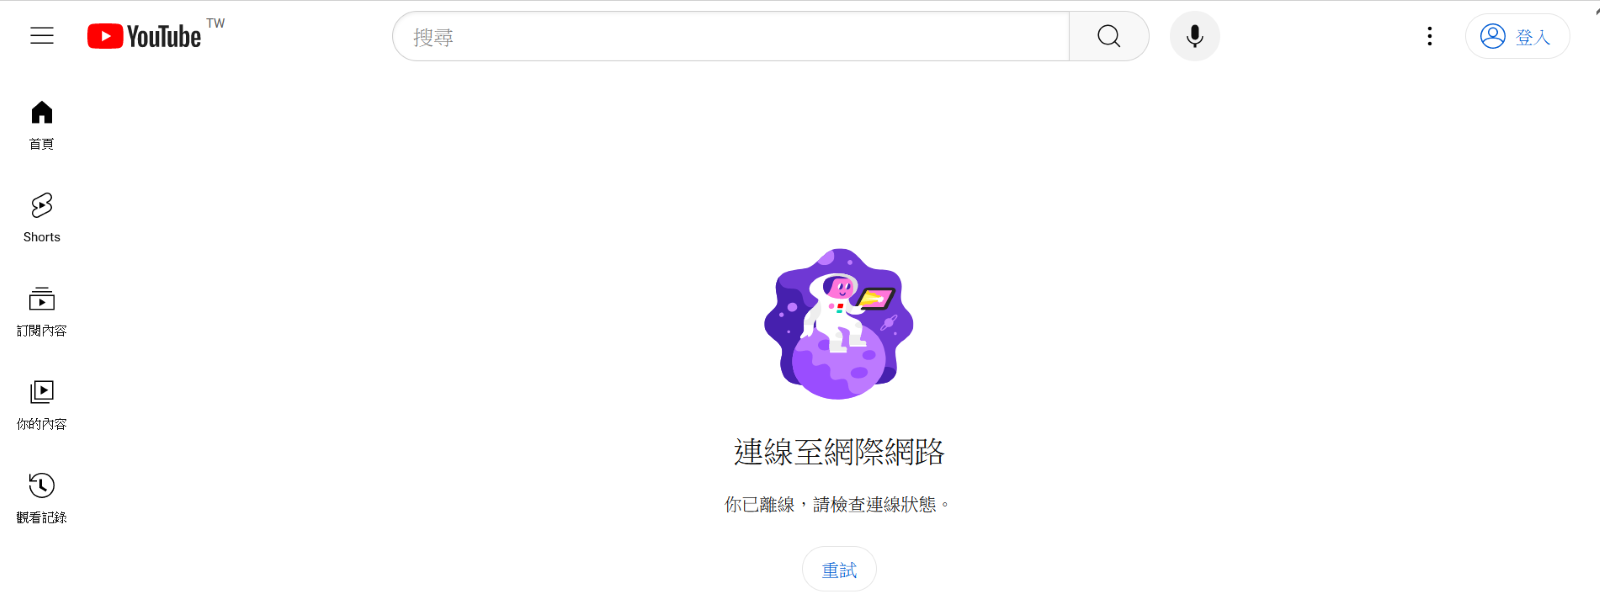
- LAN 裝置測試 Ping YouTube 無回應,驗證 YouTube 廣告與存取已被成功攔截。

實作範例 3:vBridge 模式連線
vBridge 模式可透過容器實現兩個 VLAN 之間的跨區域橋接連線。
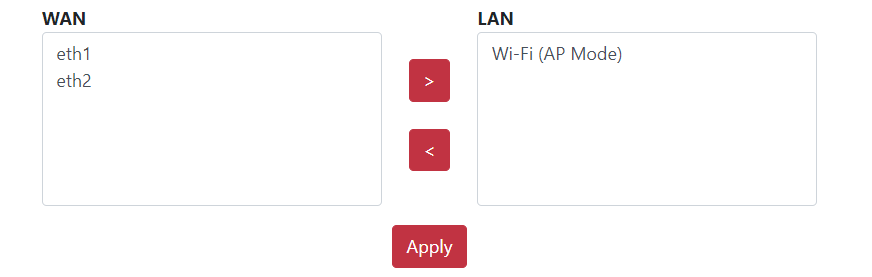
- 前往 Networking > Forwarding > Port Type 頁面,將
eth1與eth2從 WAN 移動至 LAN。
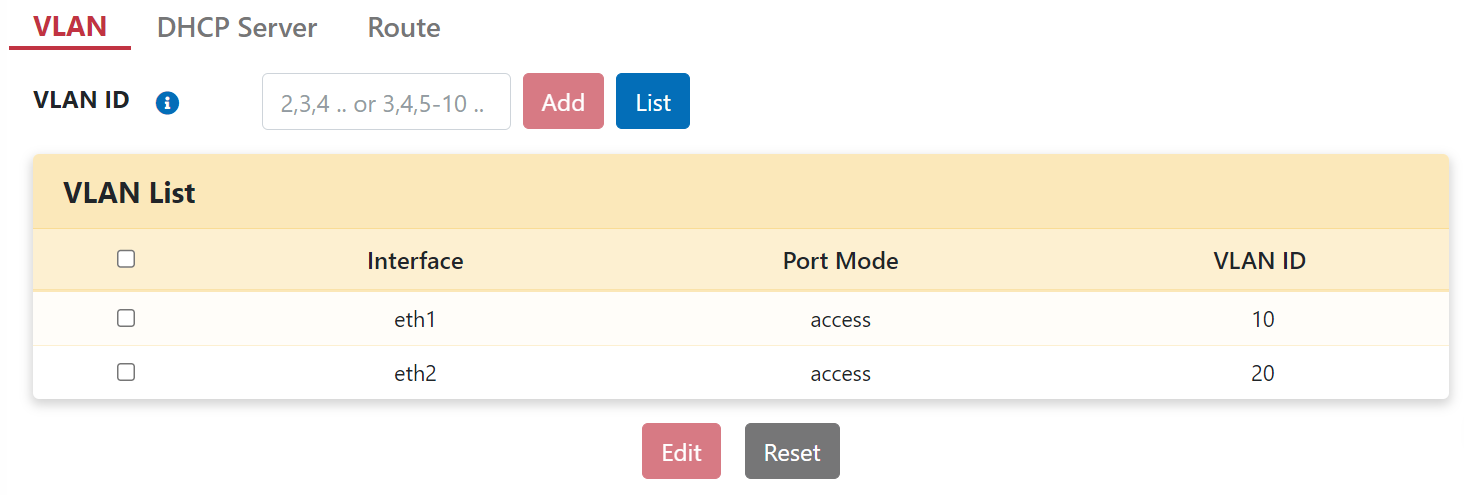
- 前往 Networking > LAN > VLAN 頁面新增 VLAN 10 與 VLAN 20。
- 編輯
eth1綁定至 Access VLAN 10,編輯eth2綁定至 Access VLAN 20。
- Laptop1 連接至
eth1,設定 IP 位址為192.168.10.10。 - Laptop2 連接至
eth2,設定 IP 位址為192.168.10.20。 - 前往 Application > App Store 頁面安裝 Nginx 與 Python 容器。
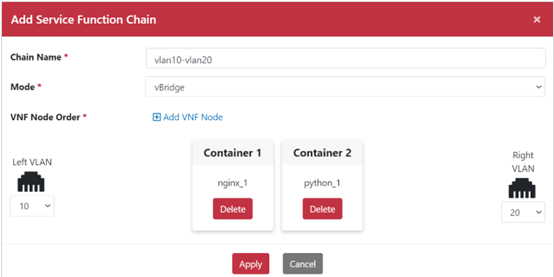
- 前往 Networking > Forwarding > Service Function Chain 頁面點擊「Add」。
- 設定 Mode 為 vBridge,輸入 Chain Name。
- 點擊「Add VNF Node」依次選擇 Nginx 與 Python。
- 設定 Left VLAN 為
10,Right VLAN 為10。
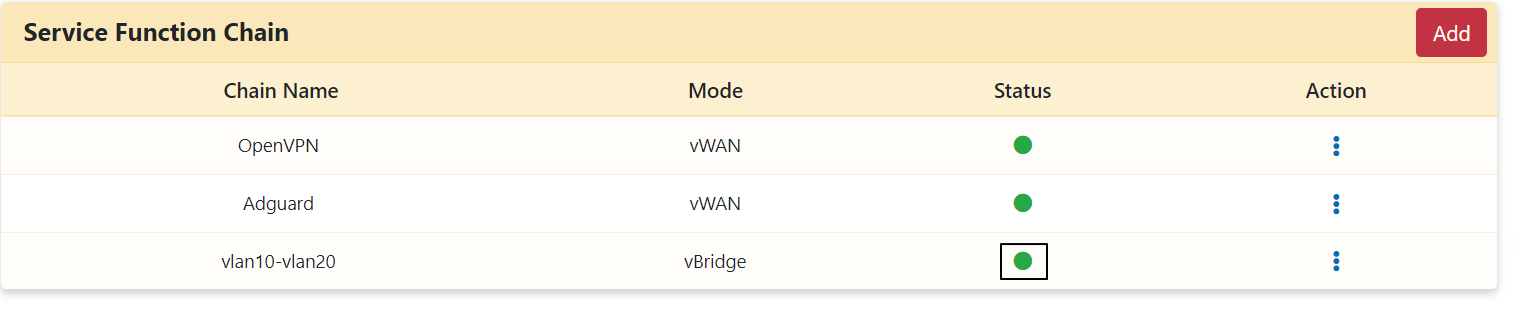
- 點擊 Action 圖示啟動 SFC。
- Laptop1 Ping Laptop2 IP (
192.168.10.20) 取得回應。 - Laptop2 Ping Laptop1 IP (
192.168.10.10) 取得回應,確認跨 VLAN 橋接正常。