Templates
Create node policy templates and topology blueprints, review device changes before applying, and track per-device results in Apply History.
What Can Templates Help You Do?
Use Templates when several devices need the same settings or when you need to reuse a connection layout. A template stores settings that you can later apply to selected devices, instead of entering them again for each device. A node is a device participating in OrpheLink connections.
The Templates screen has three tabs:
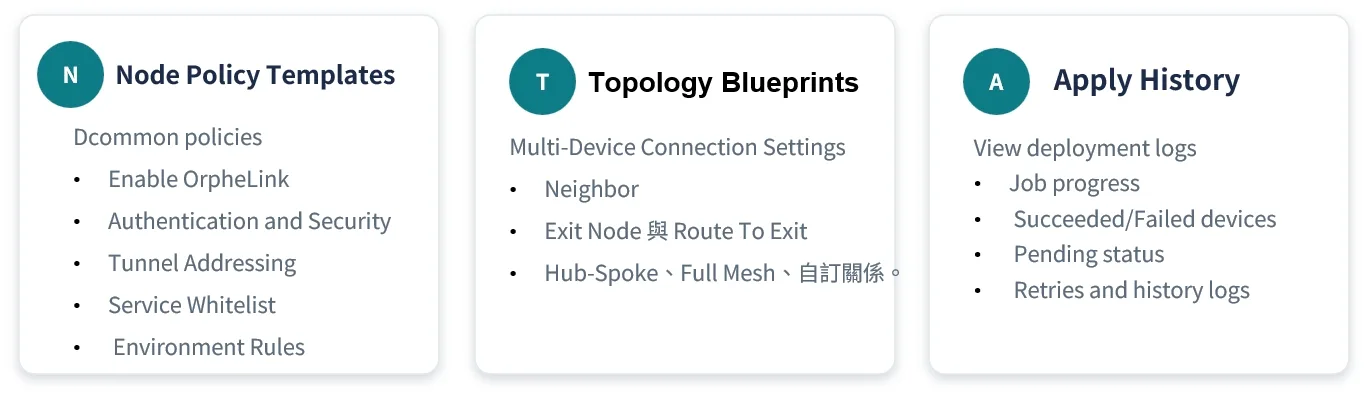
- Node Policy Templates: Standardize device settings, such as authentication, tunnel addresses, and the service whitelist.
- Topology Blueprints: Plan how devices connect to each other. A topology is the arrangement of those connections.
- Apply History: Check job progress and see which devices succeeded, failed, or are waiting for processing.
If you need both types of settings, you can standardize device settings with a node policy template first, then establish connections with a topology blueprint.
Before You Start
Sign in to OrpheLink and confirm that the target OrpheAgent devices appear in Inventory. If they have not been added, complete Provision first. Open Templates from the right-hand menu on the Site Topology screen.
Identify the devices and settings you intend to change. If tunnel addresses or routing are unfamiliar, read Topology before choosing the template settings.
Saving and applying are separate actions: Save stores the template or blueprint. To change devices, click Apply in the list, select the targets, review the changes, and confirm the final apply action. After applying, check Apply History for the results.
1. Node Policy Templates
Create a Template
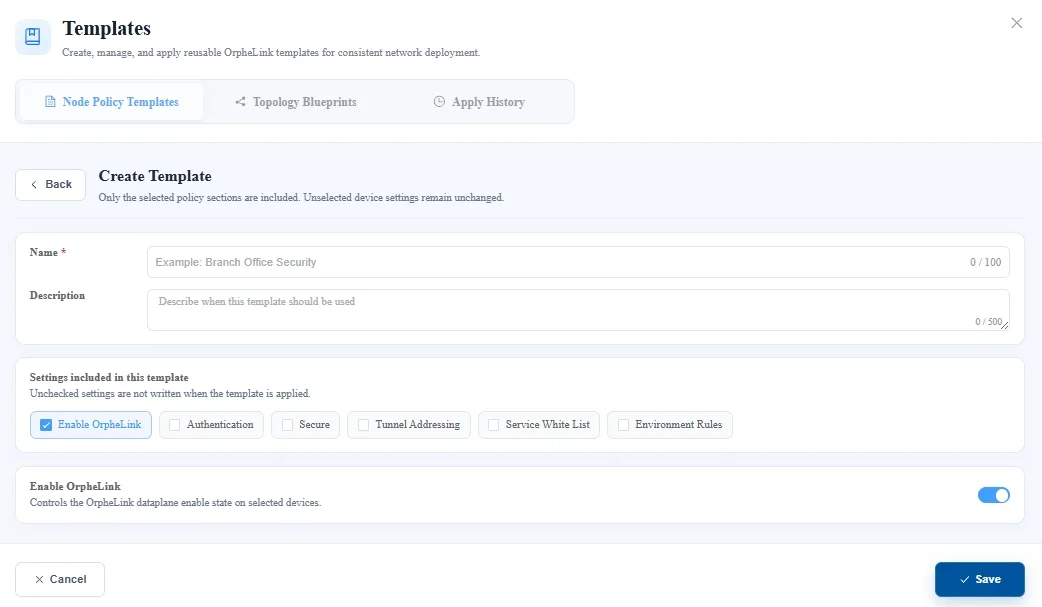
- Switch to Node Policy Templates and click Add in the top-right corner.
- Enter a name and description that help others recognize the template's purpose.
- Under Settings included in this template, select the sections to manage together. Only selected sections are included; unselected device settings remain unchanged.
- Configure each selected section. The table below explains the available settings.
- Check the name, selected sections, and values, then click Save. Back in the list, find the new template and check Included Settings. It has not yet been applied to devices.
| Section | Purpose |
|---|---|
| Enable OrpheLink | Controls whether the device's OrpheLink data plane is enabled. The data plane is the part that carries communication data between devices. |
| Authentication | Sets whether identity verification is required to access a node, and the timeout. |
| Secure | Configures Node Discovery (helping nodes find each other), Relay Transport (forwarding data through a relay node), and Enable On Boot (connection behavior after the device starts). |
| Tunnel Addressing | Selects tunnel subnets or related address settings: the virtual network address ranges devices use for OrpheLink connections. |
| Service White List | Specifies allowed protocols, ports, and neighbors. Protocols and ports identify communication methods and services; a Neighbor is another node connected to the current node. |
| Environment Rules | Configures WAN Subnet Bypass Rules. Bypass means traffic matching the specified subnet rules does not use the existing channel and is directed according to those rules. WAN means wide area network. The existing material does not establish specific entry or exit interfaces, so do not assume traffic goes directly out through WAN. Your administrator must confirm the matching traffic and actual path before you apply. |
Select Devices and Apply
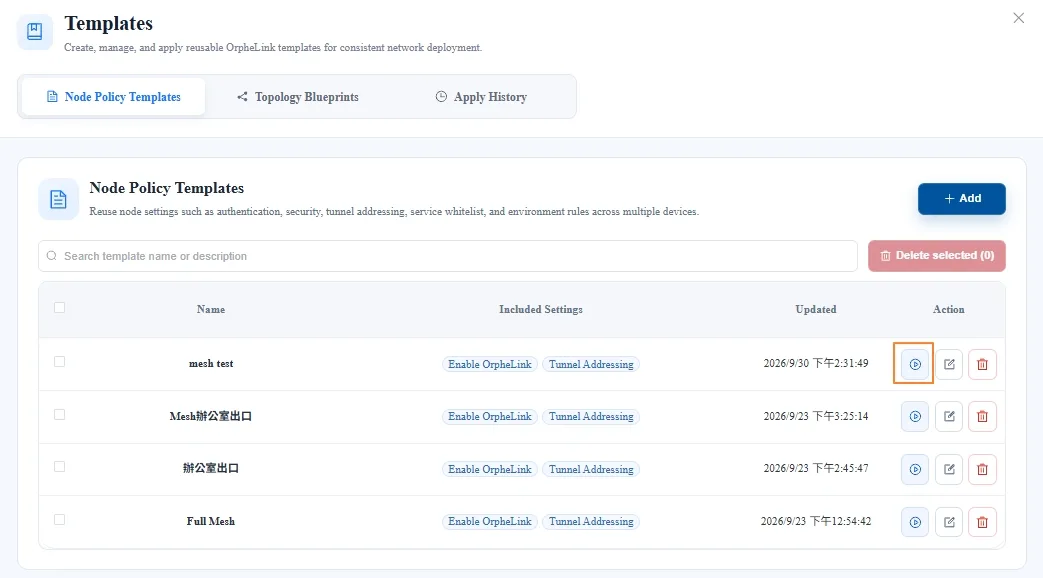
- Find the template in the Node Policy Templates list and click its Apply icon.
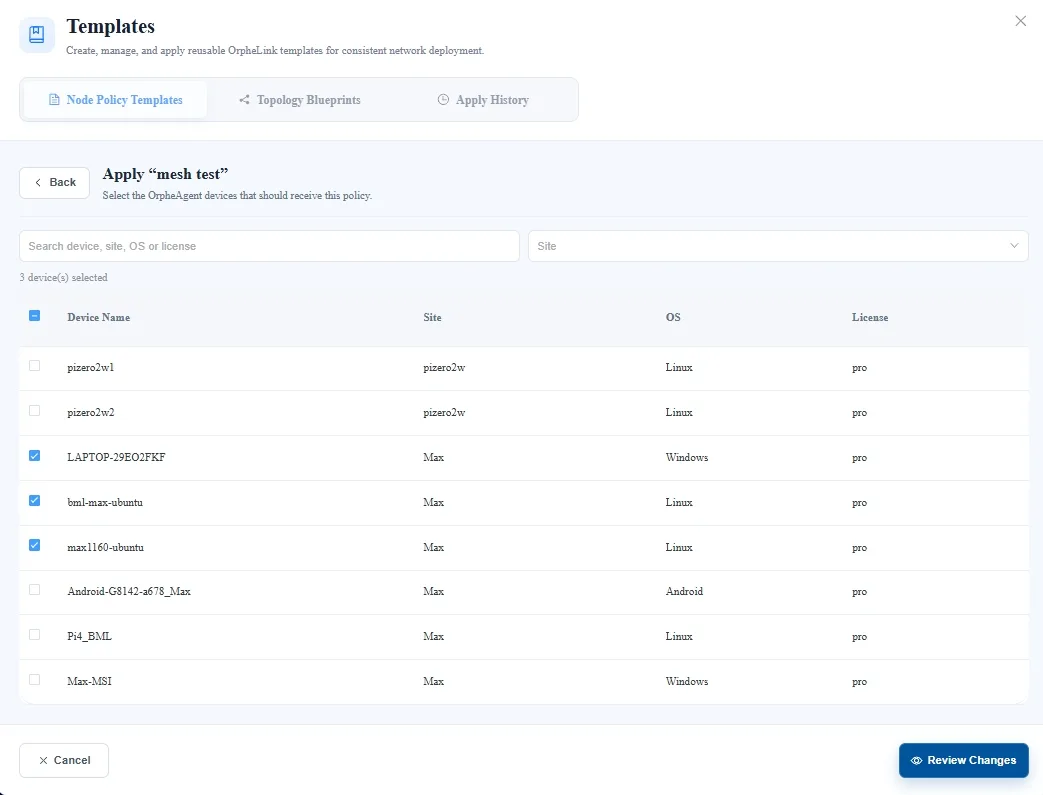
- Select the target devices; you can select several at once. Check their names, sites, and the selected device count, then click Review Changes.
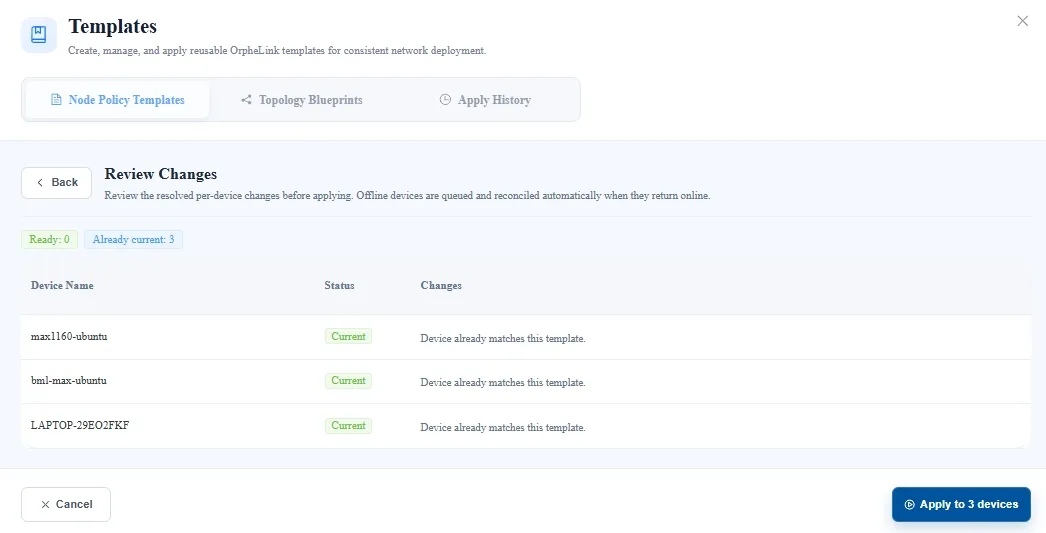
- Check each device's status and proposed changes. Current means the device already matches the template; it does not mean this job has just written settings successfully. Go back and adjust any unexpected targets or changes. When everything is correct, click Apply to N devices, where N is the displayed count. Then track the results in Apply History.
2. Topology Blueprints
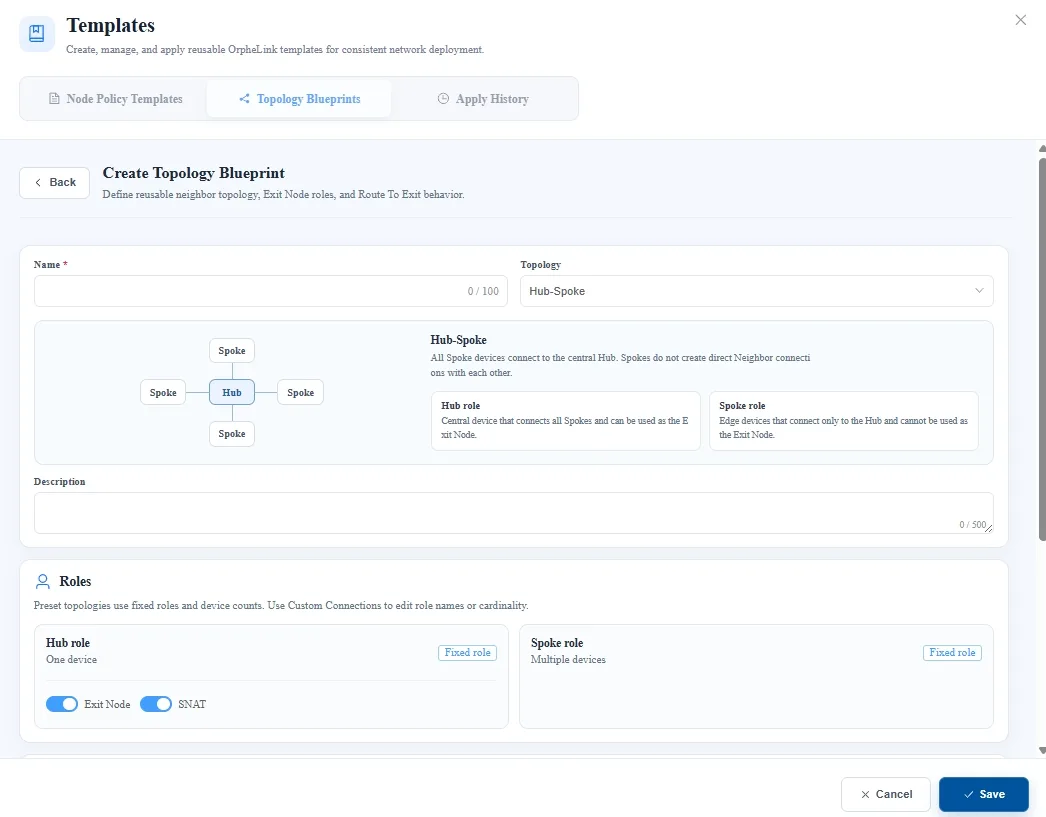
A blueprint defines roles and the connections between them; you assign actual devices to those roles when applying it. For example, a Hub is the central device, and Spokes are devices that connect to it. Start by choosing a suitable mode:
| Topology | When to Use It | Roles and Connections |
|---|---|---|
| Hub-Spoke | Branch offices or remote devices need to connect to a central device. | One Hub and multiple Spokes. Spokes connect to the Hub without direct Neighbor connections to each other. |
| Full Mesh | All members need Neighbor connections to each other. | Multiple devices use the Member role. |
| Custom connections | You need to define role names, device counts, and connections yourself. | Define roles, Neighbors, Exit Nodes, and Route To Exit settings. The English screen description uses Custom Connections, while the example list labels this mode Explicit. |
An Exit Node forwards traffic for other devices. Route To Exit determines whether a device sends traffic to an Exit Node. When enabled, SNAT (Source Network Address Translation) replaces the internal source address with the Exit Node's address. These settings affect where traffic goes, so check them against your network requirements.
Create a Blueprint
- Switch to Topology Blueprints and click Add.
- Enter a name, choose Hub-Spoke, Full Mesh, or custom connections under Topology, and fill in the description.
- For the selected mode, check roles, device counts, Neighbor relationships, and any applicable Exit Node, SNAT, and Route To Exit settings. Hub-Spoke and Full Mesh use fixed roles and device count constraints. Use custom connections if you need to change role names or counts.
- Review the role constraints and explanations on screen, then click Save. This stores the blueprint without changing device connections yet.
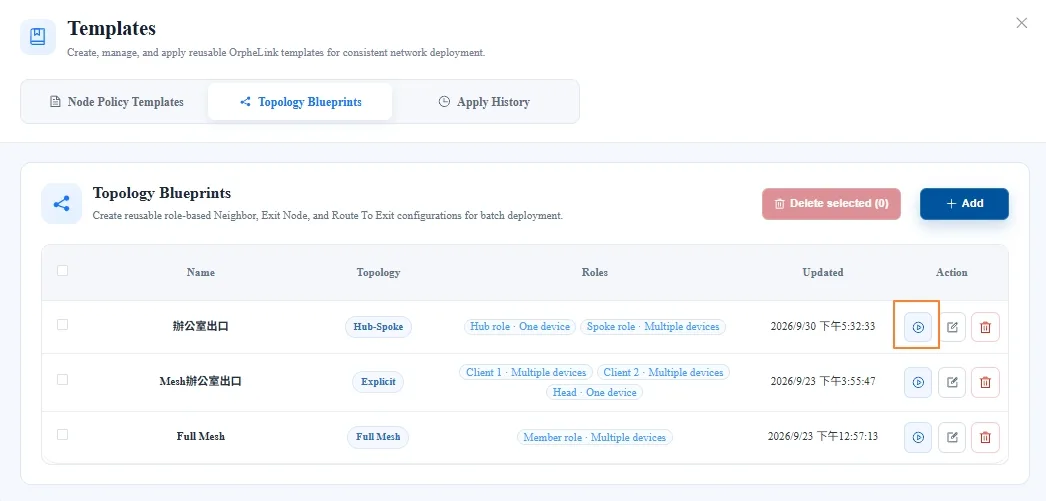
- Back in the list, check the blueprint name, topology, and roles. The list also provides apply, edit, and delete actions. Continue with the apply flow below to assign actual devices.
Assign Roles, Review Changes, and Apply
- Find the blueprint in the Topology Blueprints list and click its Apply icon.
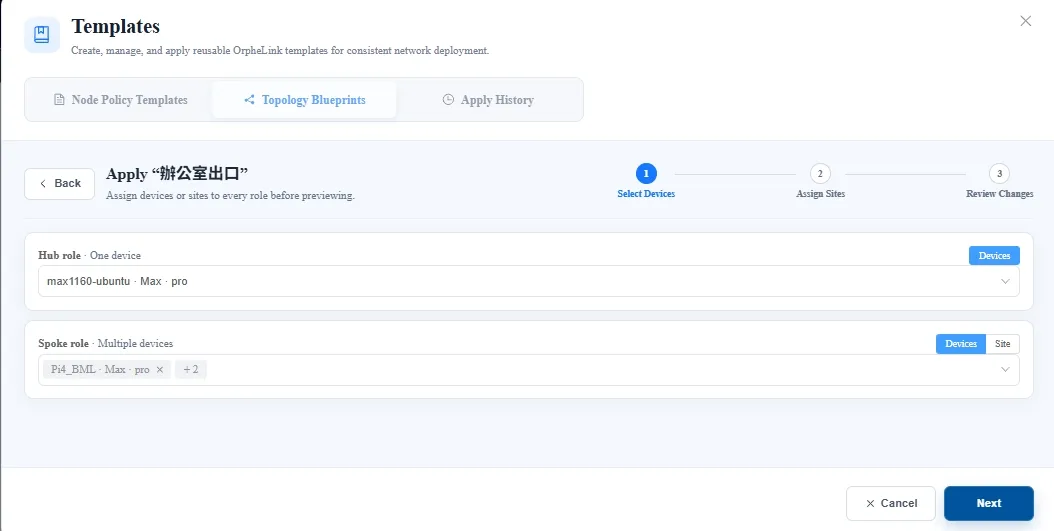
- In Select Devices, assign devices to every role. Depending on the options available for that role, choose individual devices or use Site assignment. A site is a group of devices. A single-device role accepts one device; a multi-device role accepts several. Check the assignments and click Next.
- In Assign Sites, add sites or assign devices and roles to existing sites as needed. If no site adjustments are needed, click Skip to continue to Review Changes.
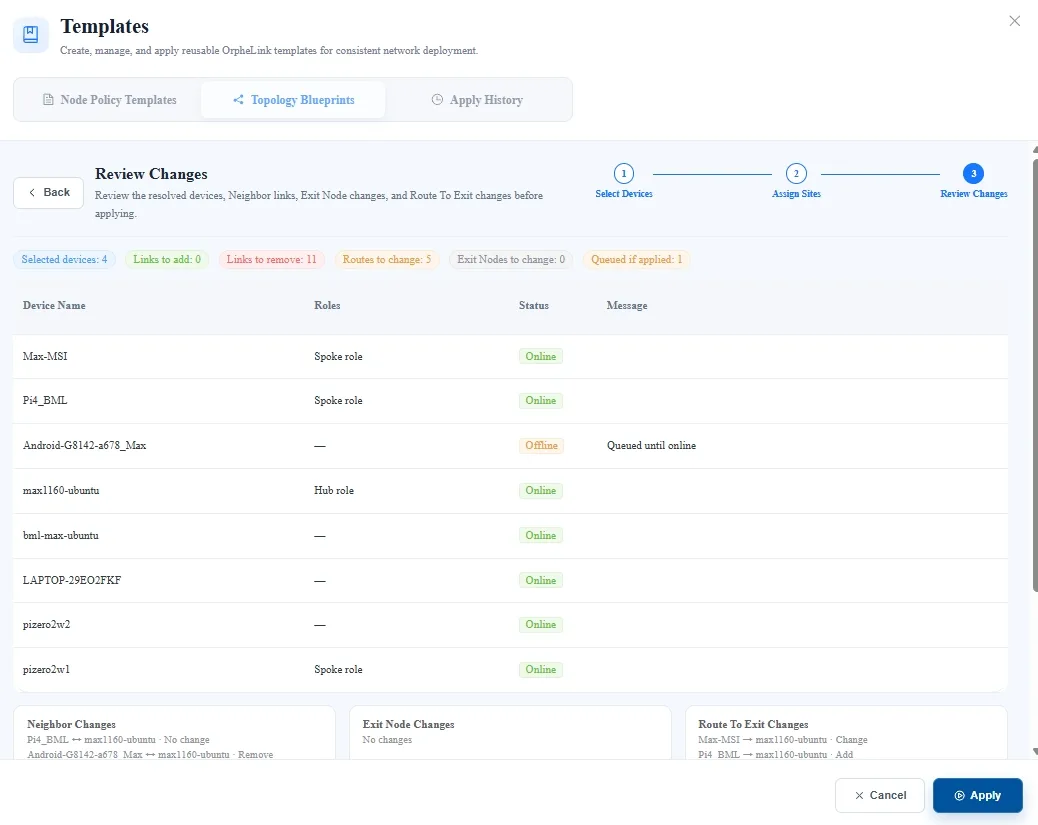
- In Review Changes, check devices, roles, statuses, and the additions, removals, retained settings, or changes for Neighbors, Exit Nodes, and Route To Exit. Also inspect listed devices without a role, as connection changes may affect them. Pay particular attention to Links to remove and queued devices so that changes to existing connections are not overlooked.
- Click the final Apply only when all affected devices and changes match your intentions. Go back and adjust anything unexpected. After applying, check each device's result in Apply History.
3. Apply History: Check Results and Unfinished Work
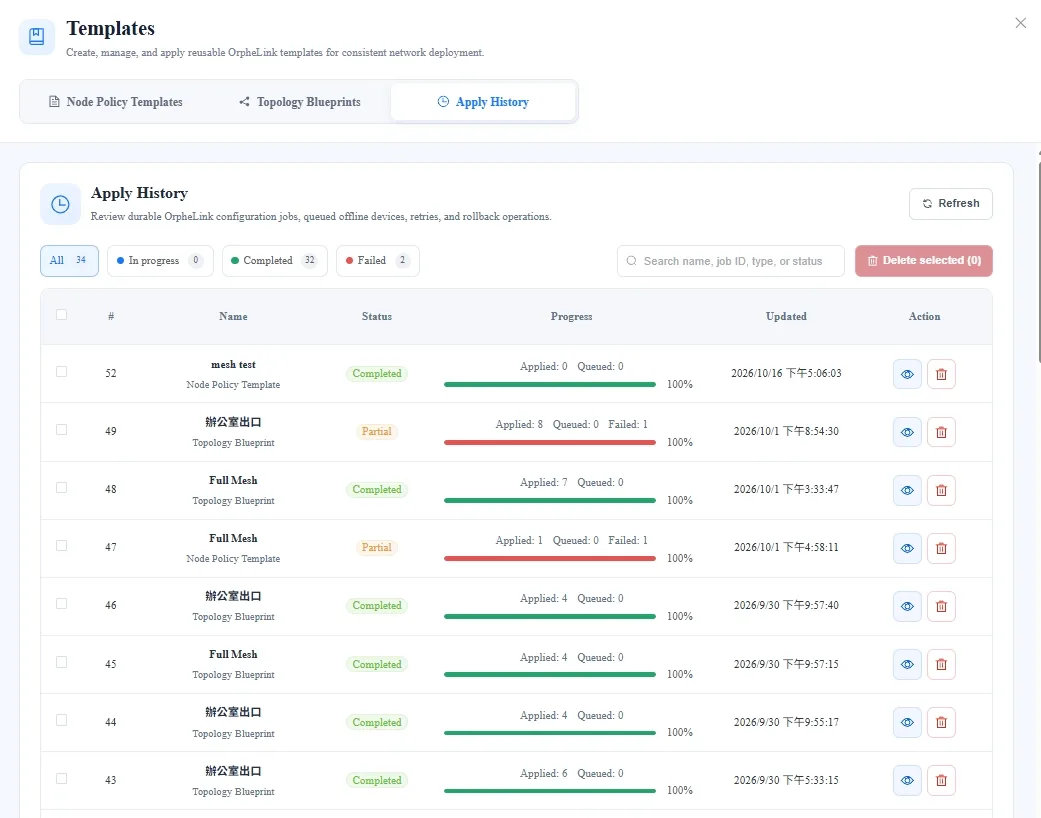
Apply History tracks job execution. A progress value of 100% does not necessarily mean every device succeeded: the Partial jobs in the screenshot still contain failed devices. Check the status and device counts together.
- Switch to Apply History and click Refresh if needed.
- Filter jobs by All, In progress, Completed, or Failed, or search by name or job ID.
- Find the job and check its status and the Applied, Queued, and Failed counts. Click the view icon in its row to inspect per-device statuses and errors.
- For queued, failed, or partially completed work, identify the unfinished devices and the reason before using the actions offered in the record. Afterwards, check the record again and verify the affected devices' actual settings and intended connections.
What About Offline Devices, Retries, and Rollback?
- Queued does not mean completed. Review Changes indicates that offline devices are queued until they return online. After reconnection, check Apply History and the device settings to confirm the actual result; do not assume success in advance.
- Distinguish undelivered changes from applied changes. Canceling queued items does not mean that settings already applied to other devices are restored.
- Verify after retrying or rolling back. Rollback attempts to restore earlier settings. Follow the available actions and prompts in the actual record, then check each device's result. The screenshots on this page do not show the complete rollback flow or its scope, so do not assume that one action restores every device to its previous state.