Auth Connect
Configure OrpheLink Auth Connect with Local, Active Directory, or RADIUS authentication, TOTP MFA, and Authorized Devices to secure OrpheAgent Data Plane access.
Auth Connect
OrpheLink Auth Connect enforces user authentication for the Data Plane. Integrating Local, AD, and RADIUS login sources with TOTP MFA, it applies precise Authorized Device rules to restrict access to explicitly permitted nodes via the OrpheAgent Desktop GUI or browser-based Captive Portal.
After a device connects to the network, confirm that the right person can access only the authorized devices. Supports Local Account, Active Directory (AD), RADIUS, and TOTP multi-factor authentication (MFA).
Quick Start: Complete Auth Connect in 5 Steps
Read this page first to understand the overall flow. Each step is explained in detail in the sections that follow.
| Step | Who | What to do | What success looks like |
|---|---|---|---|
| 1 | Administrator | Decide the sign-in source (Local / AD / RADIUS). If you use AD or RADIUS, first complete and test the integration in AD settings / RADIUS settings | The test passes, then click Apply to save |
| 2 | Administrator | In Auth Connect, click Add to create a rule that specifies the source, the devices users can access (Authorized Devices), and the MFA Policy | The rule appears in the list and Toggle is Enable |
| 3 | Administrator | Go to the target node, turn on Authentication, and select the rule to apply | The node receives the configuration (without this step, the rule does not take effect) |
| 4 | User | In OrpheAgent Data Plane Auth (or the browser Captive Portal), enter the username and password; enter a 6-digit code when MFA is required | The user can reach the authorized devices |
| 5 | Administrator | Acceptance check: traffic is blocked before sign-in, allowed after sign-in, and unauthorized devices are still blocked | All three results match expectations |
⚠️ Most common mistake: A rule was created, but Authentication was not turned on at the target node. In that case traffic is not intercepted and no sign-in is requested.
1. Overview
Auth Connect is OrpheLink's user identity authentication and device access authorization feature for the OrpheAgent Data Plane. Administrators create sign-in rules, and after users pass authentication, they can access only the devices the rule allows.
Why you need it
A device showing Online only means the encrypted tunnel is established. It does not mean the person sitting at the computer is allowed to use it. Before packets reach a protected node, Auth Connect requires users to prove their identity and access rights.
Where it fits in the three lines of defense
| Line of defense | Question it answers | Verification method |
|---|---|---|
| 1st: Device Auth | Which device may open the Data Plane and join the network? | Bound email + Magic Link approval |
| 2nd: Auth Connect | Who is using this device to reach the target resource? | Enterprise credentials (Local / AD / RADIUS) + TOTP MFA |
| 3rd: Service White List | Which ports on the peer can this device reach? | TCP/UDP + port + allowed Neighbor scope |
Auth Connect does not replace device approval or firewall rules. Each of the three is verified independently.
Three core checkpoints
Packets are forwarded only after passing the following three checkpoints in order:
| Checkpoint | Question it answers | Where administrators configure it |
|---|---|---|
| Identity source (Auth source) | Who are you? | Chosen when adding a rule; AD and RADIUS also need integration settings |
| Device authorization (Authorized Devices) | Where can you go? | Devices / Authorized Devices in each rule |
| MFA policy (MFA Policy) | Do you need an extra lock? | MFA Settings and the MFA Policy of each rule |
An office story
A company has an "office file server" and an "R&D test machine." Xiaoming is a regular employee who can reach only the file server. Xiaohua is an IT staff member who can reach both, and important devices require a code from her phone.
- The IT administrator creates sign-in rules for Xiaoming and Xiaohua.
- The administrator decides which devices each rule allows: Xiaoming gets only the file server.
- The administrator sets MFA to Required for the important devices and confirms Authentication is turned on for the target devices.
- Employees choose the target device in OrpheAgent and sign in, completing the phone verification code when required.
- Only after passing can they connect to the allowed devices. Devices not on the list are still refused.
ℹ️ "Sign-in success" here means Data Plane access authorization. It does not mean the user can sign in to the OrpheLink management console, and it does not mean every file permission on the other device is open.
2. Terminology in Plain Language
| Text in the interface | Plain explanation |
|---|---|
| Auth Connect | Rules that manage who can sign in by which method and which devices they can reach |
| OrpheLink | The control center where administrators configure rules |
| OrpheAgent / Node / Neighbor | The connection program on a computer / a managed device / another device in the list |
| Auth source | Where the username and password are verified, such as an OrpheLink-created account, the company AD, or the company RADIUS |
| Authorized Devices | The range of target devices a rule can access after authentication passes |
| MFA / TOTP | A 6-digit dynamic code generated by a phone authenticator in addition to the password (refreshes every 30 seconds) |
| Recovery Code | A single-use backup code for when the phone cannot generate a verification code |
| Session / Timeout | The temporary access state after successful authentication, and its timeout |
| Captive Portal | A browser sign-in page that appears when you access a protected web page |
3. Identity Source: Choose a Sign-In Method
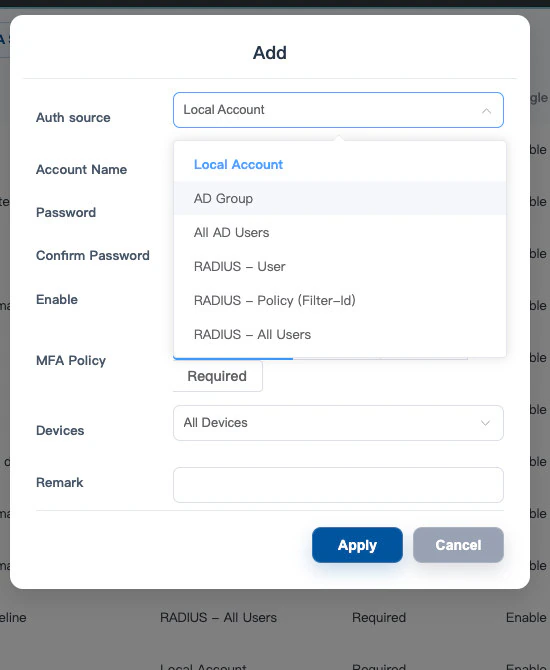
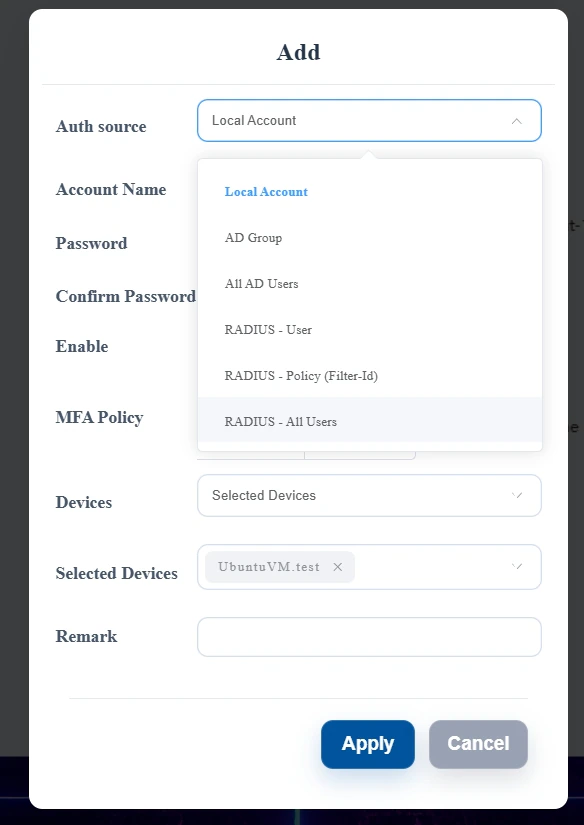
When adding a rule, the administrator selects the account source in Auth source. Users keep signing in with the familiar username and password and do not need to change their habits.
| Auth source | Authentication and authorization method | What users enter when signing in |
|---|---|---|
| Local Account | Username and password are managed by OrpheLink rules | The Account Name and password created by the administrator |
| AD Group | The AD user must belong to the specified Security Group and pass authentication with a personal password | Full UPN and AD password |
| All AD Users | Any AD user who matches the Directory and the rule's device scope | Full UPN and AD password |
| RADIUS - User | A single, complete username@realm | That account's RADIUS password |
| RADIUS - Policy (Filter-Id) | Only users whose Access-Accept reply carries the specified complete Filter-Id | RADIUS username and password |
| RADIUS - All Users | Any RADIUS user matching the Realm and device scope can attempt authentication | RADIUS username and password |
Which one should you choose?
| Company scenario (example) | Suitable Auth source | Reason |
|---|---|---|
| Guests or testers need a temporary account | Local Account | Does not depend on company AD/RADIUS; managed directly in OrpheLink |
| Only the Finance group may access Finance resources | AD Group | Uses existing company groups to handle staffing changes |
| All AD employees need basic access | All AD Users | No need to create accounts one by one, but limit devices and consider MFA |
| Only one outside contractor is allowed | RADIUS - User | Restricts access to one complete personal RADIUS account |
Only members whose RADIUS reply is engineering | RADIUS - Policy (Filter-Id) | Authorizes by the complete policy tag returned by the server |
| All valid RADIUS employees under a Realm | RADIUS - All Users | Very broad scope; combine with specific devices and MFA |
How it works
The user-side experience does not change: the user enters credentials in OrpheAgent or the Captive Portal, and the OrpheLink Controller forwards them to AD (over LDAPS) or RADIUS for verification. Connecting enterprise accounts only requires configuration on the OrpheLink side.
ℹ️ Auth source determines how identity is confirmed; Authorized Devices determines where users can go after passing. Both must be configured together, and Authentication must be turned on at the target node.
4. Prerequisites
- You have permission to view and edit Auth Connect in OrpheLink. The target OrpheAgent has been provisioned, is connected, and can be seen in Inventory or Neighbors.
- Authentication for the protected target node can be configured on the Node or Site edit page in the OrpheLink page.
- Using AD: Prepare the LDAPS certificate chain, a service account for queries, the Base DN, and the user UPN.
- Using RADIUS: Prepare the server address and port, the Realm, the Shared Secret for each server, and a PAP account that can be used for testing.
- Using MFA: Users prepare an authenticator that supports TOTP (Google Authenticator, Microsoft Authenticator, or the iPhone Passwords app), and confirm that the time on OrpheLink, OrpheAgent, and the phone is synchronized.
- For acceptance testing, prepare a protected service to check "blocked before authentication, allowed after authentication."
| Your situation | What to ask your administrator before you start |
|---|---|
| The company has no AD/RADIUS and you only want to test | Start with a Local Account and confirm the target device is connected |
| Employees normally use AD accounts | Ask IT for the AD settings and available groups; employees still sign in with personal credentials |
| The company already has RADIUS | Ask IT to confirm the Realm, Server, and Shared Secret (give these only to administrators) |
| You want users to scan a QR code | Confirm the rule is Required, the authorization is valid, and users have a TOTP authenticator |
⚠️ Changing rules, resetting MFA, or disabling a source may prevent users from establishing new connections. In production, prepare a working administrator sign-in and a recovery path first.
5. Administrator Setup
Step 1: Open Auth Connect
- Log in to the OrpheLink management interface.
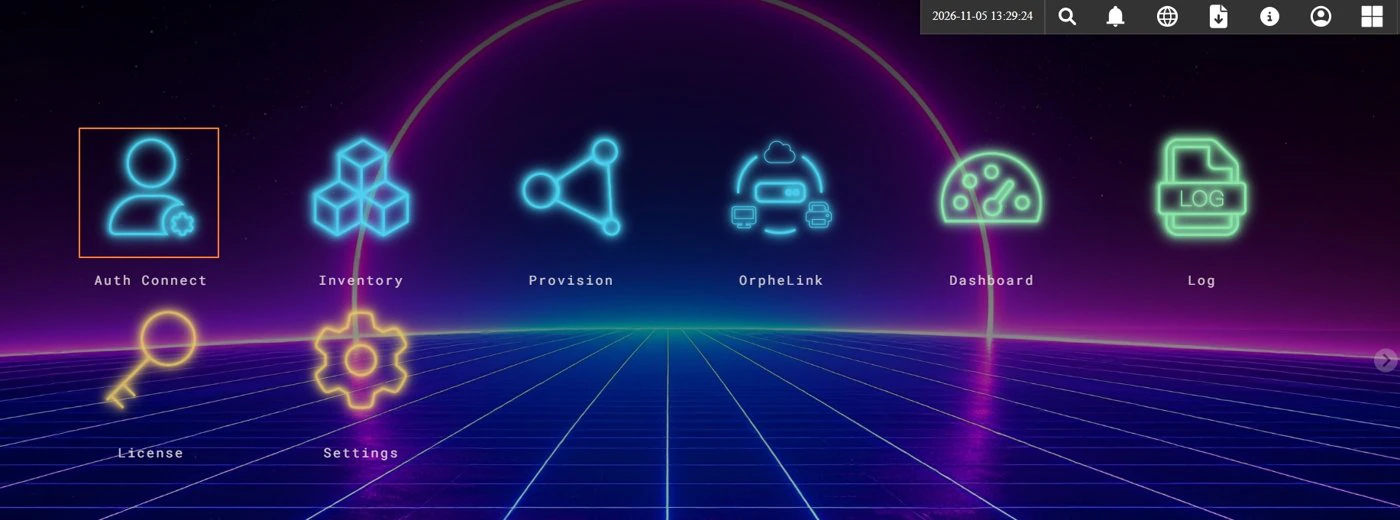
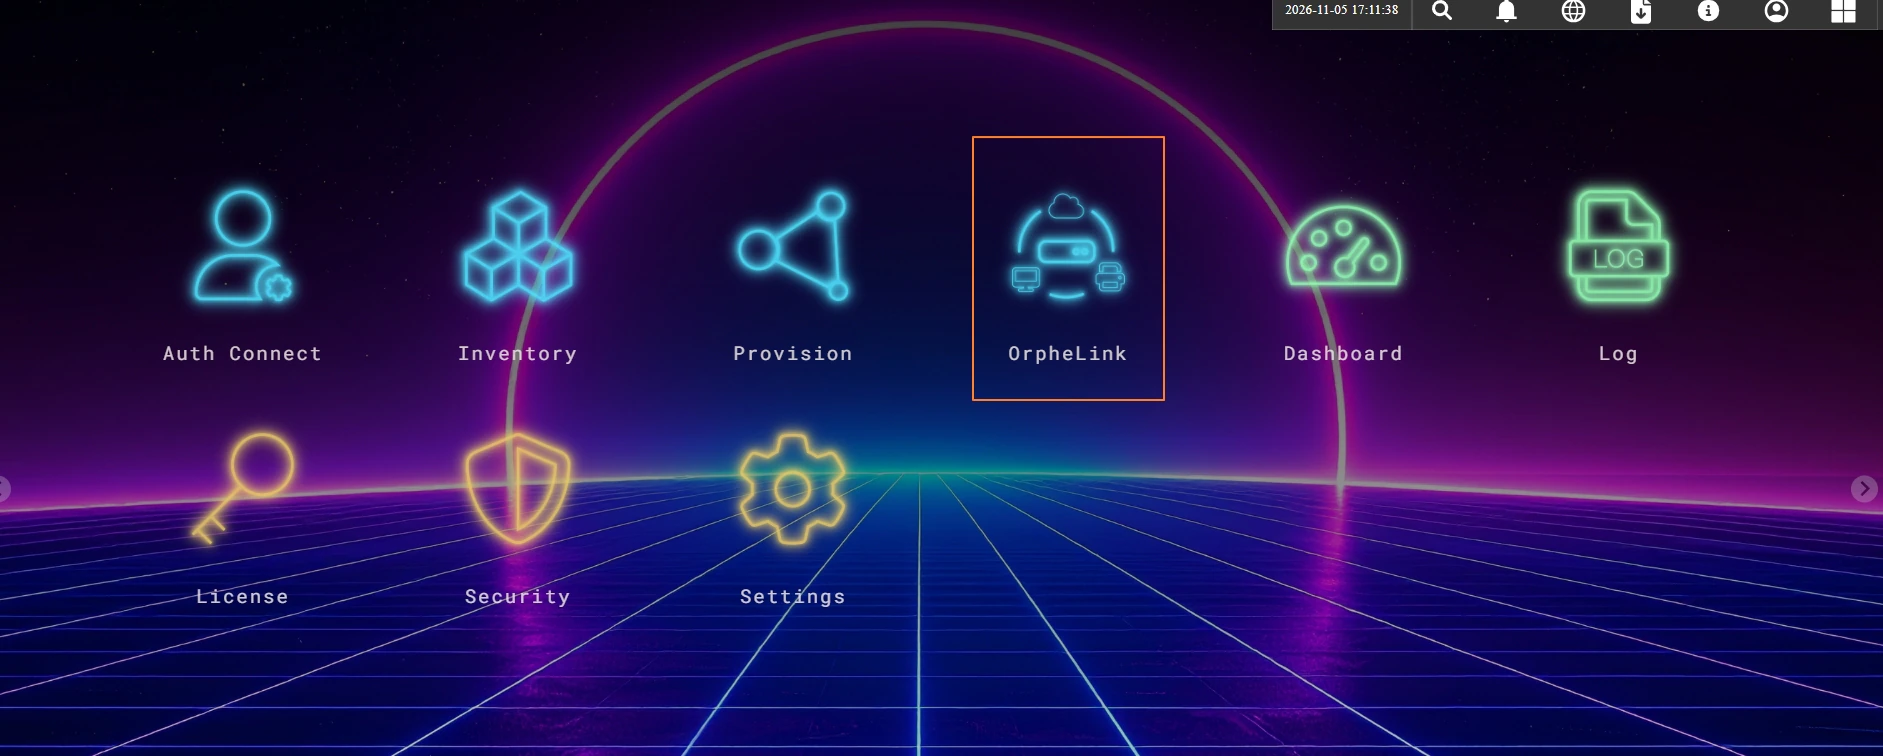
- On the application home page, click Auth Connect.
- In the list, review the existing rules. The columns are Account / Rule Name, Remark, Auth source, MFA Policy, Toggle, UpdatedAt, and Action.
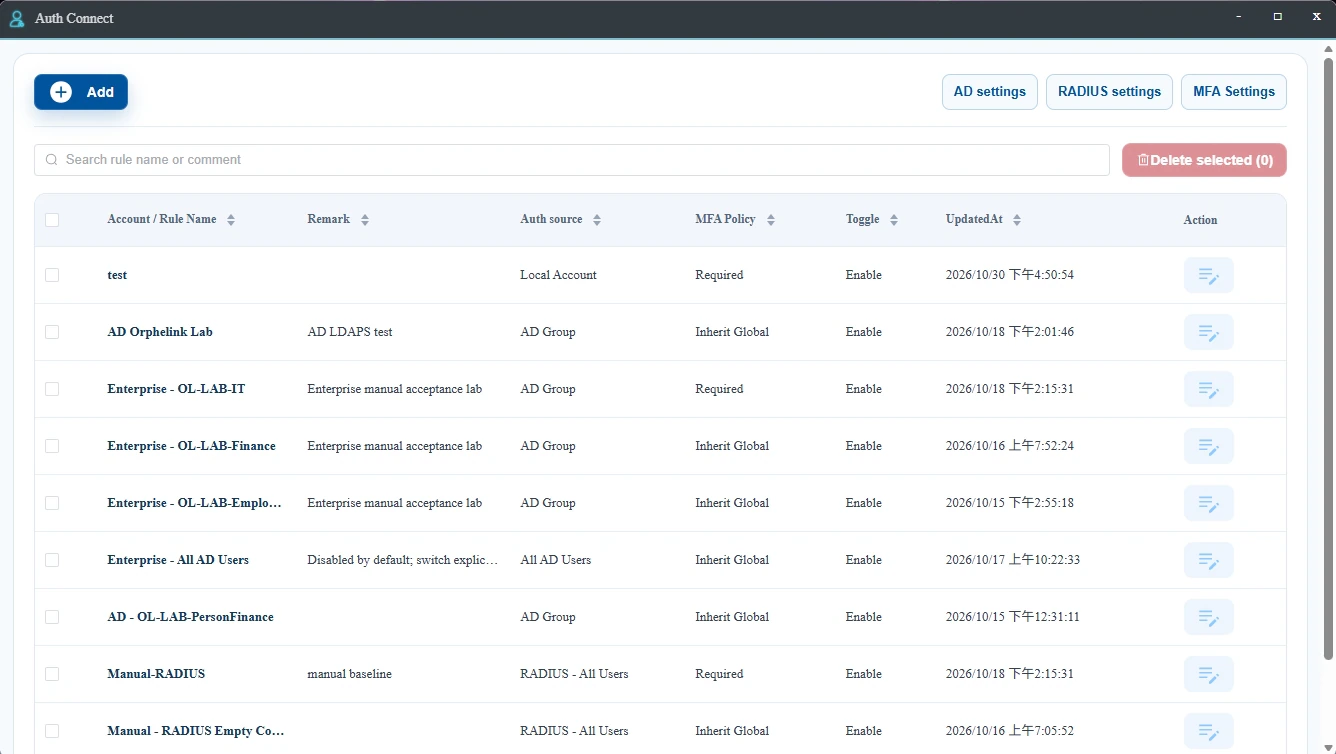
| Button | Purpose |
|---|---|
| Add | Creates a new sign-in / authorization rule; nothing is saved until you click Apply |
| Action (Edit) | Edits the name, description, enabled state, device scope, and MFA policy |
| Toggle / Enable Rule | Controls whether the rule can still be used for new sign-ins |
| AD settings | Manages the LDAPS Directory connection and service query information |
| RADIUS settings | Manages the RADIUS Realm, servers, and connection test |
| MFA Settings | Manages the global default policy, first-time enrollment on the Portal, and enrolled identities |
ℹ️ The three settings buttons serve different purposes: Action edits this one rule; MFA Settings edits the global policy or shows enrolled users; AD settings configures the company's AD connection. Editing a rule does not change employee passwords on the AD server.
Step 2: Connect an external source (when using AD or RADIUS)
If you only use Local Account, skip this step and go to Step 3.
A. Connect Active Directory (AD settings)
- Click AD settings and turn on Enable Active Directory.
- Enter the LDAPS endpoints (primary and backup, in a format such as
ldaps://host:636), the Base DN, and the UPN suffixes.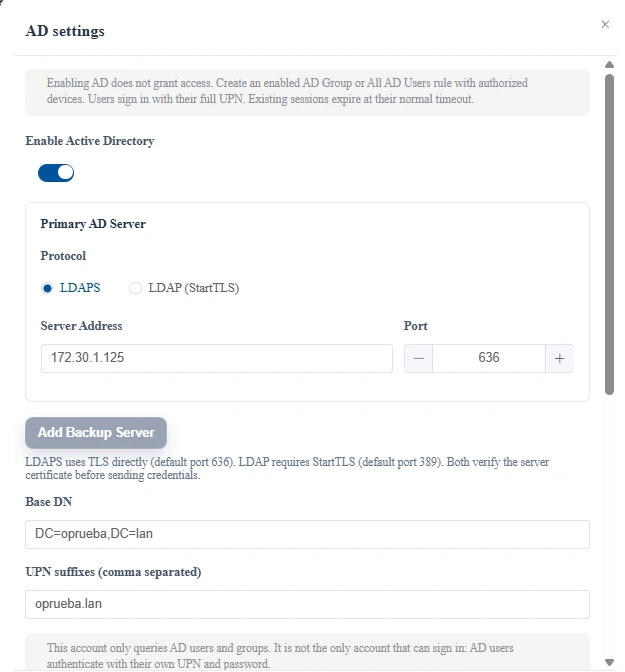
- Enter the Service Account UPN / DN and Service Account Password. This account is used only to query AD users and groups. It is not an employee sign-in account.
- Paste the Trusted CA certificates (PEM format) for your AD certificate chain, then click Test connection.
- Check Connection Diagnostics and confirm that LDAPS Connection, TLS Certificate Validation, Service Account Bind, Base DN Lookup, and Test Connection Result all show Passed.
- After the test passes, click Apply to save. Click Cancel if you do not want to apply the changes.
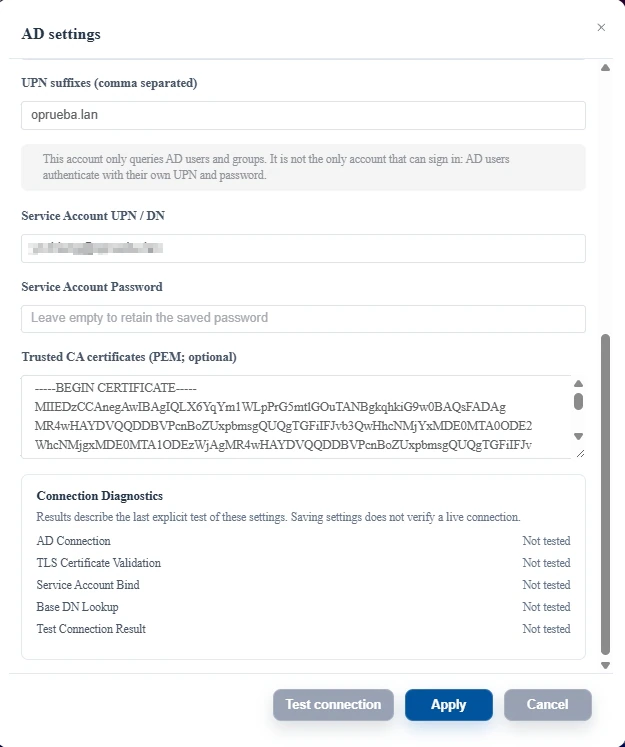
⚠️ AD supports only LDAPS with certificate verification. Do not turn off TLS certificate verification because of a connection failure. Test connection does not replace saving, and it does not mean all AD users have been granted device authorization.
ℹ️ The service account differs from employee accounts: The service account is like a library "administrator's lookup card" that only helps OrpheLink query employees and groups. Employees still sign in with their own full AD account (for example
[email protected]) and personal password. After the integration is complete, you still need to create at least one enabled AD Group or All AD Users rule before employees can sign in.
B. Connect RADIUS (RADIUS settings)
- Click RADIUS settings and turn on Enable RADIUS.
- Fill in RADIUS realm suffixes (comma-separated) and Forward Username (Full username (UPN) or Strip Realm), and fill in NAS Identifier if needed.
- Set Timeout (seconds), and under Primary RADIUS Server enter the Server Address, Authentication Port (UDP) (default 1812), and Shared Secret.
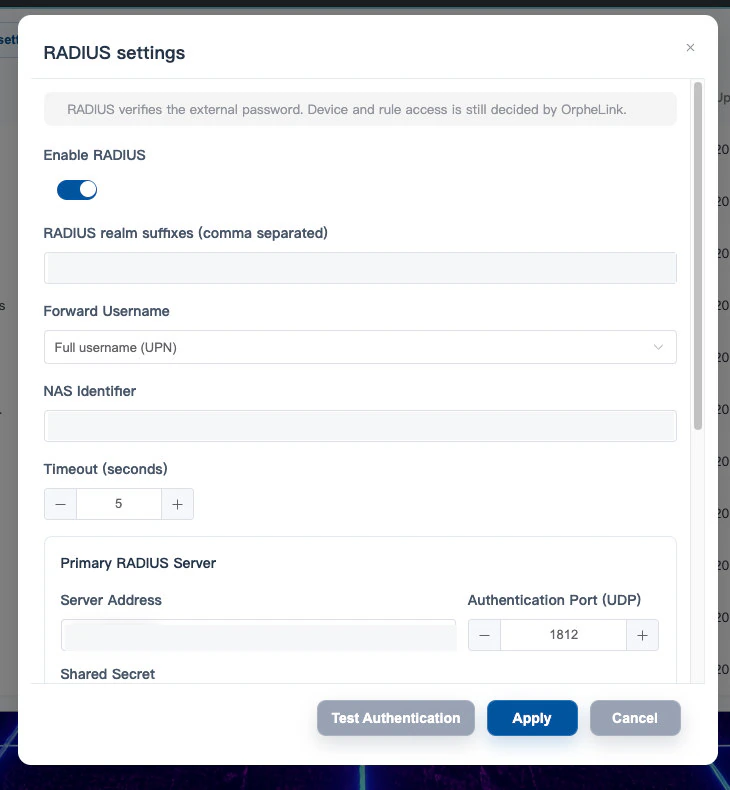
- If you need a backup, click Add Backup Server to set up a second server. If you have only one server, this is not needed.
- In Test Authentication, enter a one-time Test Username (UPN) and Test Password, then click Test Authentication. The test credentials are not saved.
- When the result is correct, click Apply, then go to the main list and create the matching RADIUS rule.
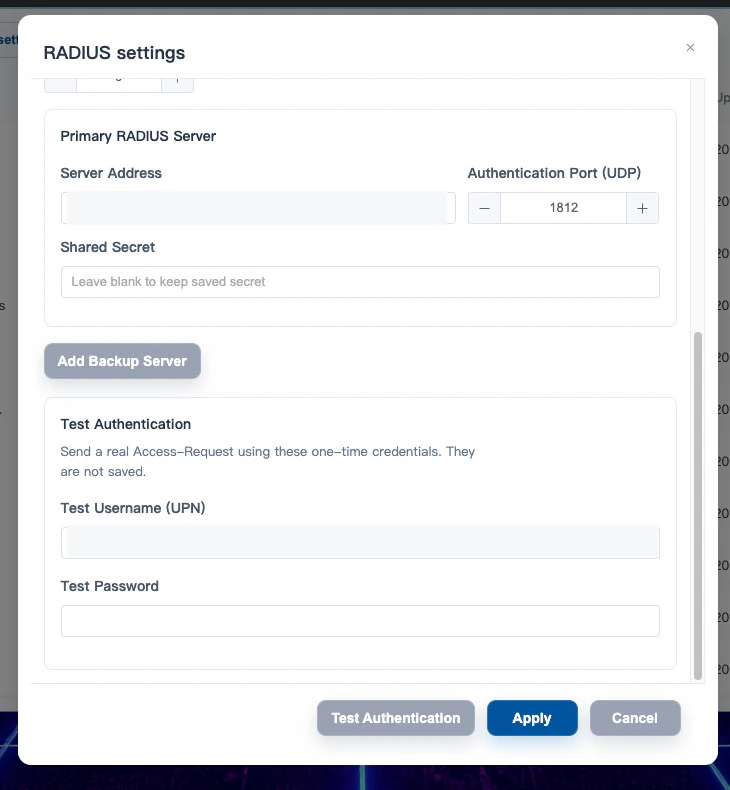
ℹ️ RADIUS only verifies the external password. Which devices a user can reach is still decided by OrpheLink rules. A successful Test Authentication only means the "external counter verified the credentials," not that the user meets Authorized Devices or MFA. When Forward Username is set to Strip Realm, the identity used for OrpheLink sign-in and MFA is still the full account.
⚠️ The backup server is tried only on connection timeout. Access-Reject, Access-Challenge, or a message integrity failure are not treated as safe fallback cases.
Step 3: Create a rule (Add)
A rule decides which source is used, which accounts apply, which devices can be reached, and whether MFA is required. Common fields:
| Field | Description |
|---|---|
| Rule Name (Account Name for Local) | The rule name |
| Enable Rule (Enable for Local) | Whether the rule is enabled |
| MFA Policy | Inherit Global, Disabled, Optional, Required (see Step 5) |
| Authorized Devices (Devices for Local) | All Devices or Selected Devices (see Step 4) |
| Description (Remark for Local) | Notes on the purpose, for easy identification |
Local Account
- In Auth Connect, click Add and set Auth source to Local Account.
- Enter Account Name, Password, and Confirm Password.
- Keep Enable on and choose an MFA Policy.
- In Devices, choose All Devices or Selected Devices, and note the purpose in Remark.
- Click Apply, then return to the main list to confirm the new rule appears.
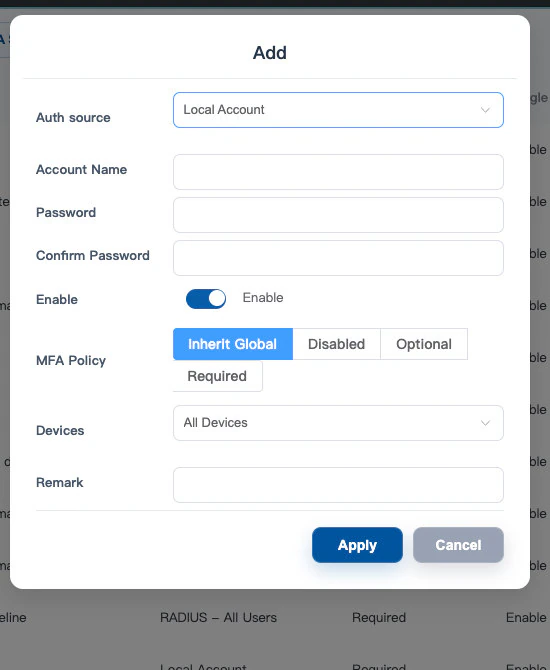
⚠️ Do not store real passwords in manuals or screenshots. Deleting and re-creating a Local account with the same name creates a new identity, and the previous MFA enrollment and recovery codes are not carried over.
Example: a one-week test account for an outside consultant. To let the outside consultant guest-demo reach only one test machine during testing, and not the Finance server: Add → Local Account, enter guest-demo and a password → set Devices to Selected Devices and select only the test machine → set MFA Policy to Required if needed → Apply, and confirm Authentication is turned on for the test machine. After signing in, the consultant can connect to the test machine, and connecting to the Finance server is refused.
AD Group
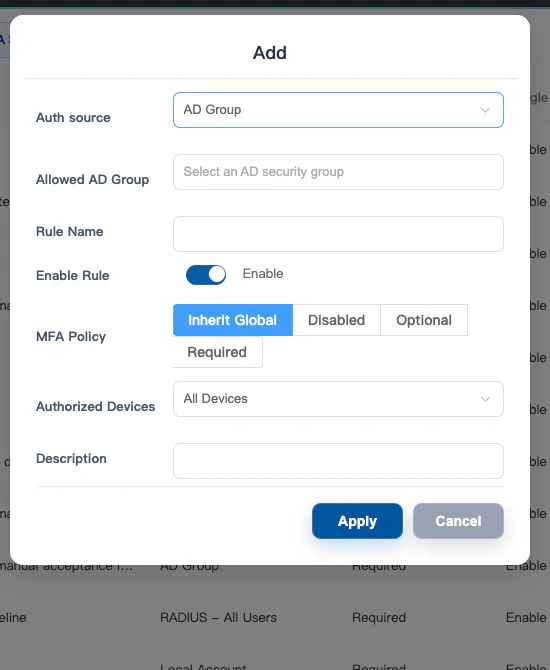
- Click Add and set Auth source to AD Group.
- In Allowed AD Group, search for and select the matching Security Group. The drop-down lists the groups on the AD server (for example Domain Admins and Domain Users).
- Enter a Rule Name and turn on Enable Rule.
- Choose the MFA Policy and Authorized Devices, and fill in a Description if needed.
- Click Apply and check the rule's enabled state and device scope.
| Employee | In the "Finance" AD Group? | Connecting to the Finance server |
|---|---|---|
| Xiaoming (Finance) | Yes | Password, device authorization, node Authentication, and MFA all match, so access is granted |
| Xiaohua (R&D) | No | Cannot pass using this Finance rule |
| New Finance employee | After being added to the group | Can use the same rule as soon as they match it, with no need to create a separate Local account |
ℹ️ After a rule is created, the identity of the selected group is protected. To change the authentication target, create a new rule and review the device associations. If a broader All AD Users rule that also matches exists, users may still be authorized through that rule, so check it as well.
All AD Users
- Click Add and set Auth source to All AD Users.
- Enter a Rule Name and turn on Enable Rule.
- Set Authorized Devices to Selected Devices to avoid unintentionally authorizing all devices.
- Specify the MFA Policy and click Apply.
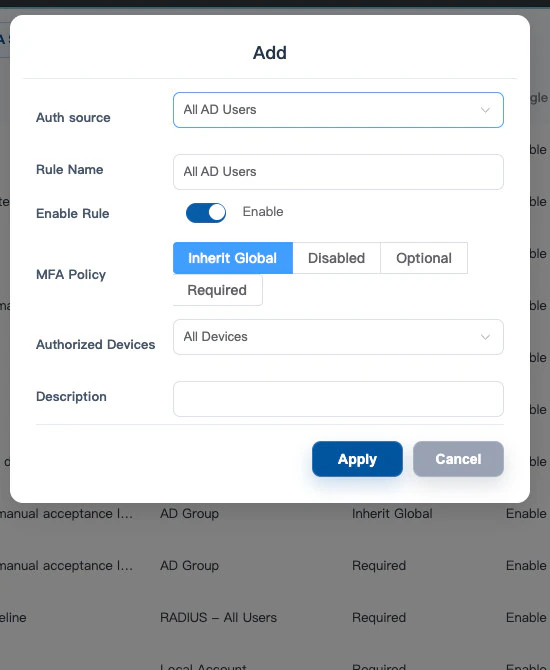
ℹ️ All AD Users does not automatically open every internal device, but it covers a very broad range of identities, so in production we recommend combining it with minimum-necessary device authorization and MFA. For example, if the rule selects only the "employee portal server," every valid AD user who completes MFA can reach the portal server, but this does not give them access to the "confidential Finance server."
RADIUS - User
- Click Add and set Auth source to RADIUS - User.
- In Full RADIUS Username, enter the complete account and Realm (for example
[email protected]). - Enter a Rule Name, choose the MFA Policy and Authorized Devices, and click Apply.
- The user authenticates in OrpheAgent with that account's RADIUS password.
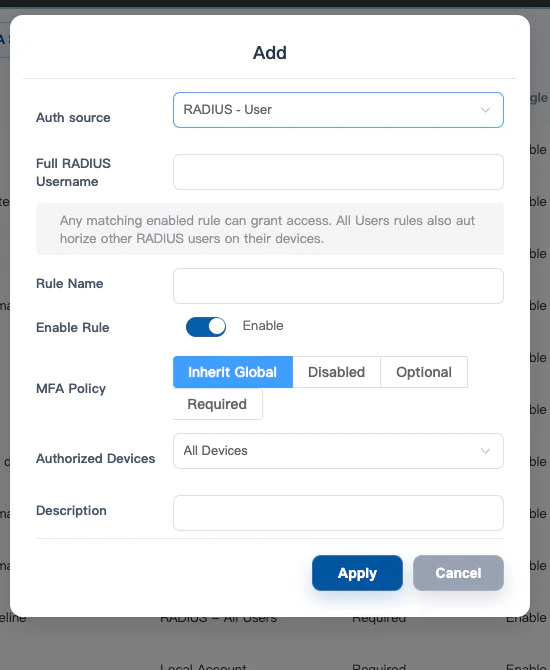
ℹ️ Another account (for example
[email protected]) cannot sign in using this single-account rule, even if their RADIUS password is correct.
RADIUS - Policy (Filter-Id)
- Click Add and set Auth source to RADIUS - Policy (Filter-Id).
- Enter the complete Filter-Id that the RADIUS Access-Accept actually returns.
- Set Rule Name, Enable Rule, MFA Policy, and Authorized Devices, and click Apply.
- Verify with a test account that has the matching Filter-Id configured.
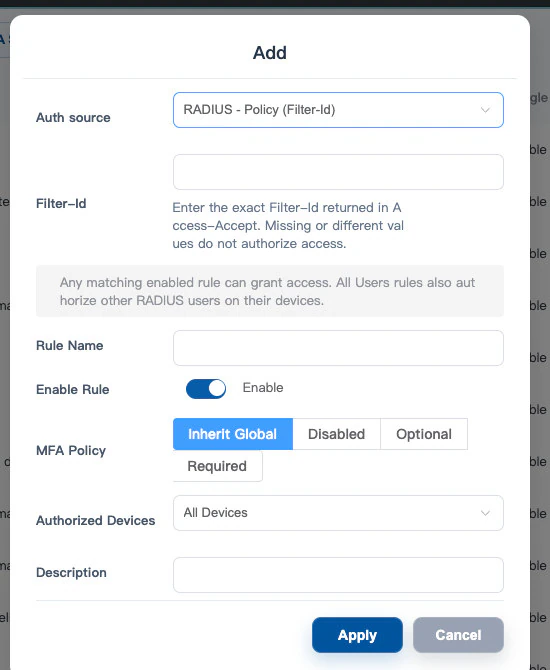
Filter-Id is matched on the complete value, not by fuzzy search:
| Filter-Id returned by RADIUS | Rule value engineering | Result |
|---|---|---|
engineering | Identical | Can proceed to the later device and MFA checks |
Engineering | Different capitalization | Cannot be authorized by this rule |
engineering-extra | Only partly the same | Cannot be authorized by this rule |
| No Filter-Id provided | Missing policy tag | Cannot be authorized by this rule |
ℹ️ The Filter-Id tag must first be set on the RADIUS server (for example, tag R&D employees as
engineering). OrpheLink does not guess departments automatically.
RADIUS - All Users
- Click Add and set Auth source to RADIUS - All Users.
- Set Rule Name, the enabled state, MFA Policy, and Authorized Devices, click Apply, and confirm Authentication is turned on at the target node.
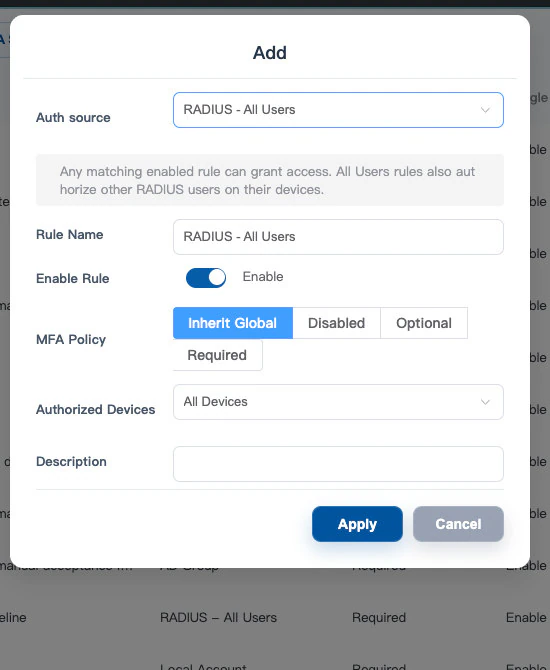
⚠️ When a RADIUS - All Users rule exists alongside User / Policy rules, you must review every rule that authorizes the device. For example, if an All Users rule already allows the Finance server, creating a more precise rule for managers does not automatically cancel the broad All Users authorization. Remove the device scope you do not need, or disable that rule.
Step 4: Set device authorization (Authorized Devices)
A correct account is not enough. The user must also be authorized to reach the device. Think of it as three doors:
| Question | Example | Result |
|---|---|---|
| Door 1: Who is this person? | Xiaoming's AD password is correct | Identity authentication passes, but this does not mean access to every device |
| Door 2: Which device can they enter? | Xiaoming is authorized only for the "office NAS" | Cannot enter the "Finance server" through this rule |
| Door 3: Is authentication enabled on that device? | The NAS has Authentication turned on and has received the configuration | Only then can the system intercept and verify according to the authorization rule |
| Option | Result |
|---|---|
| All Devices | Automatically covers current and future target devices within the same Customer; the target node still needs Authentication enabled |
| Selected Devices | Covers only the selected devices; an empty set authorizes no devices and does not fall back to All Devices |
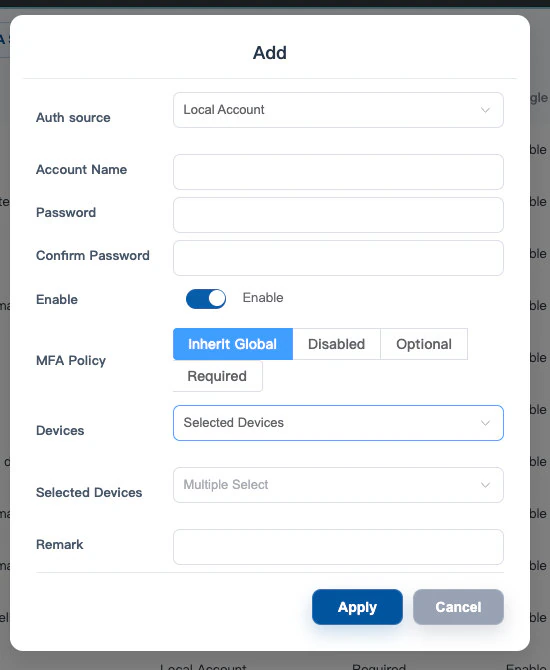
⚠️ Take a shared customer-service account as an example: with All Devices, the rule applies to current and future devices in the same Customer, which may not follow least privilege. If you select only the "customer-service application server," then even if a Finance server is added later, it is not automatically added to this account's available list.
Step 5: Set the MFA policy
Global settings (MFA Settings)
- On the Auth Connect main screen, click MFA Settings.
- Set the Default MFA Policy (Disabled, Optional, or Required). The default is Disabled, and an IT administrator must turn MFA on to use it. This default applies only to rules whose MFA Policy is set to Inherit Global.
- Set the Authenticator Issuer Name, which is the name shown in the user's authenticator.
- Set Allow First-Time Enrollment on HTTP Portal according to company policy.
- Click Apply to save.
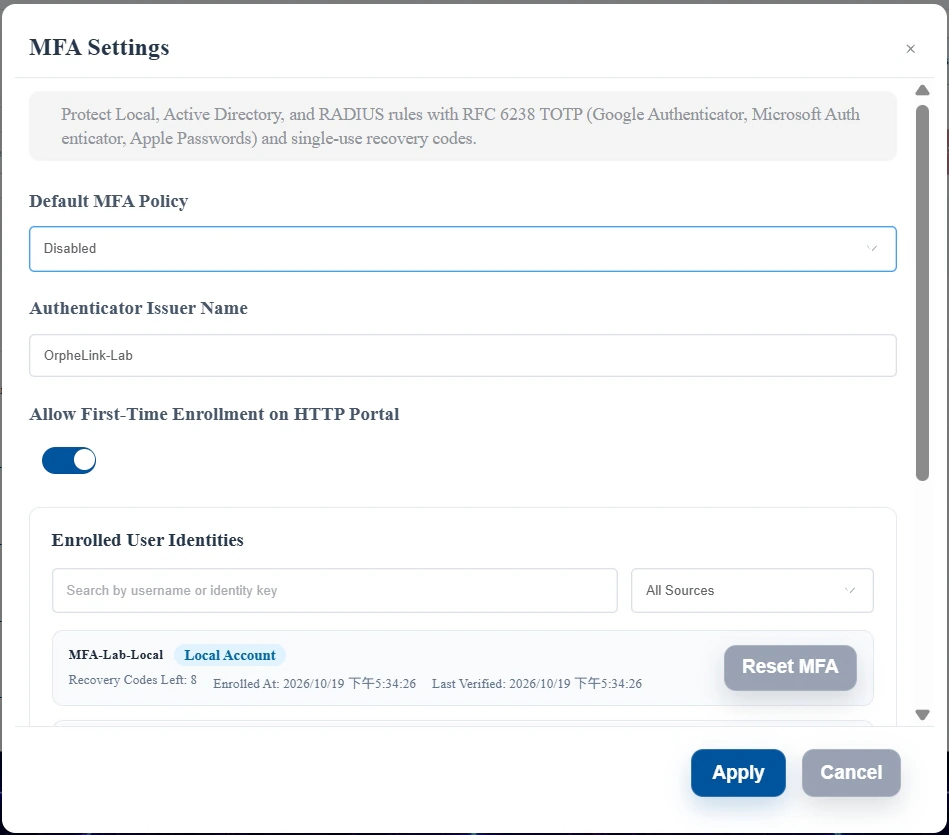
ℹ️ When "Allow First-Time Enrollment on HTTP Portal" is turned off, it only prevents identities that are not yet enrolled from enrolling for the first time through the Portal. First-time enrollment in the desktop OrpheAgent, and verification on the Portal by already-enrolled users, can still proceed according to the authorization policy.
MFA Policy of each rule
| Rule's MFA Policy | User not enrolled | User enrolled |
|---|---|---|
| Disabled | A correct password is enough to pass | A correct password is enough to pass; the existing enrollment is kept |
| Optional | Normal sign-in needs only the password | Still must enter TOTP or a Recovery Code |
| Required | Must enroll TOTP first | Every new sign-in must enter TOTP or a Recovery Code |
| Inherit Global | Determined by the Default MFA Policy | Determined by the Default MFA Policy |
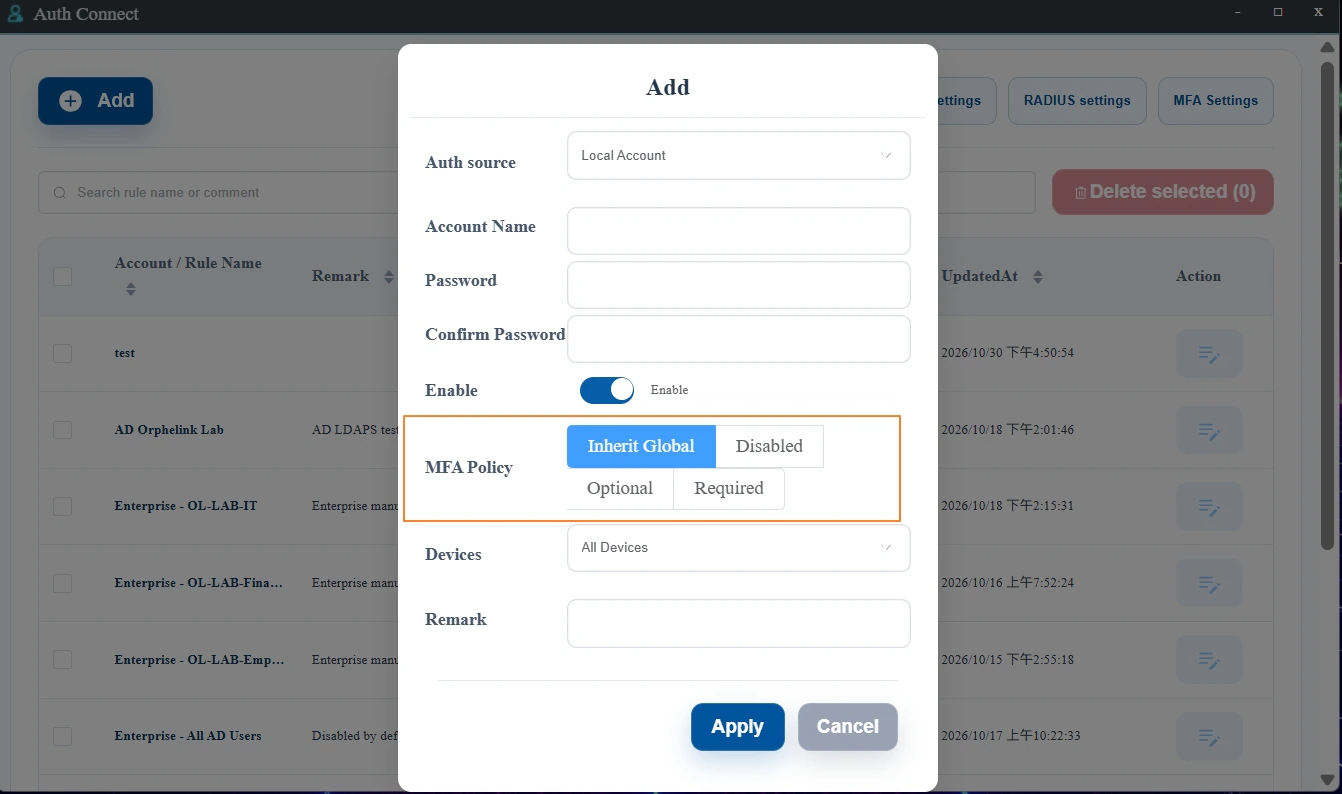
ℹ️ Key point about Optional: It does not mean users can skip MFA at sign-in, and it does not let users choose whether to enroll. Currently, desktop OrpheAgent and the Portal have no "enroll MFA on my own" button. Users who are enrolled must enter a verification code, and users who are not enrolled use only the password. To let users enroll first, an administrator can set the rule to Required, and after enrollment is complete, change it back to Optional.
Practical cases:
- Disabled: a temporary test machine that checks only the password. If the tester's password is correct and the device authorization and node settings match, they can pass. Even if they previously enrolled an authenticator, this rule does not ask for the 6-digit code. Disabled does not clear an existing enrollment, and if you switch back to Required later, the original enrollment can still be used.
- Optional: a company phasing in MFA. Xiaoming has not enrolled, so a correct AD password lets him sign in. Xiaohua enrolled earlier, so even though the rule is Optional, she must still complete TOTP or use an unused Recovery Code.
- Required: IT signing in to an important server. Users who are not enrolled complete, in order: credentials → scan the QR code or enter the Setup Key → enter the 6-digit code → Verify & Enroll → save 8 Recovery Codes. Users who are enrolled enter their credentials, then the current 6-digit code or a single-use Recovery Code.
- Inherit Global: company-wide management. Several rules are all set to Inherit Global, and the administrator changes the Default MFA Policy from Disabled to Required. New sign-ins on all of those rules then use Required, with no need to change them one by one. Rules explicitly set to Disabled, Optional, or Required do not change automatically when the Default changes.
When one person matches multiple rules
If the same user matches multiple rules and all of them authorize the same device they are connecting to, MFA follows the strictest effective policy: Required takes priority over Optional, and Optional takes priority over Disabled. For example, if Xiaohua matches both Employees (Optional) and IT (Required), this sign-in must complete MFA. A rule that does not authorize the target device does not affect the MFA requirement for this sign-in.
How to choose an MFA policy
| Practical use | Recommended policy | Reason |
|---|---|---|
| Isolated test machine (no sensitive data) | Disabled (depending on risk) | Validate the basic account sign-in flow first |
| Phasing in for employees | Optional | Users who have enrolled keep MFA, and those who have not can temporarily use a password |
| IT, Finance, or important servers | Required | Every new sign-in must complete the second factor |
| Want centralized management | Inherit Global | Adjust the Default MFA Policy to manage multiple rules |
Step 6: Enable Authentication on the target node (key step)
A rule itself does not intercept traffic. You must turn on Authentication at the protected target node and select the rule to apply.
- Open the OrpheLink page
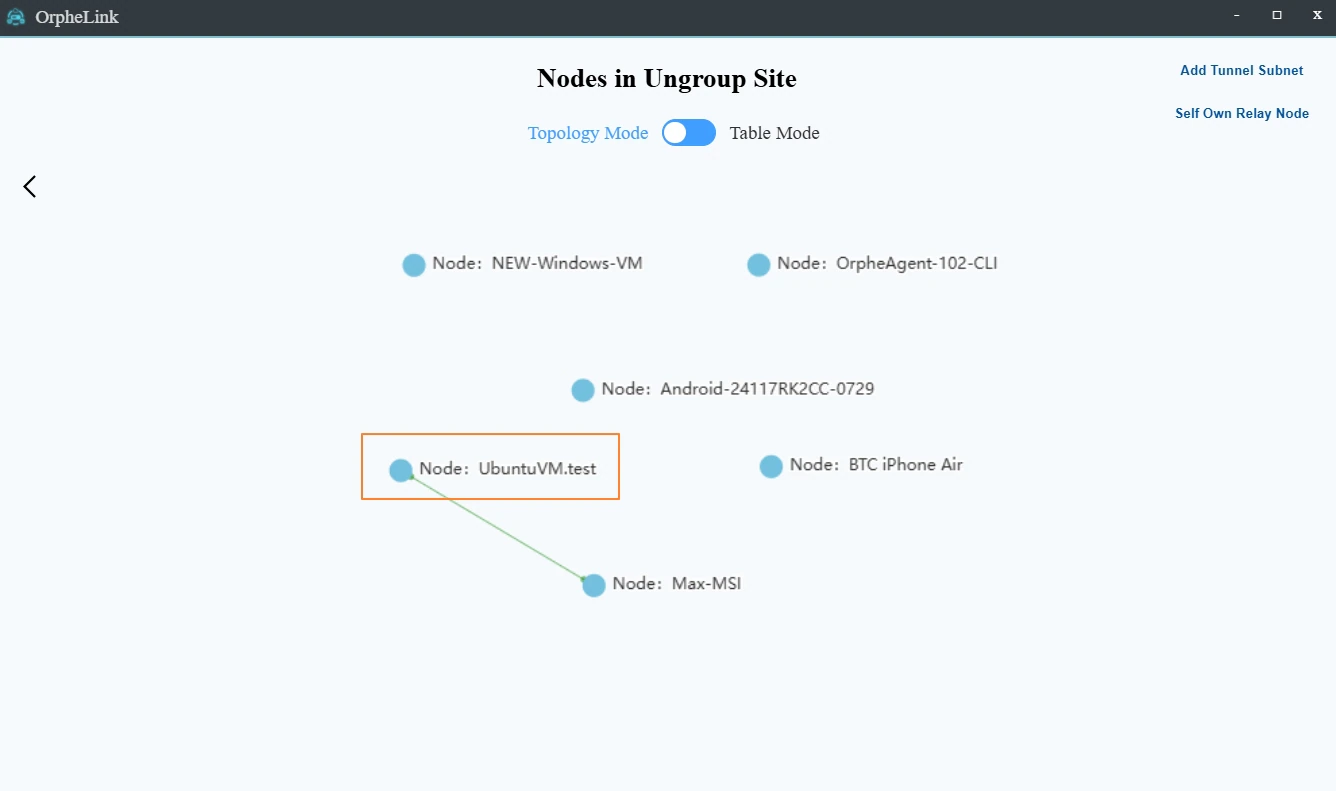
- Find the target Site, open the node list at the top right, and select the Node (device) to configure
- Turn on Authentication.
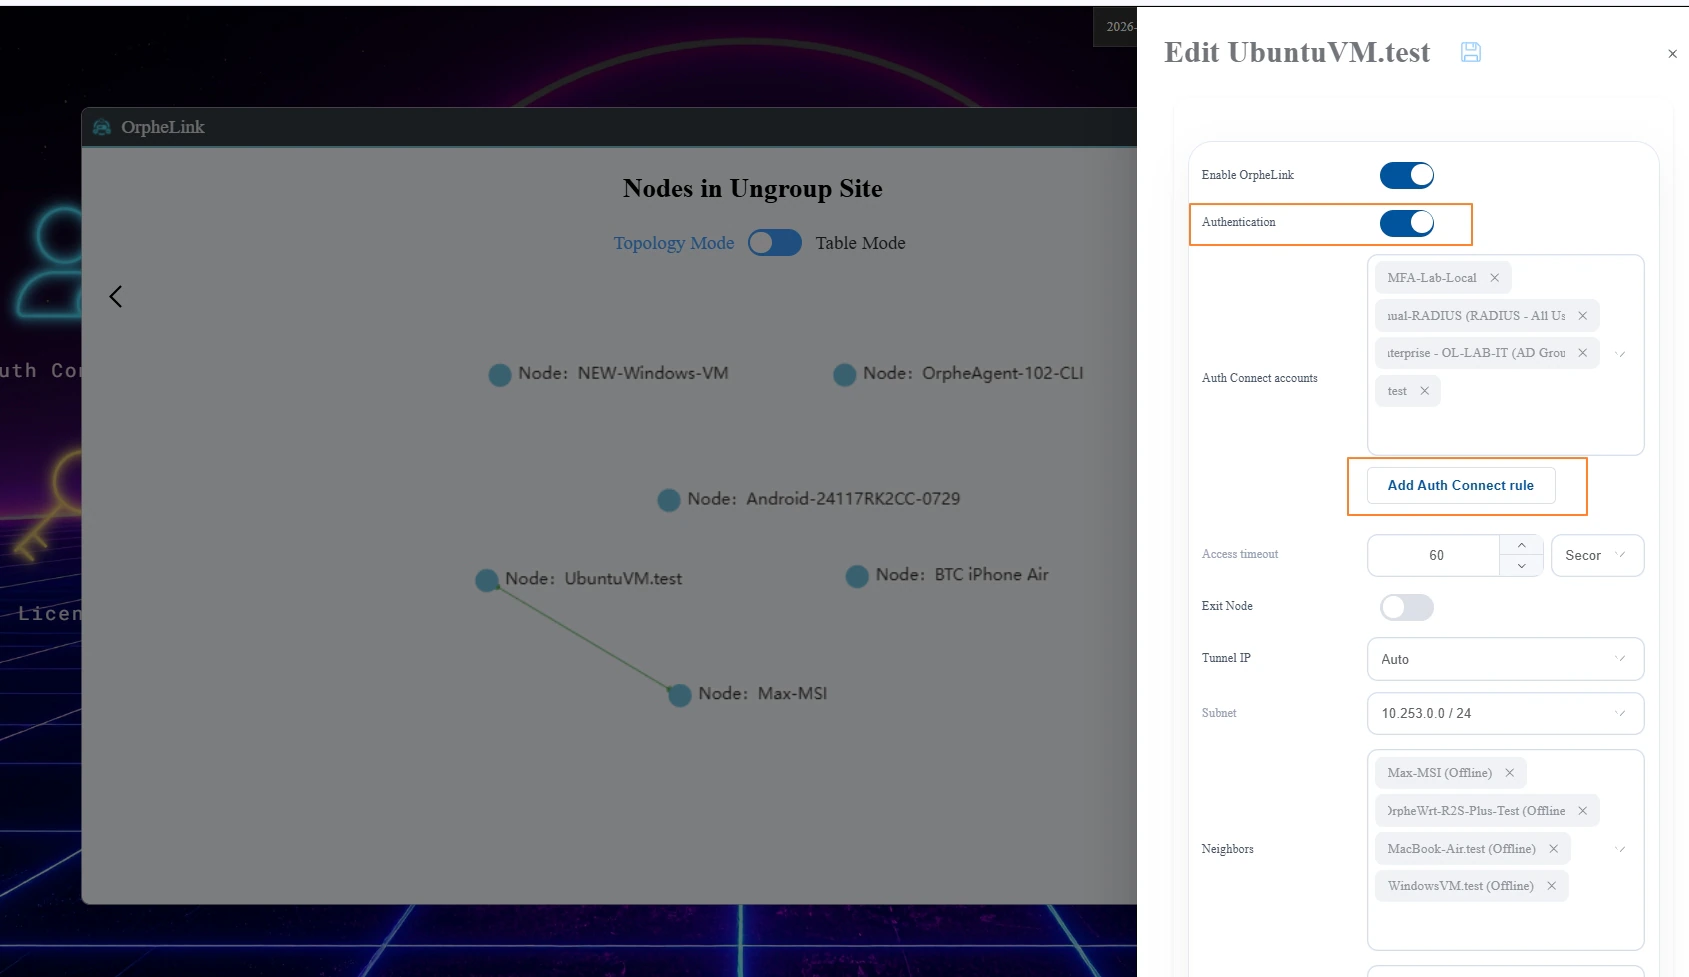
- In the Auth Connect Services field, click Add Auth Connect rule and select the rule you created in Step 3.
- Set the Access timeout (how long access stays valid after authentication succeeds; set it according to the actual working time and avoid unlimited durations).
- Save, and wait for the online OrpheAgent to receive the configuration.
⚠️ Unchecking a rule on a node does not delete the shared rule, and it does not necessarily clear the rule's own Devices setting. After making changes, check both places. If a rule is applied through a Site or Template, a scheduled-offline or pending Template Apply does not mean the protected device has taken effect at runtime. Check the Job status and test with a new session.
6. User Sign-In
| What the user is doing | Recommended entry point | How to confirm success |
|---|---|---|
| Wants to reach a Neighbor in OrpheAgent | Data Plane Auth | The protected resource is accessible |
| Browser connects to an HTTP service and a sign-in page appears | Captive Portal | After verification, return to the original service and access it |
| Browser uses HTTPS and no Portal appears | Switch to Data Plane Auth | Do not treat an HTTPS connection error as already allowed |
Method A: OrpheAgent desktop Data Plane Auth
Supported on macOS, Windows, and Linux. The steps are the same on all three platforms.
- Open OrpheAgent and confirm Connect is on and the Data Plane connection is normal.
- Next to the Neighbors heading, click Data Plane Auth.
- In Neighbor, select the target device to connect to (its Tunnel IP is shown).
- Enter Username and Password. For AD and RADIUS, enter the full UPN / Realm identity.
- Click Authenticate, then complete any further verification according to the effective MFA Policy.
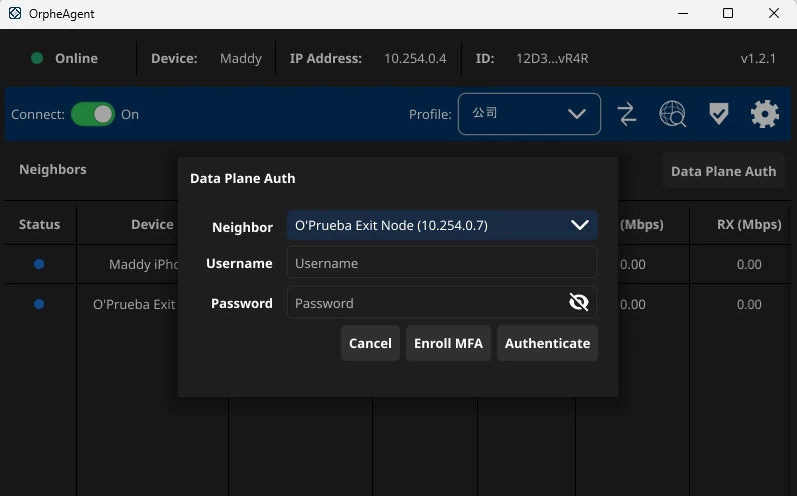
A complete sign-in story: Xiaohua is at home and needs to reach the company test machine. She opens OrpheAgent, clicks Data Plane Auth, selects the test machine as the Neighbor, and enters her personal credentials. Because she has enrolled MFA, the next screen is not a QR code but a 6-digit code field. She enters the latest code from her phone and clicks Verify, which completes this authorization.
First-time MFA enrollment (when the rule is Required)
⚠️ This section and the Portal screens below are illustrations of the operation, reconstructed from the current OrpheAgent and Portal front end. The screens use sample data that does not work. Do not scan the sample QR code or enter the placeholder values in it.
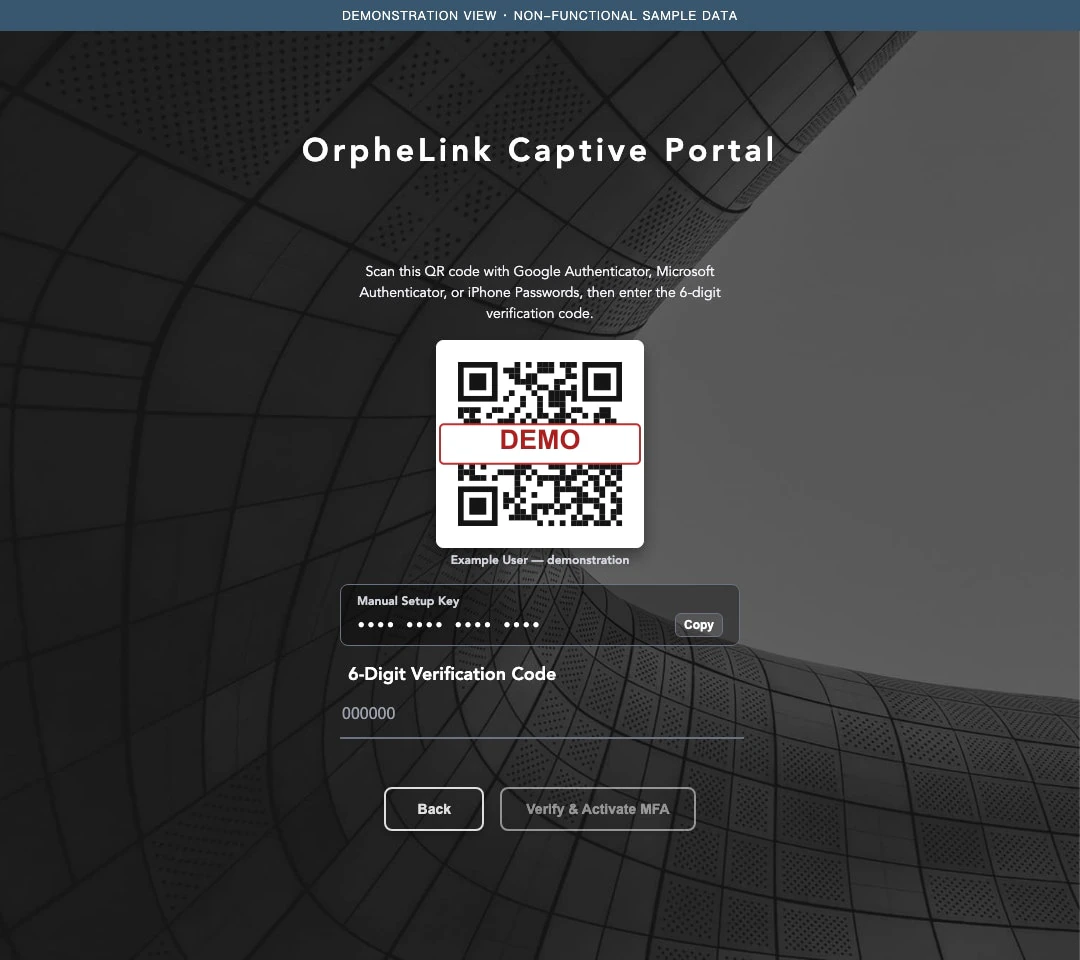
- After you enter your credentials, if this identity needs first-time enrollment, the screen shows a QR code, a Setup Key, and a 6-digit verification code field. First confirm the screen shows your own account, and do not scan someone else's enrollment screen.
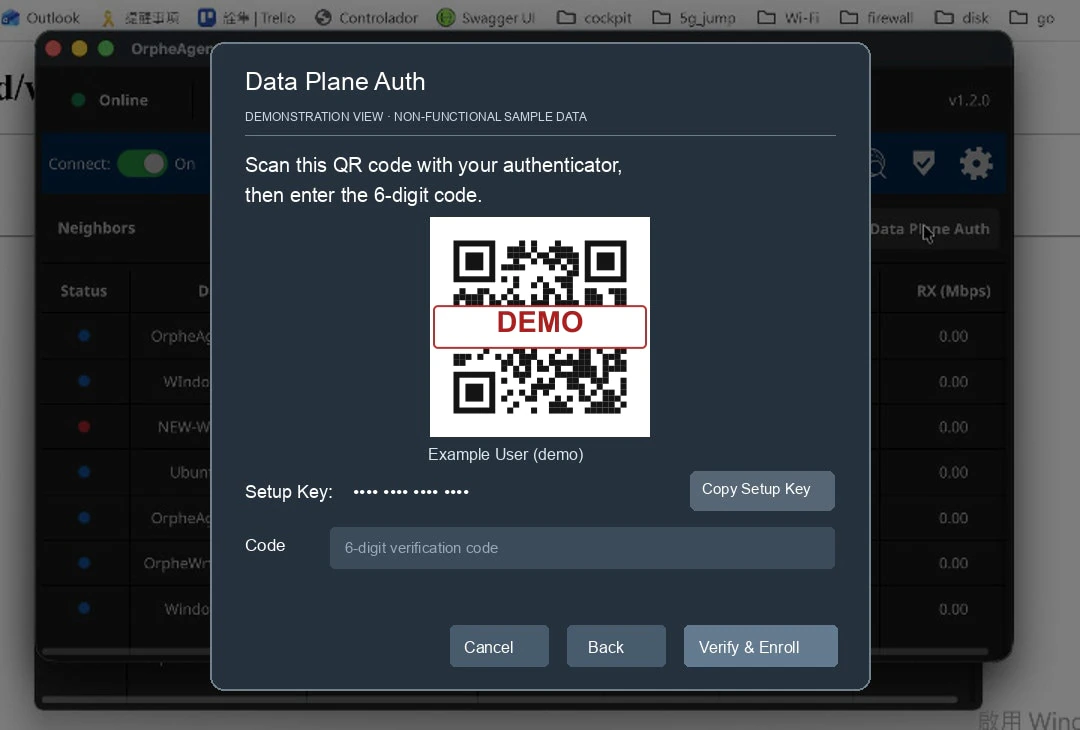
- In your phone authenticator, add an account and scan the QR code. If you cannot scan it, click Copy Setup Key and enter it manually. iPhone users can find the matching name in the verification code window of the Passwords app.
- Enter the 6 digits currently shown in the authenticator and click Verify & Enroll.
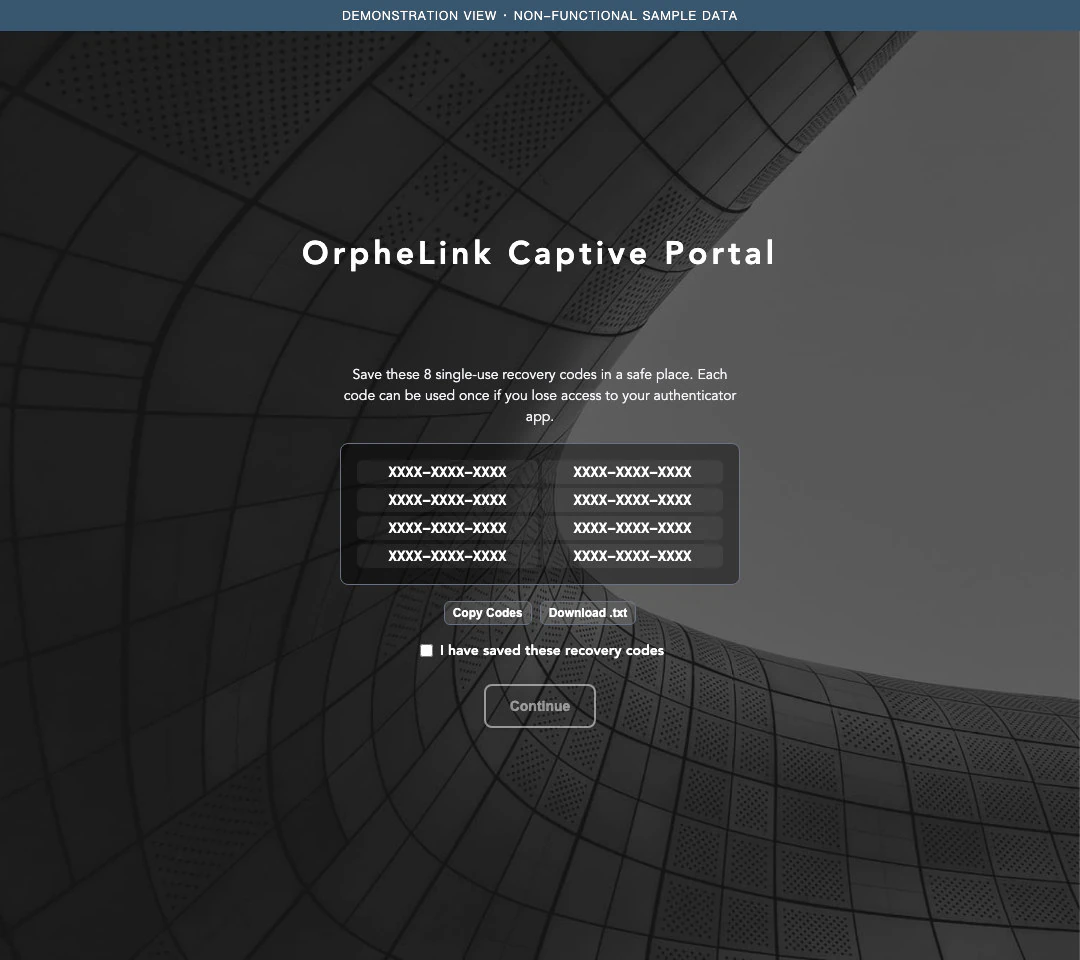
- The system shows 8 single-use Recovery Codes. Click Copy Recovery Codes and store them in a safe place, select I have saved these recovery codes, and then click Done.
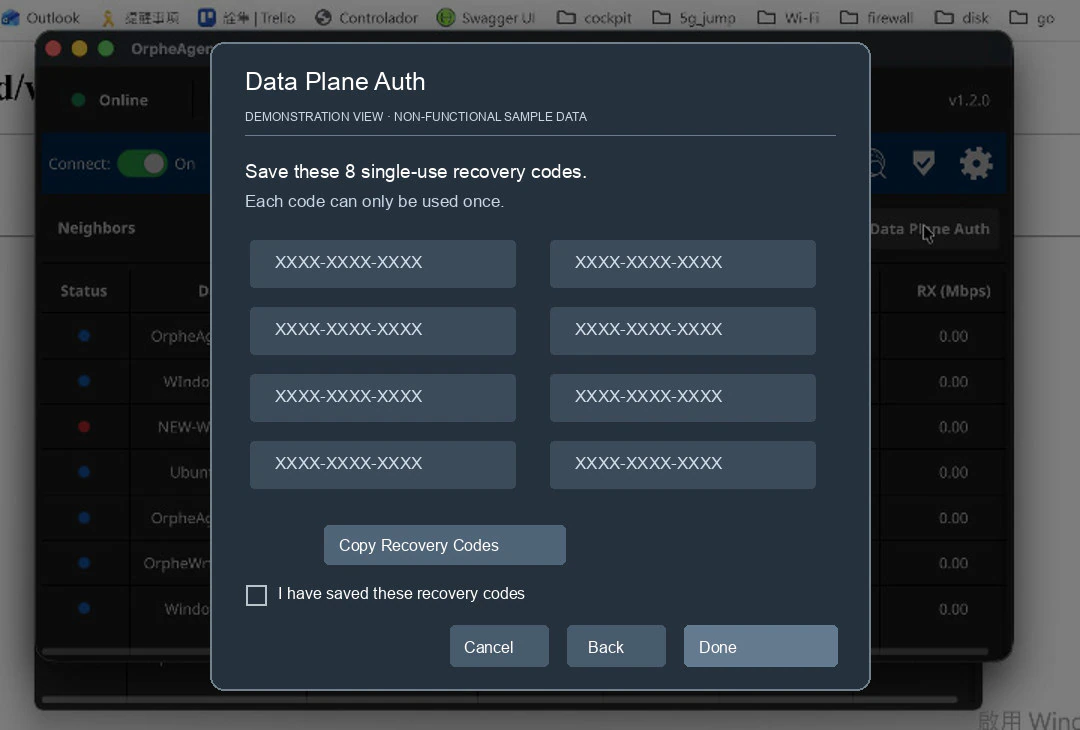
⚠️ Until Verify & Enroll is completed, the protected service is not allowed through. Recovery codes are in the format
XXXX-XXXX-XXXXand are shown only once after enrollment is complete. Do not keep them in screenshots, chat rooms, or shared cloud notes.
Everyday sign-in
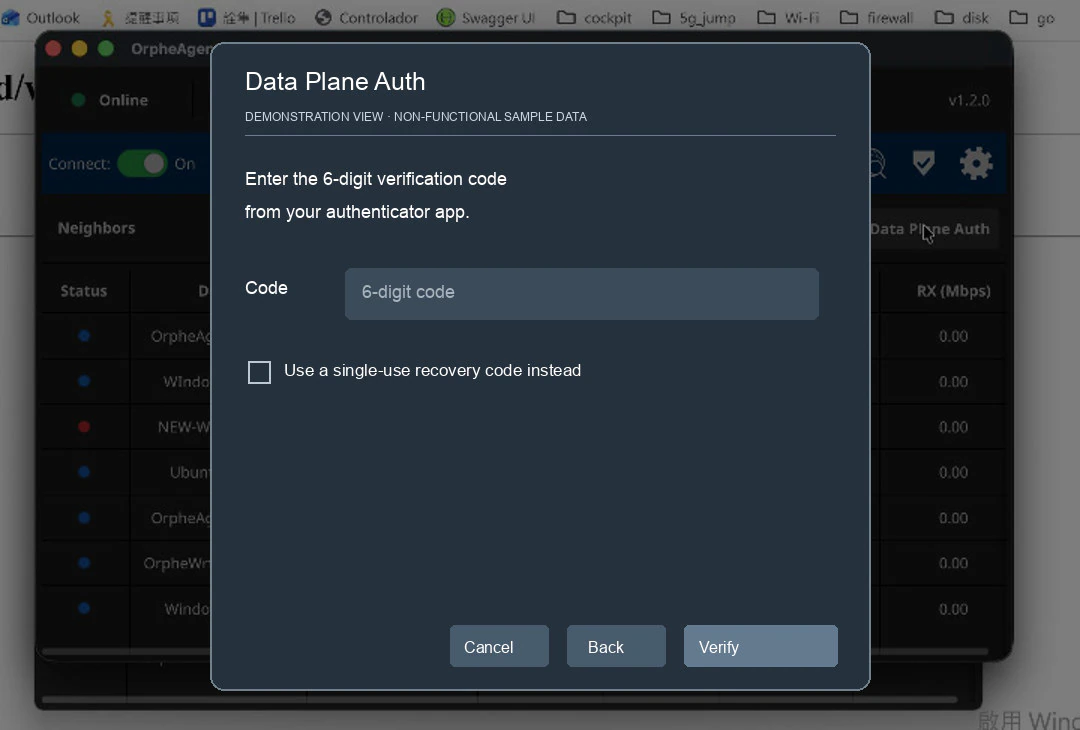
An enrolled identity no longer sees the QR code. After you enter your credentials, only the Code field appears. Enter the 6 digits currently shown in the authenticator and click Verify. A code from the same 30-second time step cannot be reused.
Lost phone or authenticator unavailable
- Select Use a single-use recovery code instead.
- Enter a complete, unused Recovery Code (
XXXX-XXXX-XXXX), not the 6-digit TOTP. - After success, that recovery code is no longer valid, and your other unused recovery codes remain. Contact the administrator promptly to reset MFA.
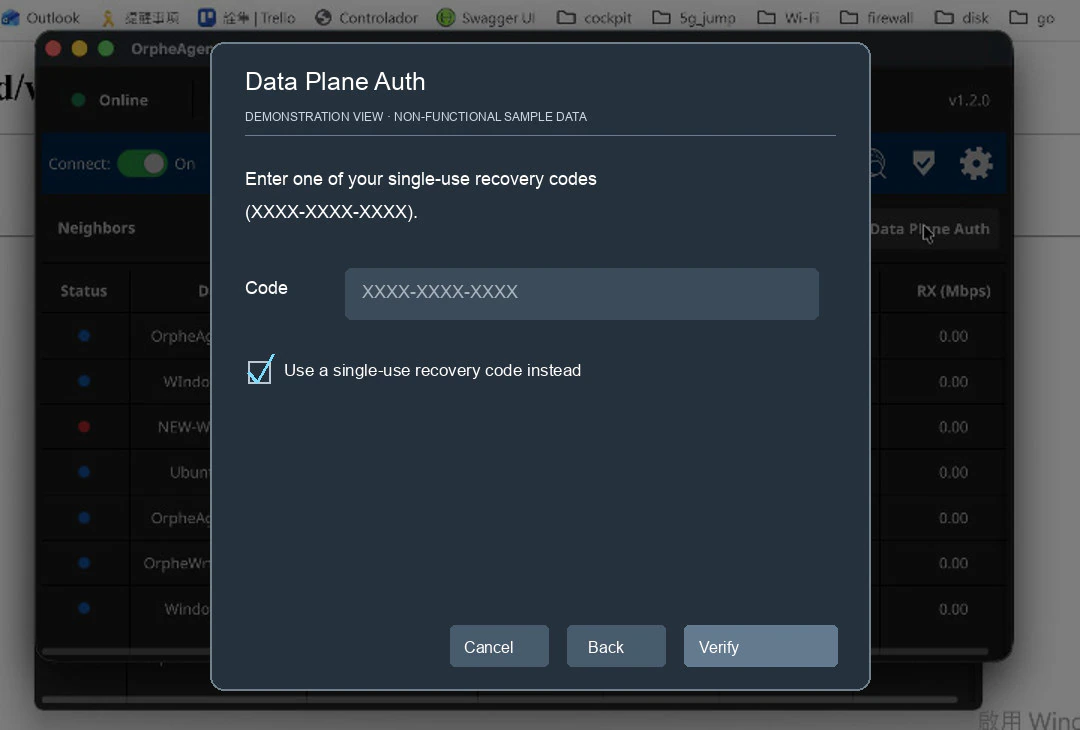
ℹ️ A Recovery Code is not a second password that can be reused. If Xiaoming gets a new phone and still has the old one, he should first migrate the authenticator. If the old phone is lost, he can use an unused recovery code. If he has no recovery codes either, he needs to ask the administrator to reset the MFA for that identity.
Method B: Browser Captive Portal
When a user accesses a protected HTTP service, the browser is automatically redirected to the OrpheLink Captive Portal. The operating logic is the same as OrpheAgent.
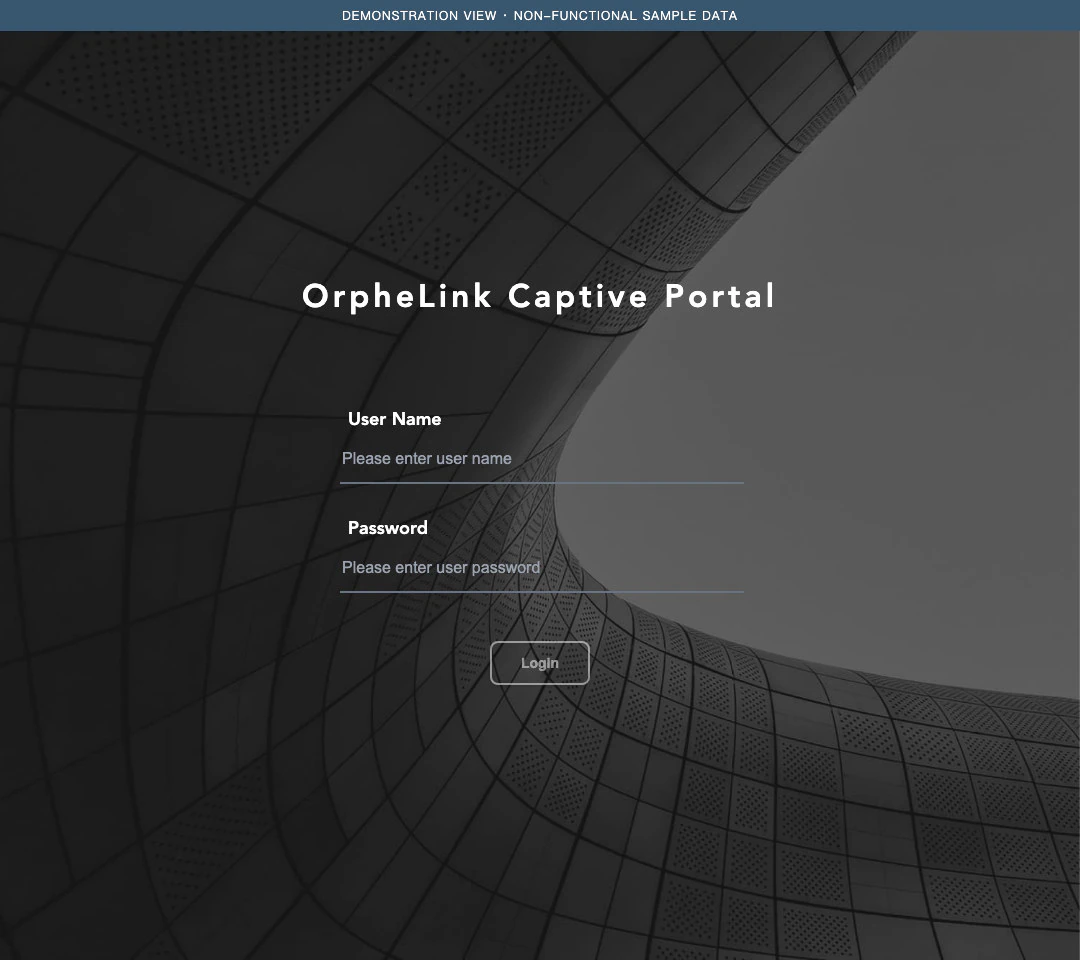
- From the browser, connect to the protected HTTP service so that the Authentication flow redirects you to the Captive Portal.
- In the Portal, enter your Auth Connect User Name and Password. What you enter here is your Auth Connect personal identity, not your OrpheLink management console credentials.
- When the rule is Required and you have not enrolled yet, complete TOTP enrollment using the QR code or Manual Setup Key,
- Use Copy Codes or Download .txt to save the Recovery Codes safely, select the save confirmation, and click Continue.
- If you have already enrolled, enter the 6-digit code from your authenticator
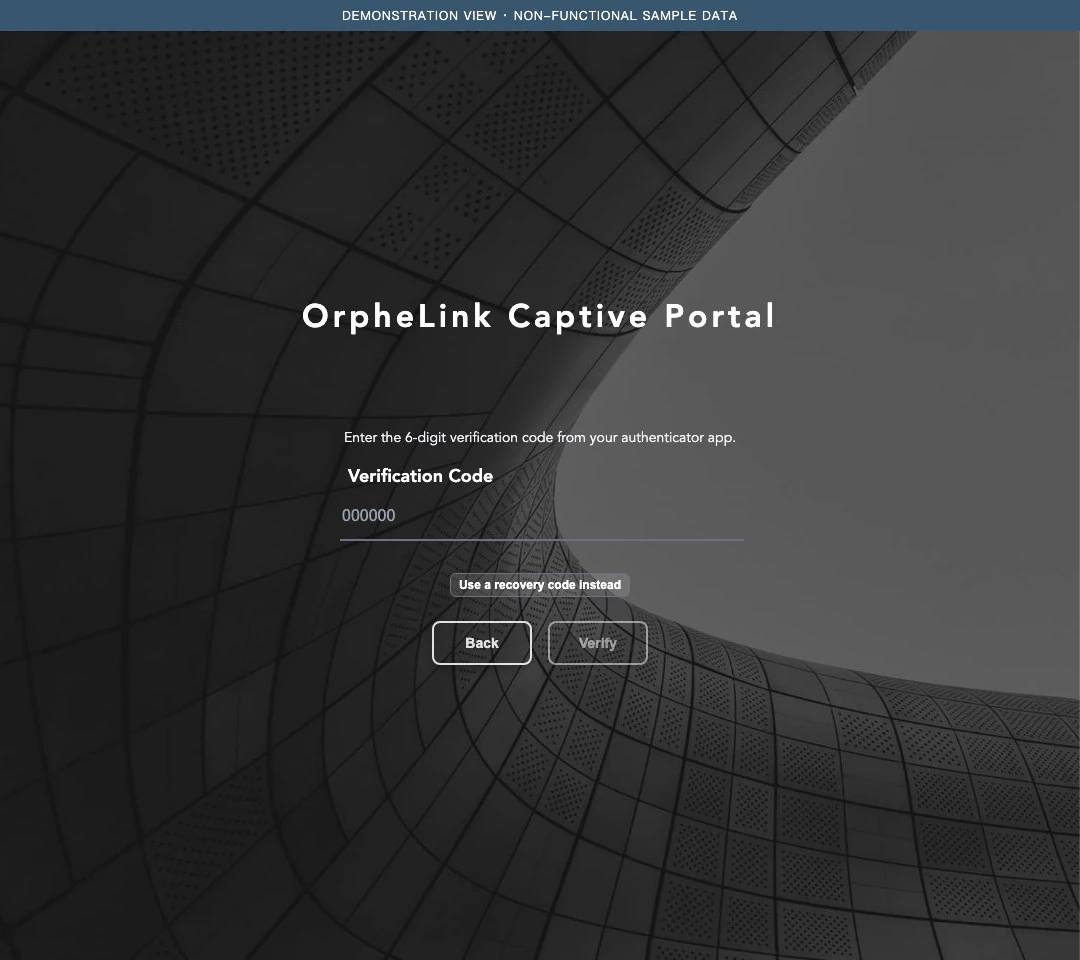
If needed, click Use a recovery code instead.
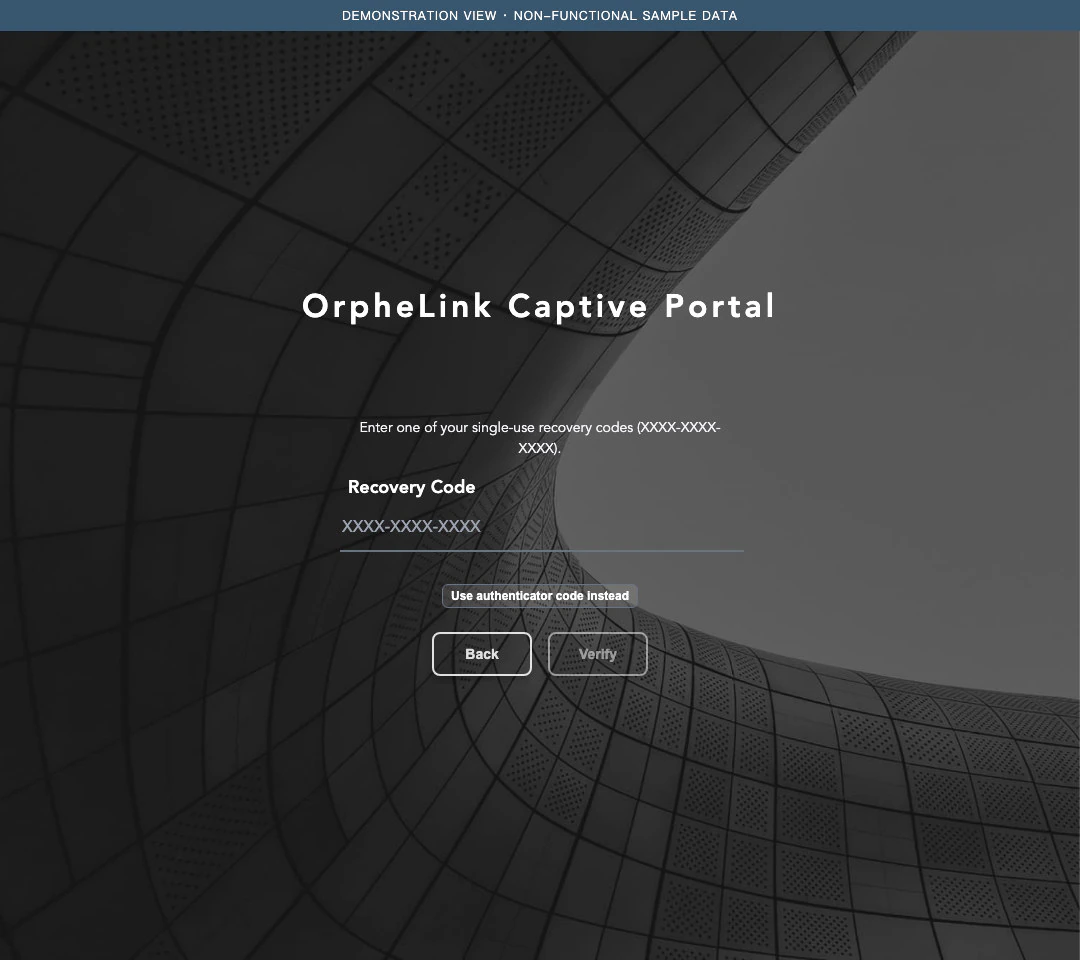
- After verification succeeds, return to the original HTTP service and try again, and confirm authorization by whether the service is usable.
ℹ️ Portal vs. OrpheAgent: The Portal is like the sign-in page that appears before you connect to hotel Wi-Fi, except that what it verifies is access to enterprise resources. The Portal is mainly triggered by HTTP traffic. HTTPS or QUIC browsers do not always open the Portal automatically and may show only a connection error. This does not mean you can skip authentication, and it does not mean Auth Connect is not enabled. Use OrpheAgent Data Plane Auth instead. If the administrator turned off "Allow First-Time Enrollment on HTTP Portal," users who have never enrolled cannot enroll for the first time on the Portal and should use desktop OrpheAgent.
7. Management and Maintenance
| Action | Impact and notes |
|---|---|
| Edit / Apply | Saves the rule. After changing Devices or the MFA policy, reopen to check the settings and verify with a new session |
| Cancel | Discards a form that has not been saved |
| Disable Rule | Blocks new sign-ins that are no longer authorized by any other rule; existing sessions are not revoked immediately |
| Delete Rule | Permanently removes the rule; if a node or Template references it, check that separately |
| Reset MFA | Removes the MFA enrollment and recovery codes of the selected identity; the next sign-in re-enrolls according to policy, and existing connections are not cut off immediately |
| Disable AD / RADIUS settings | Blocks new valid authentication against that external source; it does not mean already-open sessions are reclaimed |
View enrolled users: In Enrolled User Identities under MFA Settings, you can search and view, by identity source, the remaining recovery codes (Recovery Codes Left), enrollment time, and last verification time.
Reset MFA: When a user changes phones, loses the authenticator, or has no recovery codes, the administrator runs Reset MFA for that identity here. Verify the identity source and account first so you do not reset another identity with the same name. Reset MFA is not deleting the account.
ℹ️ Why can a user still connect after I changed a rule? An established Data Plane session may still be able to connect for its original validity period. For example, Xiaoming authenticates successfully at 2:00 PM, and at 2:01 PM the administrator disables his rule, yet his connection may continue. Confirm the new rule has been saved, stop traffic to the target, wait for the session to time out, and then initiate a new sign-in to confirm whether the new policy blocks it. Do not use "pressing Cancel or closing the window" to judge that the user has signed out.
⚠️ Avoid directly changing the password of an identity in use, or resetting the MFA of a user who is actively using their phone. Before making formal changes, record the original rules, device scope, and timeout so you can restore them.
8. MFA for OrpheLink Management Console Sign-In
Besides the Data Plane Auth Connect MFA, the OrpheLink management console sign-in also supports MFA. This is a separate mechanism and is unrelated to the rules above.
- Existing OrpheLink accounts: When you sign in, if the system prompts you to turn on multi-factor authentication (MFA), click Enable MFA to start setup. If you do not want to set it up for now, click Not now, sign in to skip it and sign in directly.
- Steps to enable MFA:
- Enroll the authenticator (left image): Use an authenticator app (such as Google Authenticator, Microsoft Authenticator, or Apple Passwords) to scan the QR code on the screen, or manually enter the key below it (Setup key).
- Enter the verification code: In the field below, enter the 6-digit code generated by the app and click SIGN IN.
- Save the recovery codes (right image): After successful verification, the system shows a set of recovery codes. Click Download, or store them safely somewhere other than this device.
- Complete activation: Select "I have saved my recovery codes securely," then click Confirm to finish.
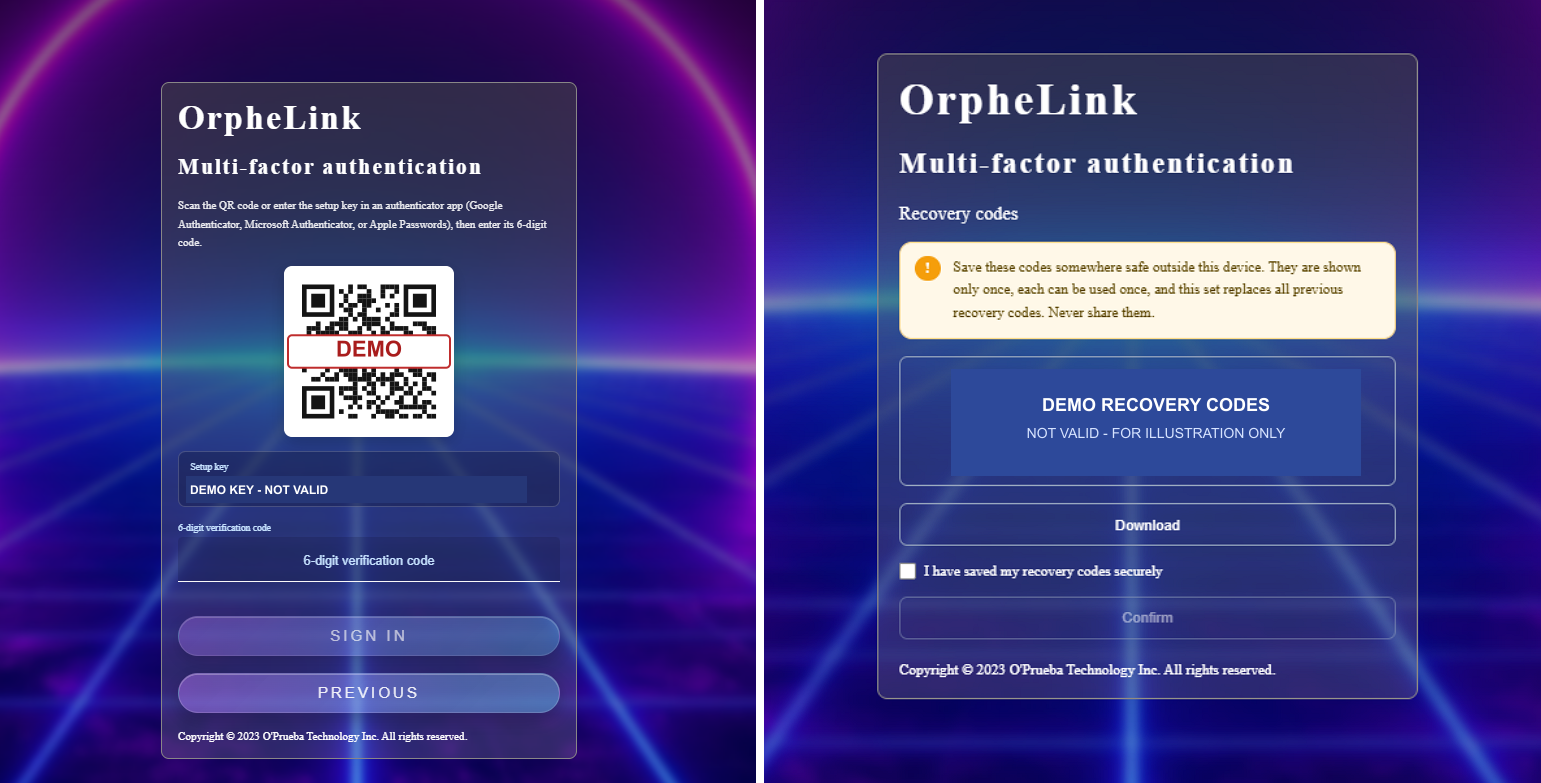
⚠️ Important reminder: Recovery codes are shown only once, each code can be used only once, and they directly overwrite any previous codes. Do not share them with anyone, to keep your account secure.
- Turn multi-factor authentication (MFA) on or off yourself:
- Go to the settings page: Go to Settings → Account.
- Open the edit window: Next to the Multi-factor authentication (MFA) item, click the Edit button.
- Check or uncheck to enable: In the pop-up settings window, check or uncheck Enable multi-factor authentication.
- Save the change: Click Apply to finish (click Cancel to discard your changes).
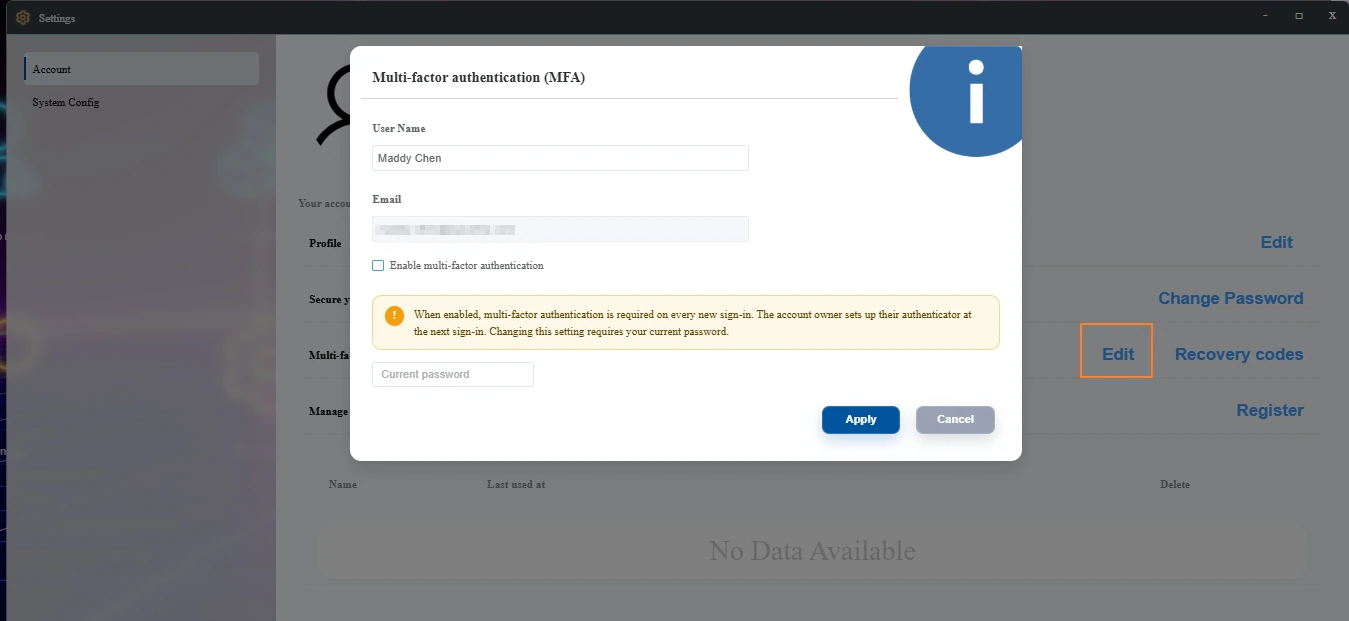
⚠️ Notes:
- After MFA is enabled, every future sign-in requires verification. Users who enable it for the first time complete authenticator enrollment at their next sign-in.
- Changing this setting may require you to enter your current account password for security.
- Regenerate recovery codes (Recovery codes):
- Go to the settings page: Go to Settings → Account.
- Open the recovery codes window: Next to the Multi-factor authentication (MFA) item, click the Recovery codes button.
- Verify your identity: In the pop-up window, enter each of the following:
- Current password: your current account password.
- 6-digit verification code: the latest 6-digit dynamic code generated by the authenticator app.
- Generate new codes: Click Generate new recovery codes.
- Download and save the new codes: After the system generates a brand-new set of codes, download or save them in a safe place right away.
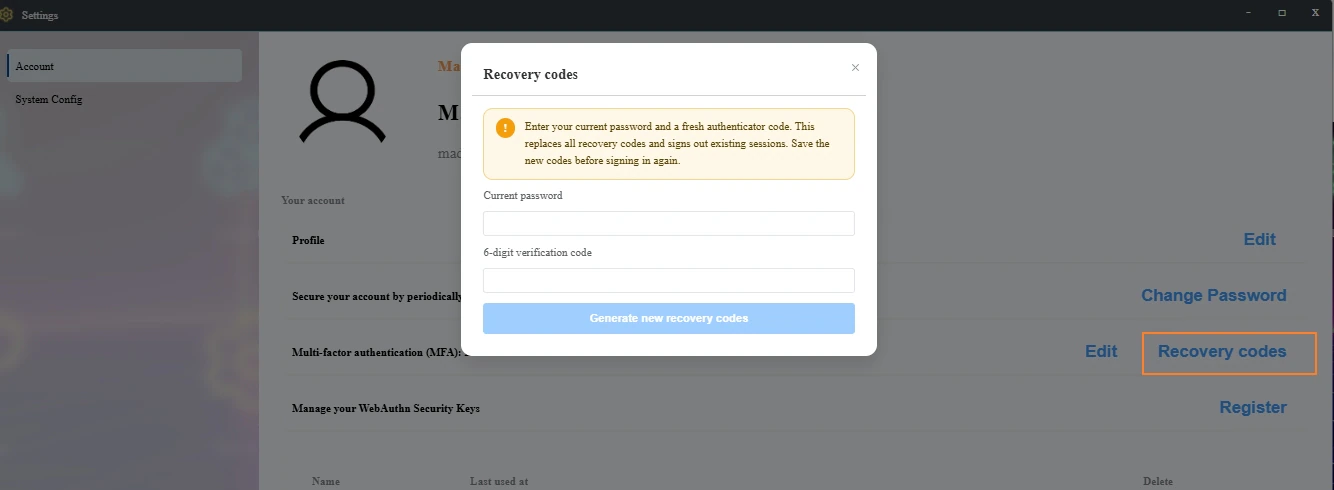
⚠️ Notes:
- Old codes become invalid immediately: Once new codes are generated, they replace and void all previous recovery codes.
- Existing connections are forcibly signed out: This action forcibly signs out all current device sign-in sessions (Existing sessions).
- Save the codes first: Before signing in to the system again, confirm you have safely backed up the new codes.
- Re-enrolling MFA and administrator assistance (Reset MFA):
- Personal settings limitation: After a user enables MFA, personal settings only let them choose "enable / disable" or "regenerate Recovery codes." Users cannot rescan the QR code on their own to re-enroll the authenticator.
- Reset scenarios: If a user changes phones, changes authenticator apps, or loses both the verification code and the Recovery codes, they must ask an administrator to run Reset multi-factor authentication.
- Request channels and division of responsibility:
- On-premises deployment / organization-managed accounts: An account with administrator permission in the organization can go directly to the console and reset MFA for that member.
- Cloud users (Cloud User): Because the highest-level administrator of the cloud system is O'Prueba, if a cloud account cannot sign in, the user must send an email to the support contact address provided on the sign-in screen to submit a request. After the O'Prueba team verifies the customer's identity information, they will help reset MFA in the back end, and the user can then rescan the QR code to enroll again at their next sign-in.
9. Acceptance: Confirm Auth Connect Really Works
During acceptance, separately confirm that "unauthenticated traffic is really blocked" and "authenticated traffic is really allowed." You cannot judge that the service is effective from a successful sign-in message alone.
- Blocked before sign-in: On the client, ping the target node's Tunnel IP. You will see Communication prohibited by filter, which is the packet-filter response before authentication and differs from an ordinary network timeout. When you open an HTTPS website in Chrome, ERR_SSL_PROTOCOL_ERROR may appear.
- Allowed after sign-in: After completing Data Plane Auth or Portal verification, actually open the service you want to use and confirm it is accessible.
- Unauthorized devices are still blocked: Using the same account to reach a device that is not in Authorized Devices should be refused.
- A wrong verification code cannot pass: A wrong or already-used code should not be allowed through.
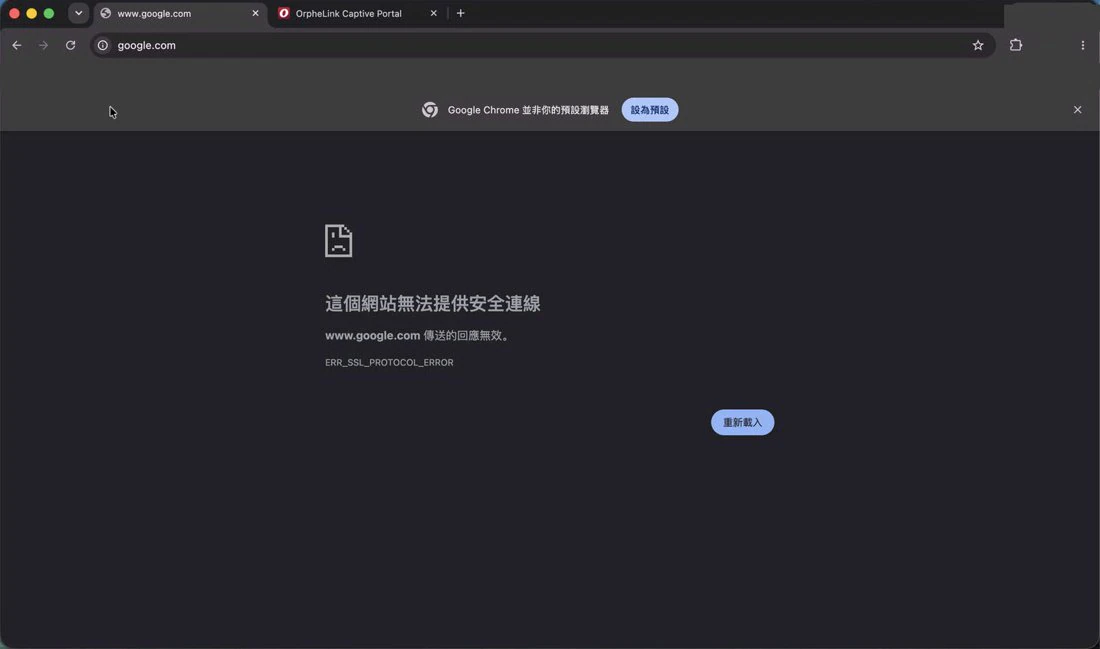
ℹ️ Neighbors showing Online / Good only means the tunnel is discoverable. It does not mean the user has authenticated. An SSL error by itself cannot prove that Authentication is working, so you still need to check HTTPS, routing, and certificates separately. After you see the text "Authentication succeeded," also open the service to confirm, because it does not guarantee that every later application operation will succeed.
10. FAQ and Troubleshooting
Before troubleshooting, ask yourself four questions:
- Did I choose the right target device?
- Is my sign-in source correct? Local accounts and AD or RADIUS accounts are not necessarily interchangeable.
- Is my account authorized for this device? A correct password can still fail if the Devices scope does not match.
- Have I completed the MFA currently required? The 6-digit code may have expired, or the Recovery Code may already have been used.
| Situation | What to check |
|---|---|
| A rule was created but traffic is not being verified | Confirm Authentication is turned on at the target node, the rule has been applied, and the node has received the updated configuration |
| Correct credentials but sign-in is refused | Check whether the rule is enabled, the identity source, the Devices scope, and the node association, and first rule out an old session |
| AD Test connection fails | Check item by item: LDAPS Endpoint, FQDN / SAN, trusted CA, Service Account Bind, and Base DN; do not downgrade to skipping certificate verification |
| RADIUS test succeeds but access still fails | Test checks only the password; check the rule, Realm, User / Policy, Filter-Id, authorized devices, and MFA |
| AD account sign-in fails | Enter the full UPN, and confirm the account belongs to the rule's AD Group (or that the rule is All AD Users) |
| No QR code appears on first-time Required | Check whether the identity is already enrolled, whether the effective policy is Required, whether first-time enrollment on the Portal is turned off, and whether the Controller and Agent versions are consistent |
| TOTP shows invalid verification code | Confirm the phone time is synchronized, enter the latest code, make sure you are not using an old QR code or reusing a code from the same 30-second step, and watch for lockout |
| Recovery Code cannot be used | Confirm you entered the complete code, whether it was already used, or whether the identity was Reset; if necessary, ask the administrator to reset MFA precisely |
| The service still connects after a rule change | Old sessions are not revoked immediately; stop traffic, wait for the timeout, and confirm again |
| The browser does not show the Captive Portal | Confirm that protected HTTP traffic can trigger interception; for HTTPS or QUIC, use Data Plane Auth instead |
| The target node is offline and the rule did not take effect | Confirm the selected node is online and the configuration has been dispatched and received; do not rely only on the Controller having saved it |
| Locked out after too many failures | Stop retrying repeatedly and wait for the lockout to end, or have an administrator evaluate a Reset |
| Cannot sign in to the Portal after enabling Service White List | Confirm there is a rule for Authentication, TCP, Port 81 (the system usually adds it automatically) |
| Confusing Auth Connect with Device Auth | Device Auth authorizes a device to join the network; Auth Connect authenticates users who access protected services |
If authentication shows success but you still cannot use the service, tell IT the connection target, the sign-in time, the error you encountered, and whether you completed MFA. Do not provide passwords or verification codes.
11. Security Recommendations
- All AD Users and RADIUS - All Users cover a very broad range of identities. We recommend combining them with Selected Devices, Required MFA, and least privilege.
- AD service account passwords, RADIUS Shared Secrets, MFA Setup Keys, QR codes, and Recovery Codes should not appear in manuals, logs, screenshots, or version control.
- After a device is moved, leaves, or is re-provisioned, re-confirm the rule's Devices, the node's Authentication, and the MFA identity scope.
- When backing up the OrpheLink Controller database, the encryption keys for MFA, Directory, and RADIUS must be preserved together according to the operations documentation. If the keys are missing, do not simply regenerate them to overwrite existing enrollments.
- Regular users: first ask IT whether to use Local, AD, or RADIUS; do not use administrator credentials as regular user credentials; when first asked for MFA, safely store the 8 recovery codes, and do not send the real QR code or Key through chat apps.