Mobile
How to install OrpheAgent on a mobile device and configure it in OrpheLink.
OrpheAgent Mobile User Guide & SOP
OrpheLink User Manual | Onboard an iPhone, iPad, or Android phone to OrpheLink, and access internal resources via Data Plane and subnet routing.
1. Feature Overview
OrpheAgent Mobile is the mobile client for OrpheLink installed on smartphones and tablets. Once installed and provisioned, the mobile device joins the OrpheLink network and connects to designated OrpheAgent devices and internal subnets based on the Neighbors and Subnet routes configured by IT administrators.
The entire workflow is split between the "Mobile User" and the "IT Administrator", requiring coordination between both sides:
| Role | Responsibilities | Corresponding Steps |
|---|---|---|
| Mobile User | Download and install the app, allow VPN configurations, paste the Provision Key, and name the device | Steps 1, 2, 4 |
| IT Administrator | Retrieve the Provision Key, provision the device to Inventory, establish Data Plane connections, and configure subnet routing | Steps 3, 5, 6, 7 |
Workflow: ① Download & Install → ② Retrieve Provision Key → ③ Enter Key in App → ④ Provision to Inventory → ⑤ Establish Data Plane → ⑥ Configure Subnet Routing → (⑦ Enable Device Auth, Optional)
⚠️ Note:
Pasting the Provision Key in the mobile app and tapping Save is not enough to start using the service.
The IT administrator must provision the device to Inventory in OrpheLink and set up the Data Plane connection and routing before the phone can access internal resources.
2. Prerequisites
- An active OrpheLink account. If you do not have one yet, please register at Create New Account.
- A mobile device running iPhone/iPad (iOS) or Android with active internet connectivity.
- IT administrator access to log in to the OrpheLink web console (Dashboard).
- A planned target OrpheAgent device to connect to (e.g., a virtual machine acting as an Exit Node) and the target internal subnets (e.g.,
192.168.22.0/24).
3. Step-by-Step Instructions
Step 1: Download and Install OrpheAgent (Mobile User)
- Go to the Download OrpheAgent page.
- Select either the iPhone & iPad (iOS) or Android version depending on your mobile operating system, and complete the installation.
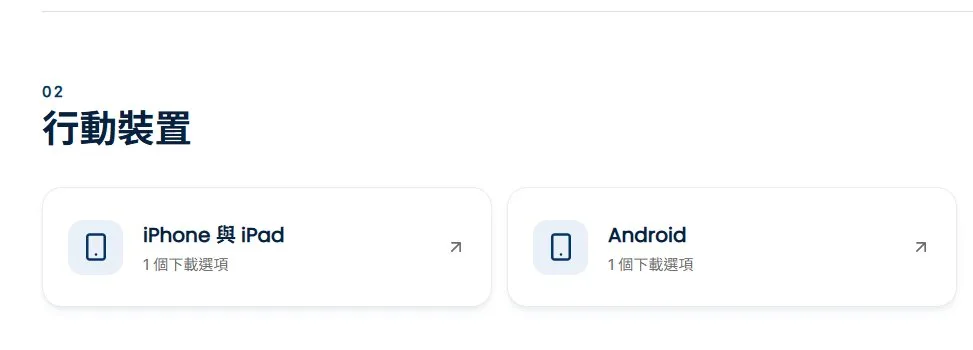
- For desktop devices (Windows, macOS, Ubuntu), please refer to the Official Manual.
Step 2: Open the App and Allow VPN Configuration (Mobile User)
- Open the installed OrpheAgent app.
- When the system prompt appears requesting permission to "Add VPN Configurations", tap Allow.
- It is normal for the app to display Offline and Device as Unknown at this stage, as provisioning is not yet complete.
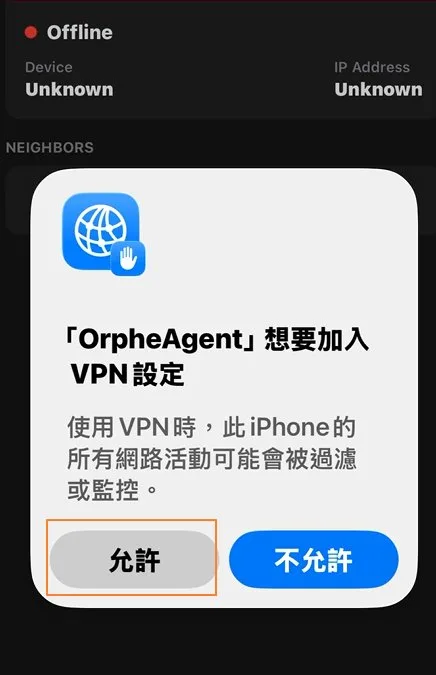
⚠️ If you tap "Don't Allow", the app cannot establish a VPN connection. You will need to go to your mobile system settings to allow VPN configurations for OrpheAgent.
Step 3: Retrieve the Provision Key (IT Administrator)
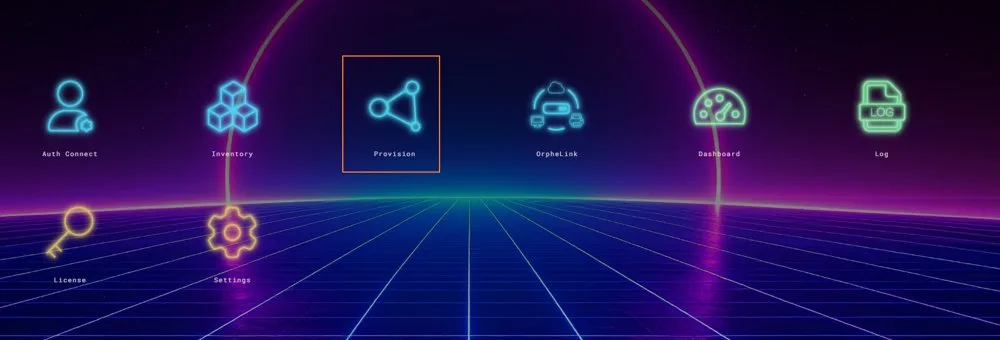
- Log in to the OrpheLink web console (Dashboard) and click the Provision icon.
- Locate the Provision Key at the bottom of the page and click the Copy icon on the right.
- Send the copied Provision Key to the mobile user.
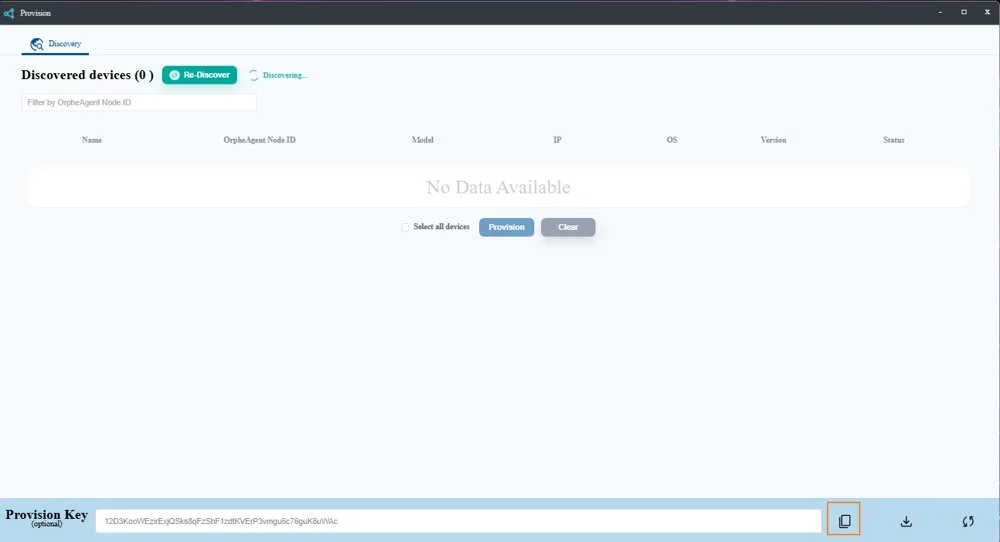
⚠️ Key Security: The Provision Key allows devices to join your organization. Send it only through secure channels to intended users, and never share or post it publicly.
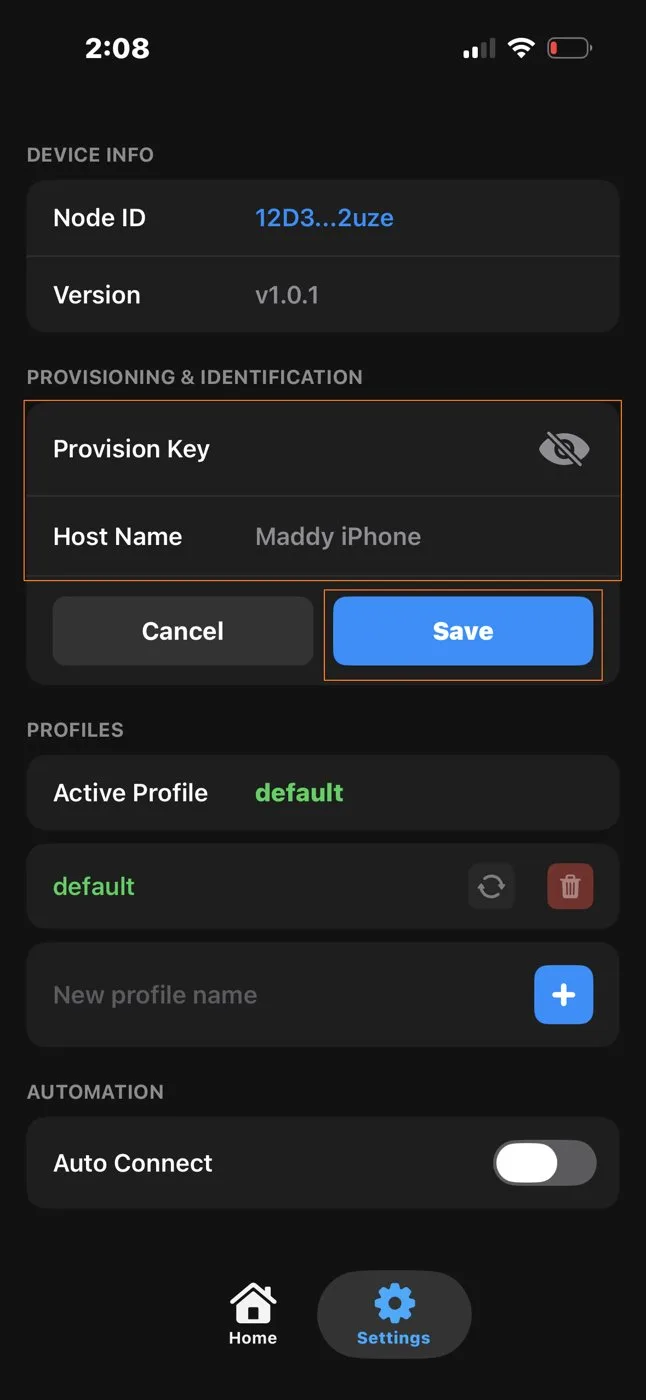
Step 4: Paste the Provision Key in the App (Mobile User)
- Tap the Settings icon on the bottom navigation bar.
- Paste the copied key into the Provision Key field.
- Enter an identifiable device name in the Host Name field to help IT administrators recognize it.
- Tap Save.
Step 5: Provision Device to Inventory (IT Administrator)
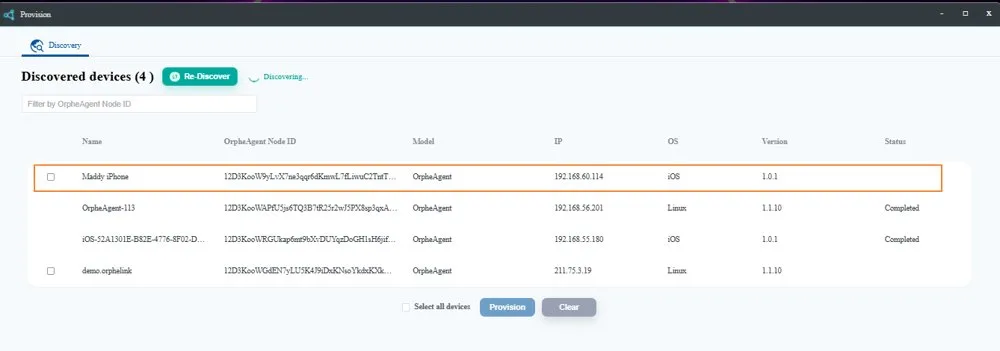
- Return to the OrpheLink web console and click the Provision icon again.
- In the Discovered devices list, verify that the newly configured phone appears (its name will match the Host Name set in Step 4).
- Select the checkbox for that device and click the Provision button below to complete onboarding.
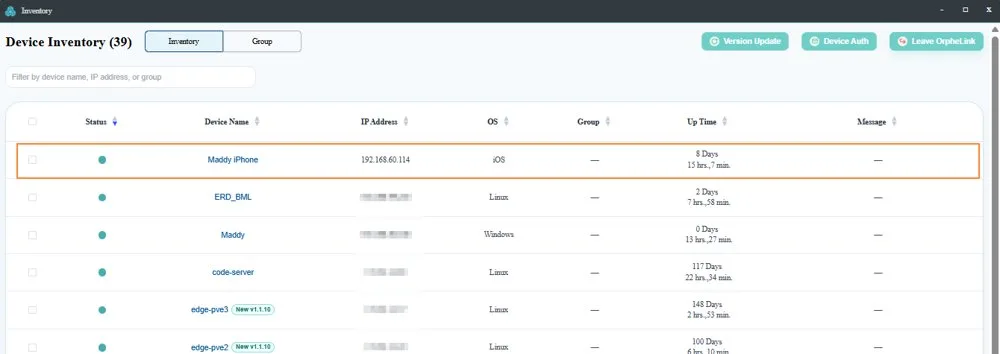
- Navigate to the Inventory page and verify that the device is listed and in healthy status.
Step 6: Establish Data Plane Connection (IT Administrator)
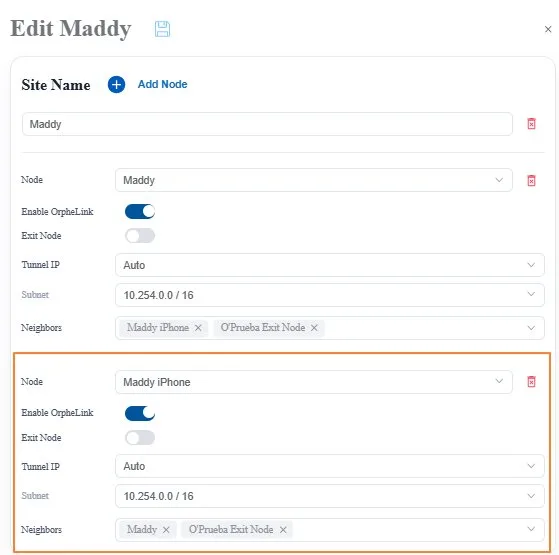
Successfully provisioned devices are placed in the Ungroup site by default. Sites allow IT administrators to organize and manage devices by group and can be added as needed.
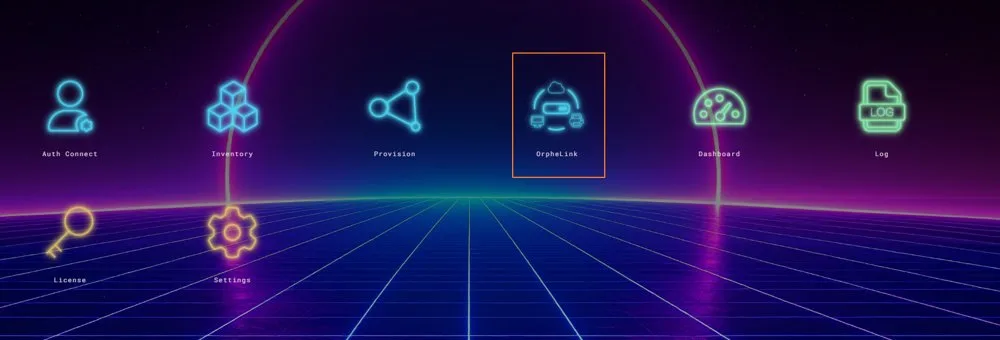
- Click the OrpheLink icon on the Dashboard.
- Click Add Site and enter a site name in Site Name.
- Click Add Node and select the OrpheAgent corresponding to the mobile phone from the list.
- Set Tunnel IP to Auto (default).
- In the Neighbors field, select the target OrpheAgent device the phone needs to connect to. Depending on network requirements, this is typically a virtual machine acting as an Exit Node.
- Click Save to apply changes.
Step 7: Configure Subnet Routing (IT Administrator)
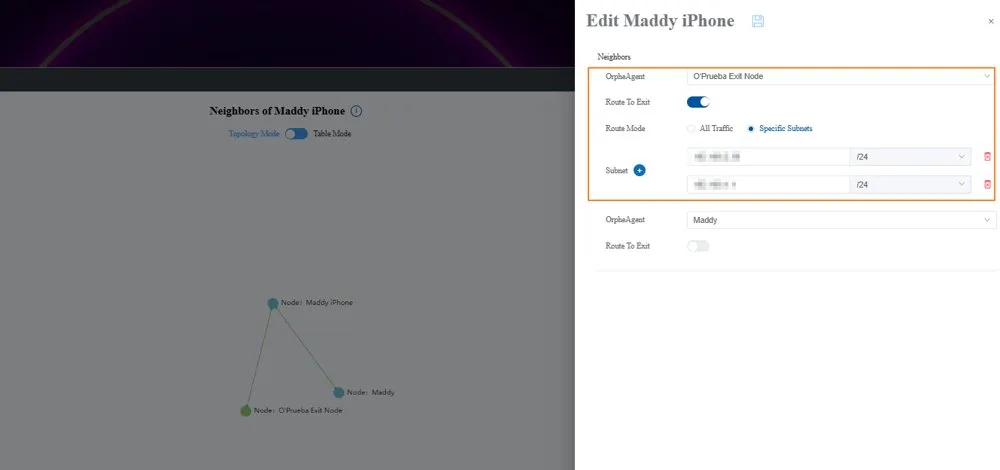
- Click the newly created Site, then click Node in Site in the top-right corner of the right panel.
- Select the mobile node to configure, then click Neighbors of Node in the top-right corner of the right panel.
- In the side panel, click the Edit icon next to the Agent name.
- Toggle on Route to Exit.
- Set Route Mode to Specific Subnets to restrict the phone to only accessing designated subnets behind the Exit Node.
- In the Subnet field, enter the internal CIDR subnet and mask to share (e.g.,
192.168.22.0/24), or specify an individual IP address. - Click the Save icon in the top-right corner to apply the settings.
Step 8: Enable Device Auth (Optional)
If you require mobile devices to complete email verification before connecting, the IT administrator can enable Device Auth:
- In Inventory, select the phone and click Device Auth.
- Toggle on Enable Device Auth, enter the Bound Email, and click Save.
- A verification icon will appear on the mobile OrpheAgent app, showing status as REQUIRED and Data Plane as BLOCKED.
- The mobile user taps Send Magic Link (or Resend Magic Link). The recipient of the Bound Email must click Review Device Request in the email within 15 minutes, then click Verify Device.
- Once the phone displays VERIFIED and Data Plane becomes ALLOWED, authorization is complete.
ℹ️ Every time the OrpheAgent app is closed and restarted, email verification must be completed again. For complete screen illustrations and troubleshooting, please refer to the "Device Auth SOP & User Guide".
4. Verification & Health Checks
| Check Item | Expected Result |
|---|---|
| Discovered devices | The phone appears in the list and completes Provisioning |
| Inventory | The phone is listed with an active, healthy status |
| Site / Neighbors | The mobile node is added to a Site, and Neighbors include the target device |
| Route to Exit | Enabled, with Subnet configured to the expected network range |
| Mobile Device Test | The phone successfully connects to resources within the configured internal subnet |
5. Frequently Asked Questions (FAQ)
| Issue | Recommended Action |
|---|---|
| App continuously shows Offline and Device Unknown | Ensure VPN configurations were allowed, and verify that the correct Provision Key was pasted in Settings and saved. |
| Phone does not appear in Discovered devices | Ensure the phone has internet access, verify that the Provision Key belongs to the same organization, and refresh the Provision page. |
| Phone is listed in Inventory but cannot access internal resources | Ensure Site and Neighbors are configured, Route to Exit is enabled, and the Subnet setting is correct. |
| Target subnet is not accessible | Add the subnet CIDR rule or single IP address under Specific Subnets, then click Save. |
| Still blocked after enabling Device Auth | Verify that Send/Resend Magic Link was tapped on the phone and that the recipient clicked Verify Device. Re-verification is required whenever the app restarts. |